
How to (easily) work with textures that use Alpha as non-transparency
When working with and editing some textures in FF14, some files use the alpha channel as greyscale data instead of transparency to save on space. This causes a lot of issues for people who do not know how to work with this properly, and can cause people to unintentionally break these textures which causes problems.
This guide will show you a way to work with these, and the ways I find easiest. This guide will be utilizing Textools and Photoshop. From what I understand, Penumbra and Gimp work in place of these two, but I am not as comfortable with them, so I will not be showing them. Anyone more comfortable with those is free to make another guide or add to this one showing the same process but using those instead.
When working with textures that use alpha as non-transparency, it is best to export these files from the game/your mod tool of choice as TGA or DDS. While PNG has capabilities of storing the alpha channel as non-transparency, the default handling by 99.9% of softwares is to use alpha as transparency, and once this is done, it cannot be undone. even for softwares that are capable of reading PNG alpha as non-transparency, there are often special ways you have to load the file in those softwares for it to read correctly, so for the sake of ease and less confusion in the real world; you should only be exporting these textures as TGA or DDS. I personally reccommend TGA, as DDS is a proprietary format that most software cannot read.
The most common textures in 14 that use alpha as data and not transparency are skin/body Normal map, hair Normal map, and hair Mask. however this may change at any time. for a full list of what textures use what, please refer to https://xivmodding.com/books/ff14-asset-reference-document/page/dawntrail-shader-reference-table
Step 1- Exporting the textures
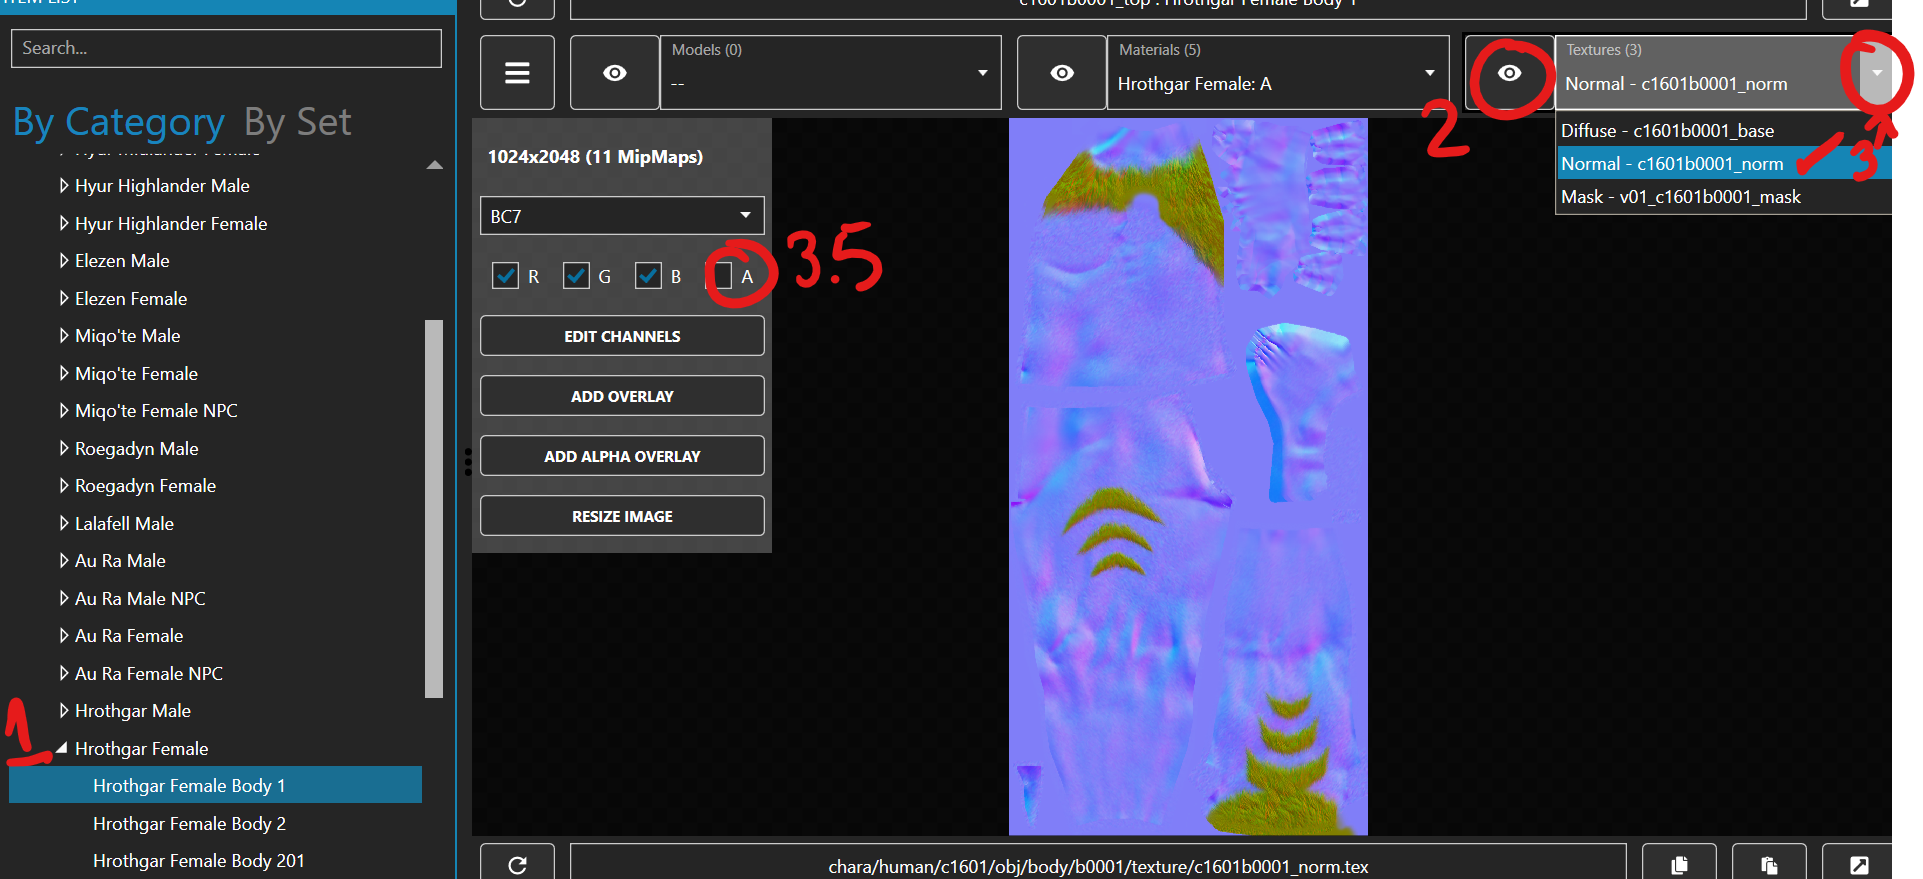
- In textools, navigate to the item you want to edit. If you want to edit a modded texture, make sure to load the mod in a transaction in SAFE mode.
- Click the eyeball next to "texture"
- Click the dropdown arrow and select the texture you want to edit (generally normal or mask) Optional step, confirm the alpha channel is being used by clicking the A box. if the texture changes, it is using alpha
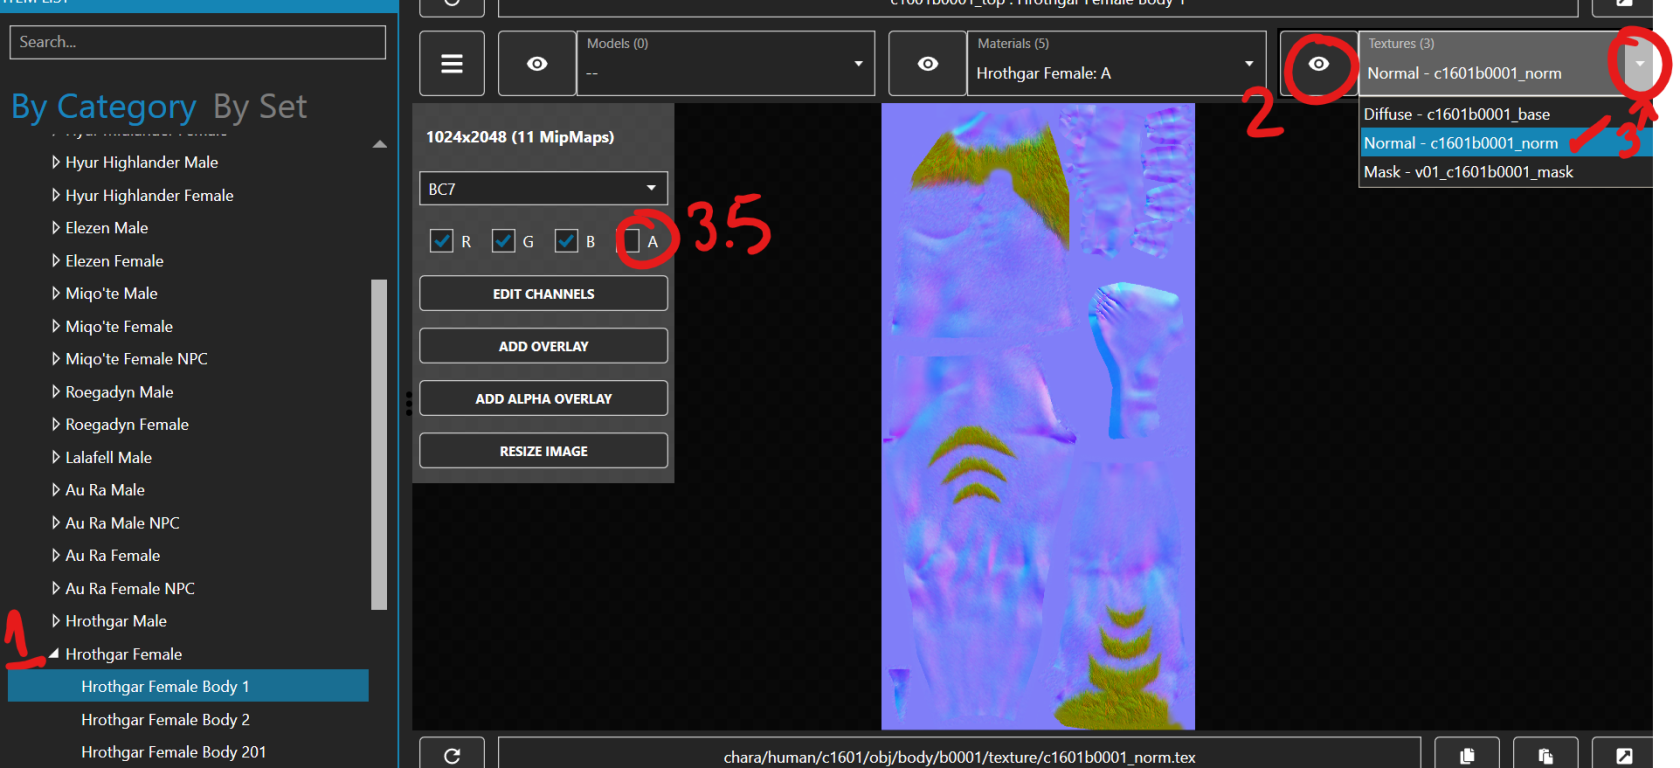
- At the bottom left click the arrow next to "save as" and click TGA

- Click the folder icon at the far right to open the folder the file was saved to. Repeat for all textures you want to edit.

Step 2- Prepping the textures for Editing
While photoshop and gimp allow for per-channel editing and editing of the alpha separately, it can still be a little annoying to do so, and you have to be mindful of your save options when you finish. It also causes problems for those who may want to edit the textures later but do not have photoshop or want to use gimp. So I prefer to split the TGA into two PNGs that will not cause alpha issues. one image that is a full color RGB image, and another that is a greyscale Alpha Only image. I will be showing the steps in Photoshop, but I believe this process in gimp is called "decompose". At this time, photopea does not have this capability, or if it does, it does not follow the photoshop way and I have not found it.
- Open the image in photoshop. I personally drag and drop the image either into the main menu when I don't have other projects open, or into the channel/layer box to open a new file if i have other projects open.
- To separate the alpha, we will click the "channels" tab instead of "Layers"
- Then click the channel labeled "alpha" or the one that is at the very bottom. you should have 5 channels there. if you only have 4, you exported wrong and have lost your alpha channel.
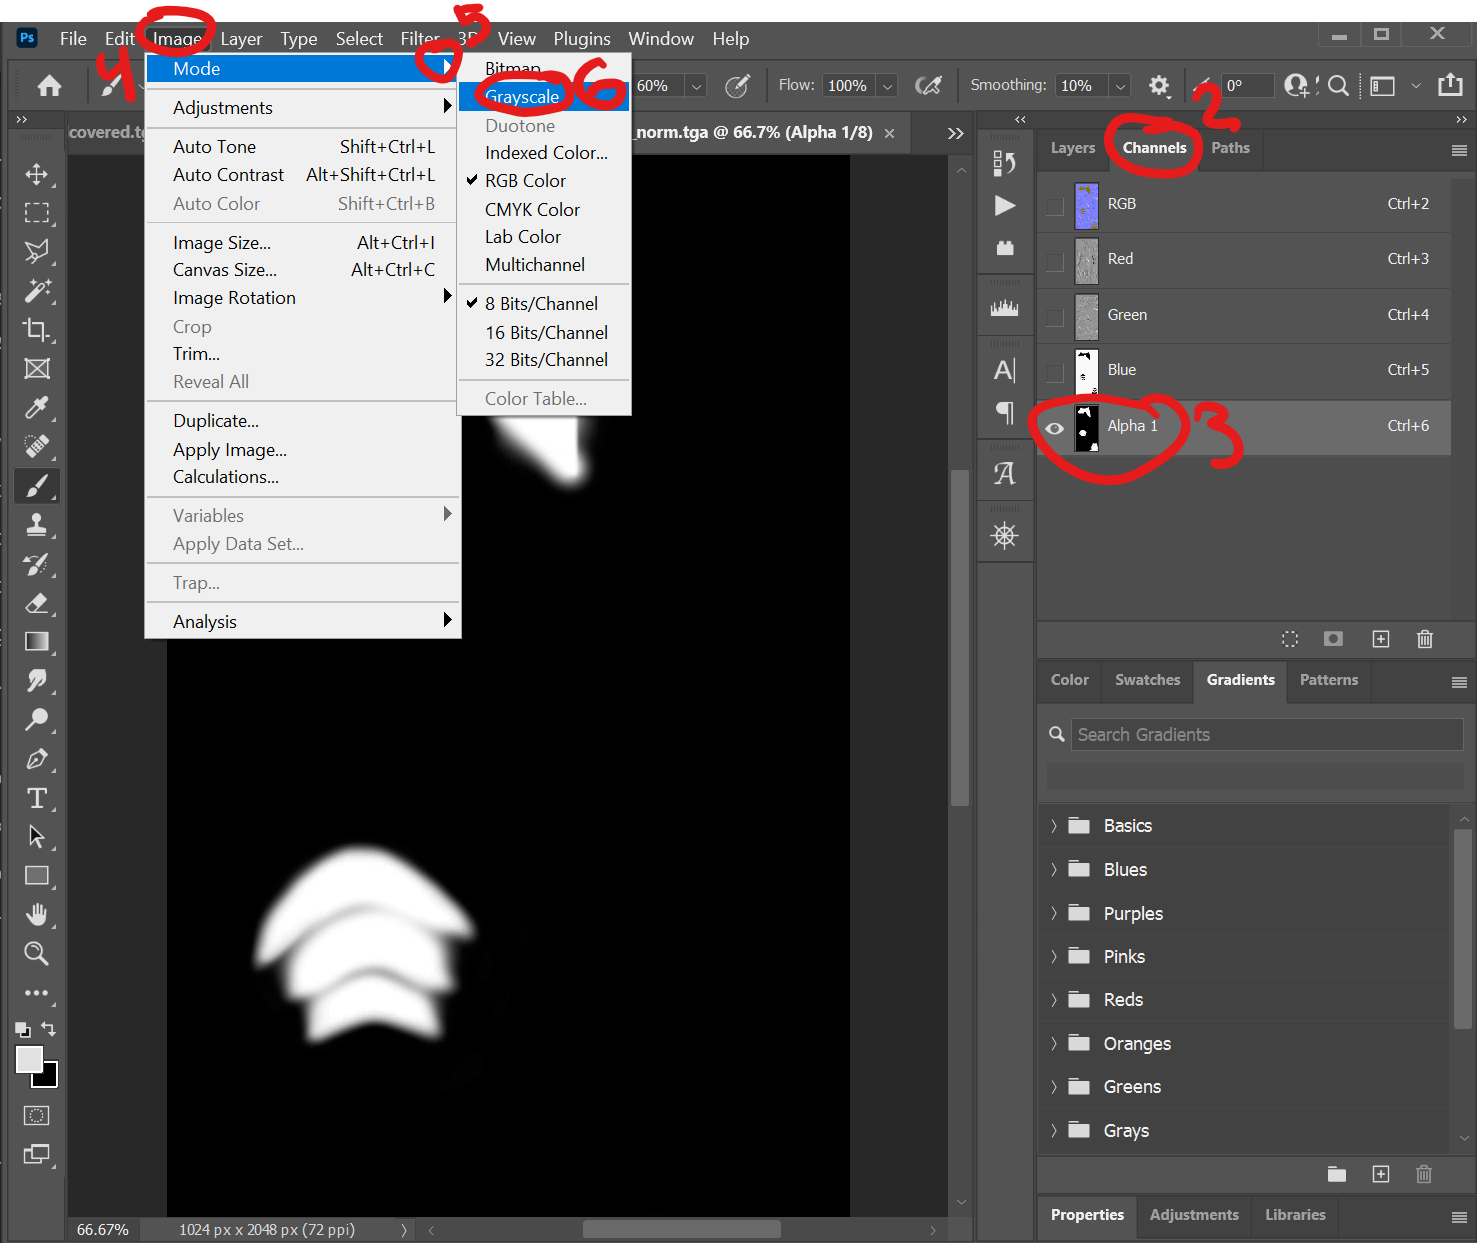
- in the top bar to the left, click "image"
- Then click "mode"
- Click "greyscale"
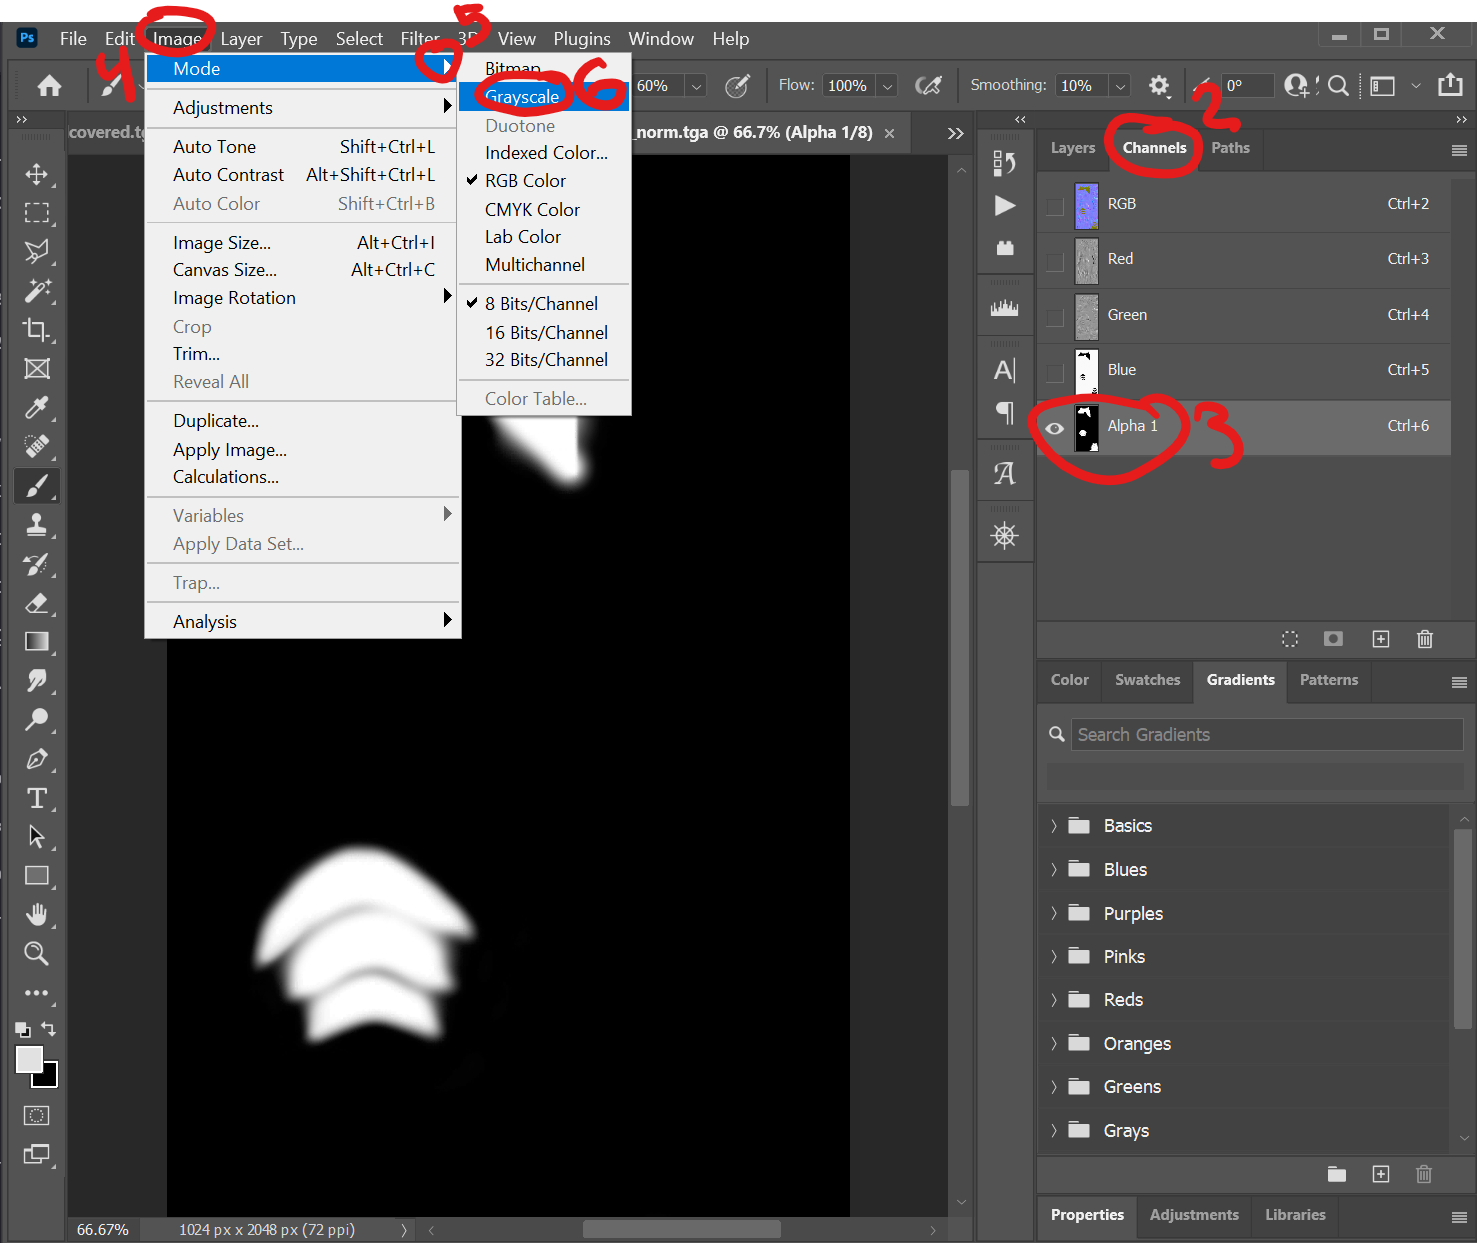
- When a message asking if it's ok pops up say "yes". once you have saved as a PNG, you can undo to get the others back.
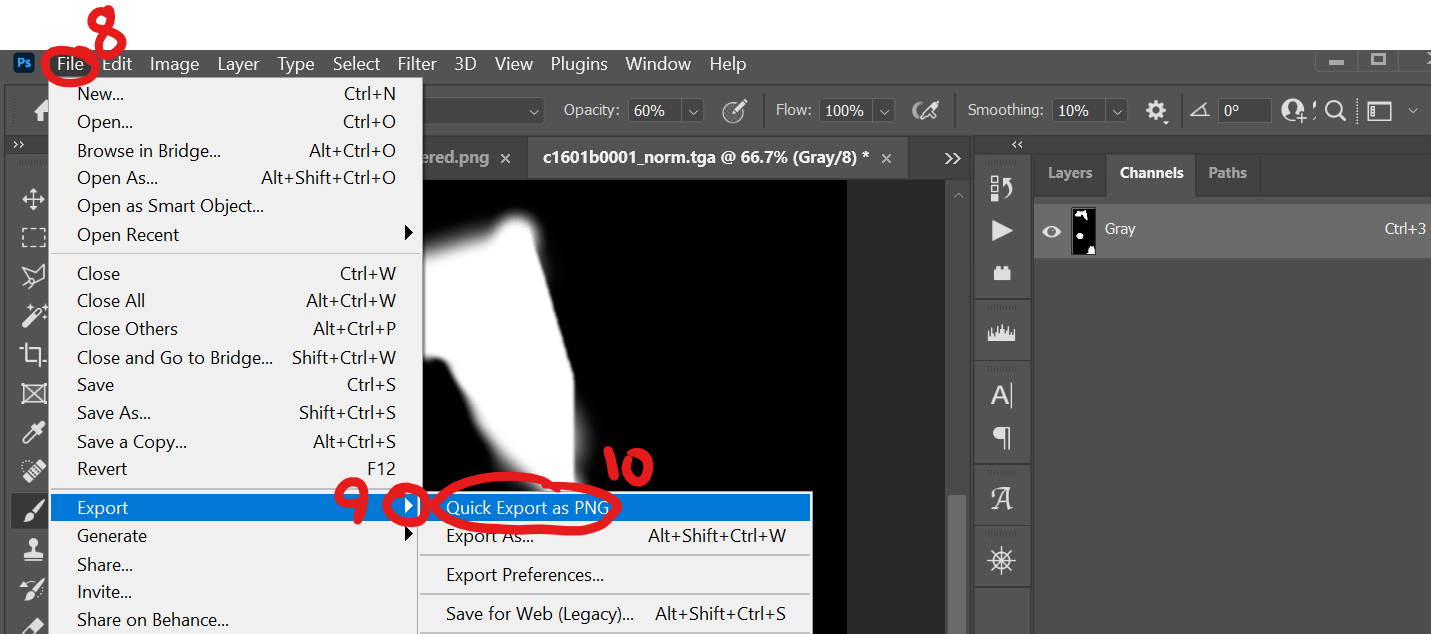
- Save as a PNG by going to "file"
- click or hover over the arrow for "export"
- click "quick export as PNG"
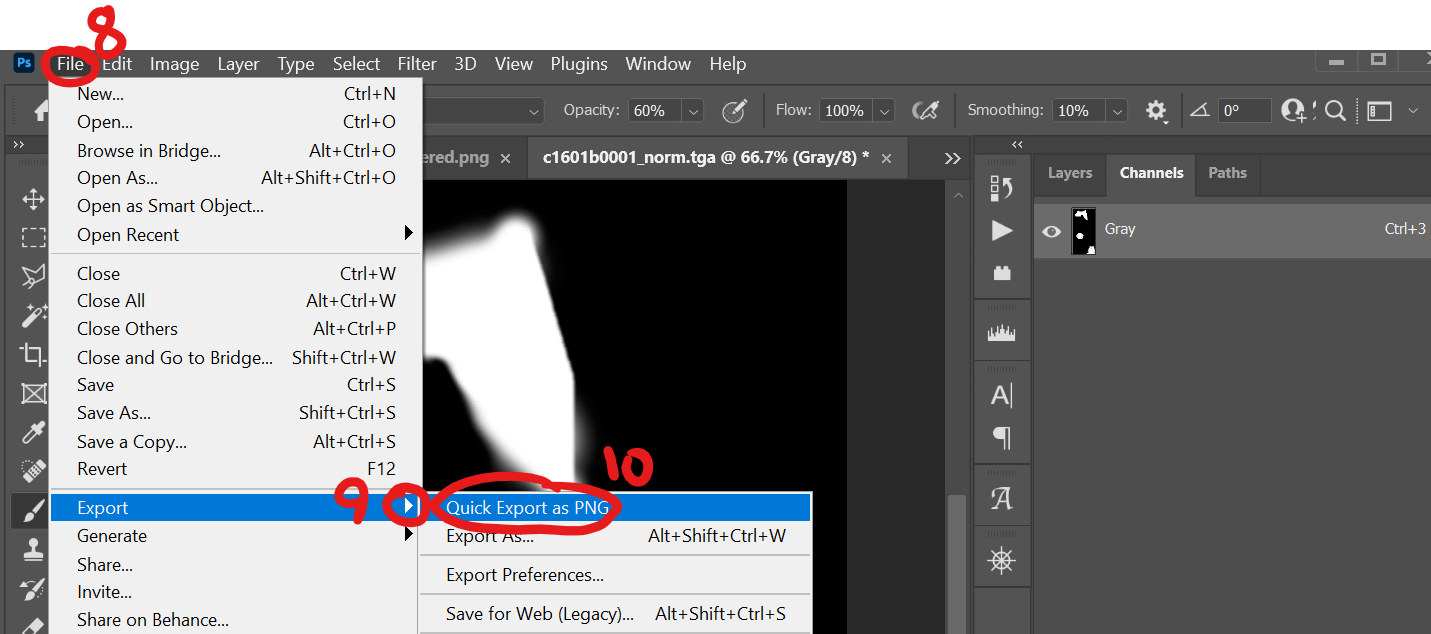
- Save the file. I recommend naming it whatever the thing is and "alpha"
- Undo until you have the 5 channels and full color again. (control Z if you use shortcuts)
- click the alpha channel if it is not selected already
- click "delete channel"
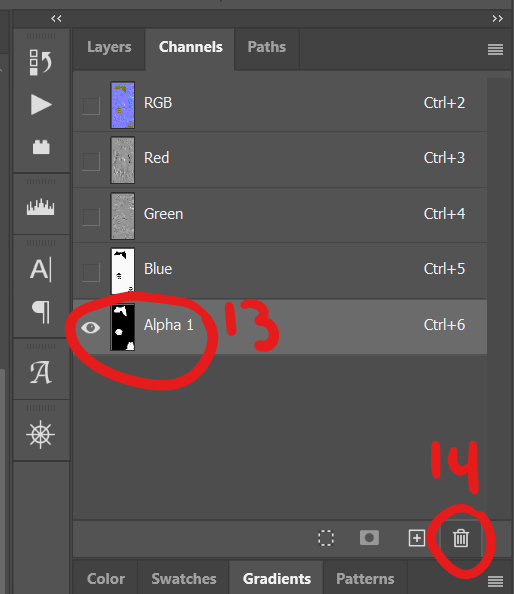
- Hit "ok" on the popup box
- save the image as PNG like in steps 8-13, but name this one with "RGB" at the end.
- re-open the PNGs in whatever software you prefer to edit in.
- Edit the images how you like. repeat for however many files.

Step 3- Re-importing and merging the alpha back in
When you finish your edits, you need to re-import them back into your mod. While it is possible to re-combine the RGB and Alpha in either photoshop or gimp, I find re-importing it into textools easier. I believe you can also do this in penumbra, but I'm not quite sure how. When doing any kind of editing or modmaking in textools, be sure to be in SAFE mod and in a transaction. if you have a transaction open and running, you will see "save to TX" at the bottom right.
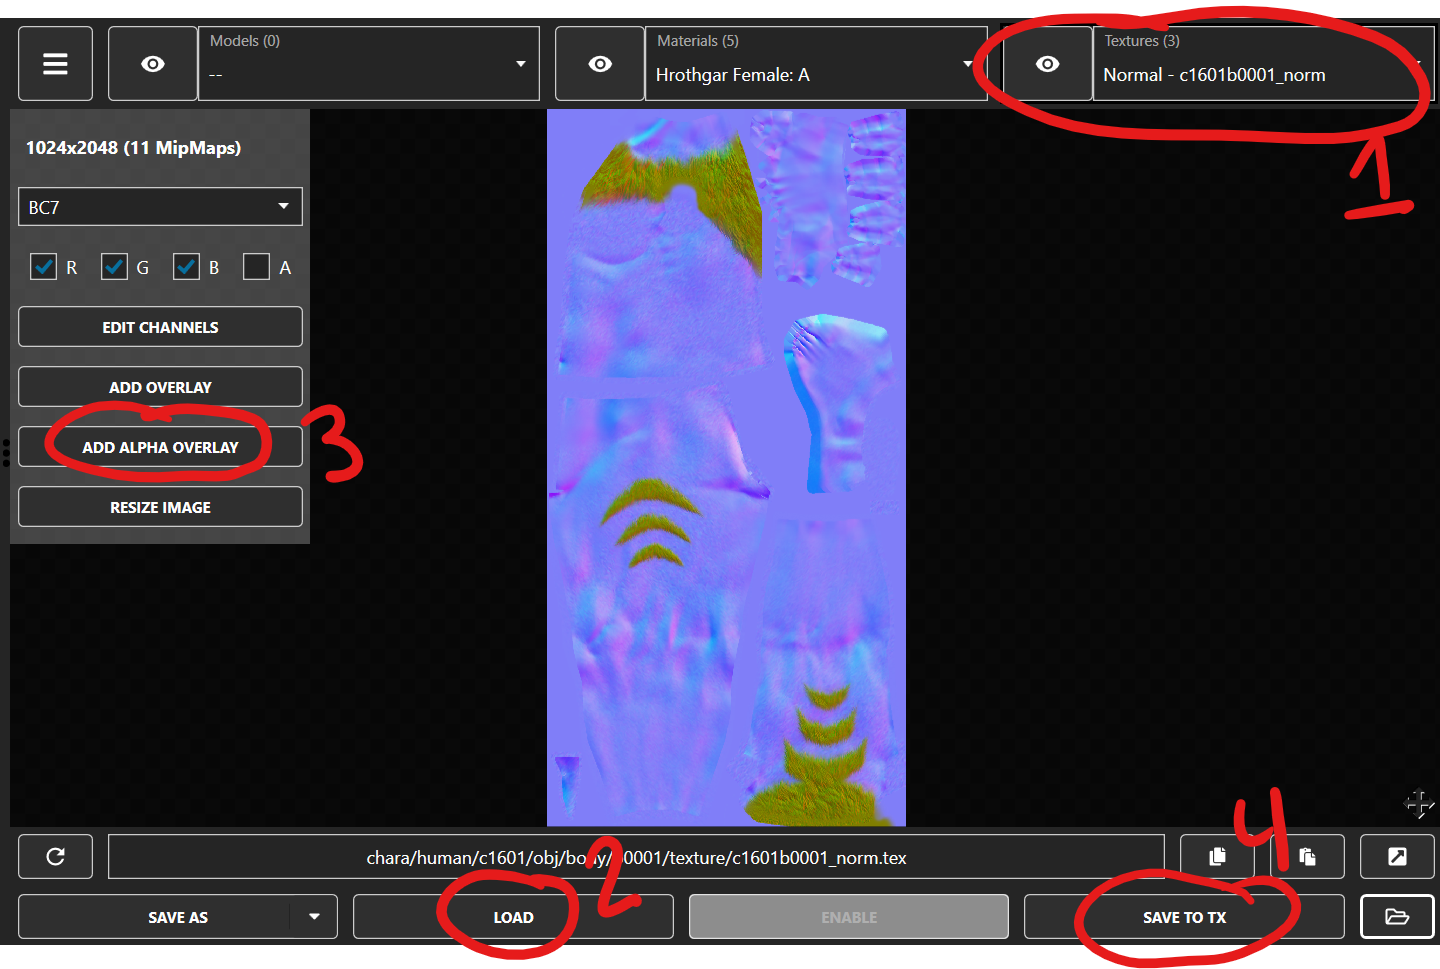
- Re-Navigate back to the matching texture you exported, or wherever you want the texture to go. Make sure to match Normal with Normal and Mask with Mask
- Click "load" and select the image labeled "RGB"
- Click "Add alpha overlay" and select the image labeled "Alpha"
- click "Save to TX"

- repeat for any other textures you have edited.
- Export your modpack however you prefer.
All done!
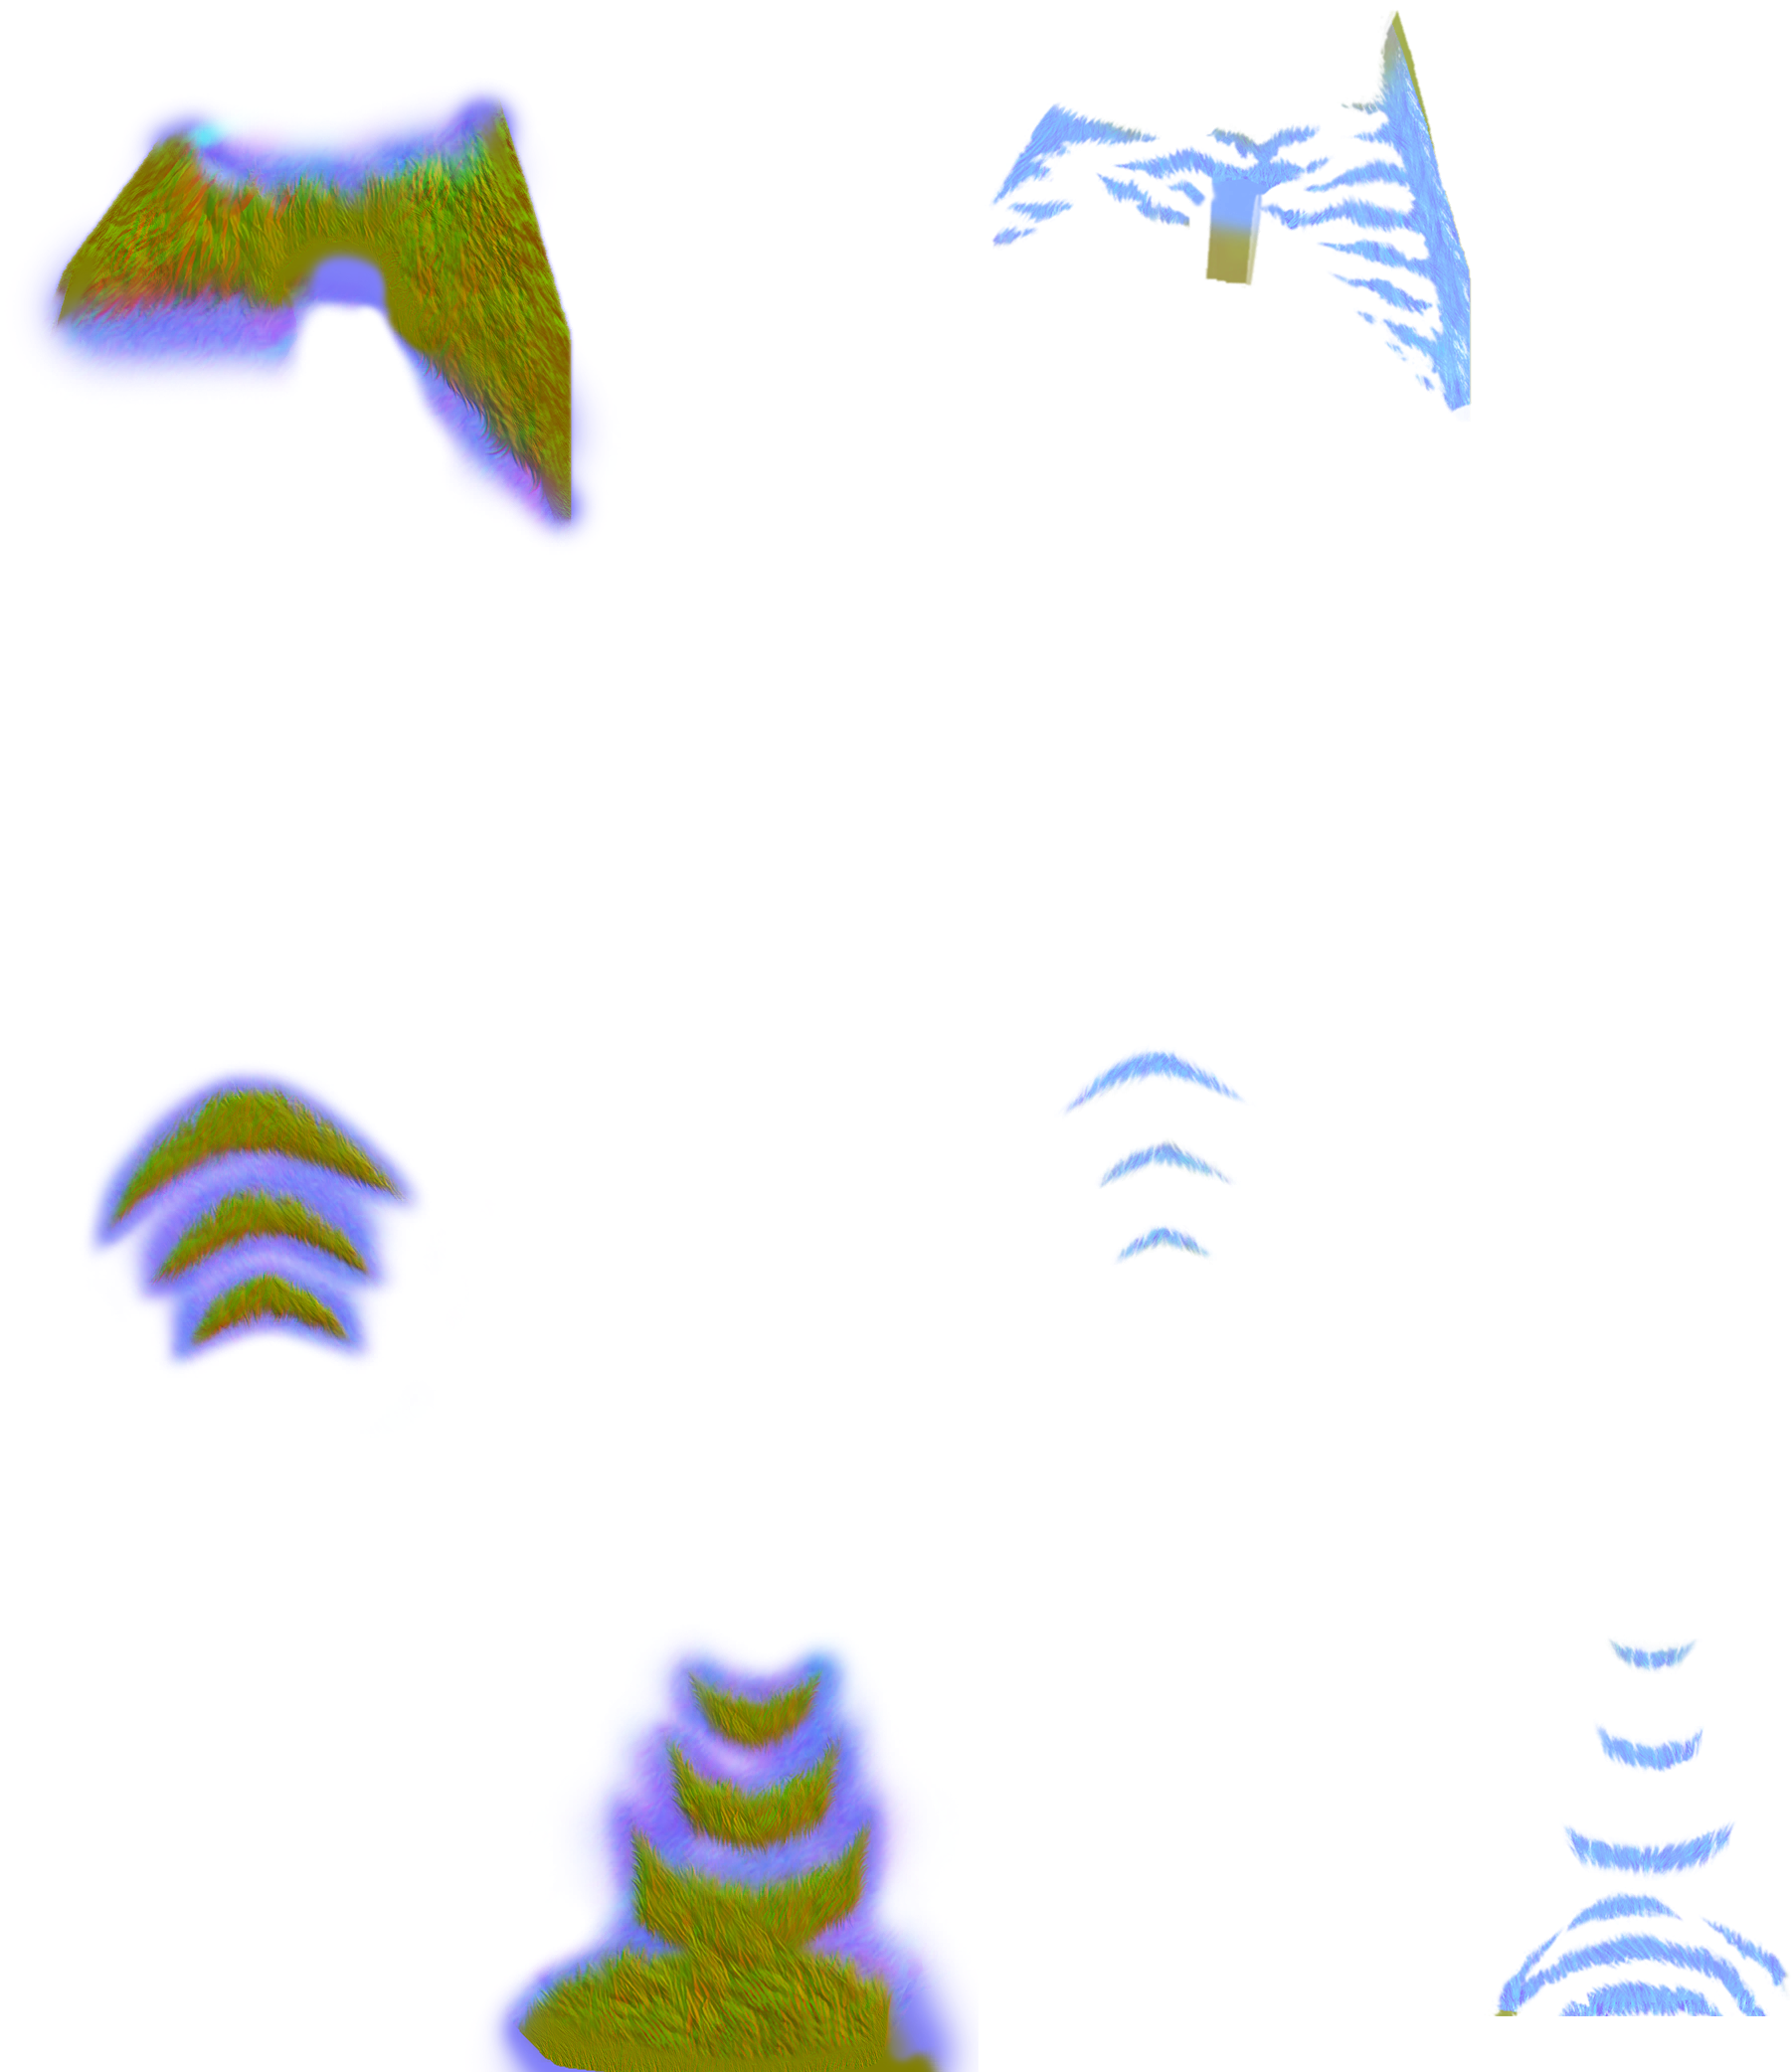
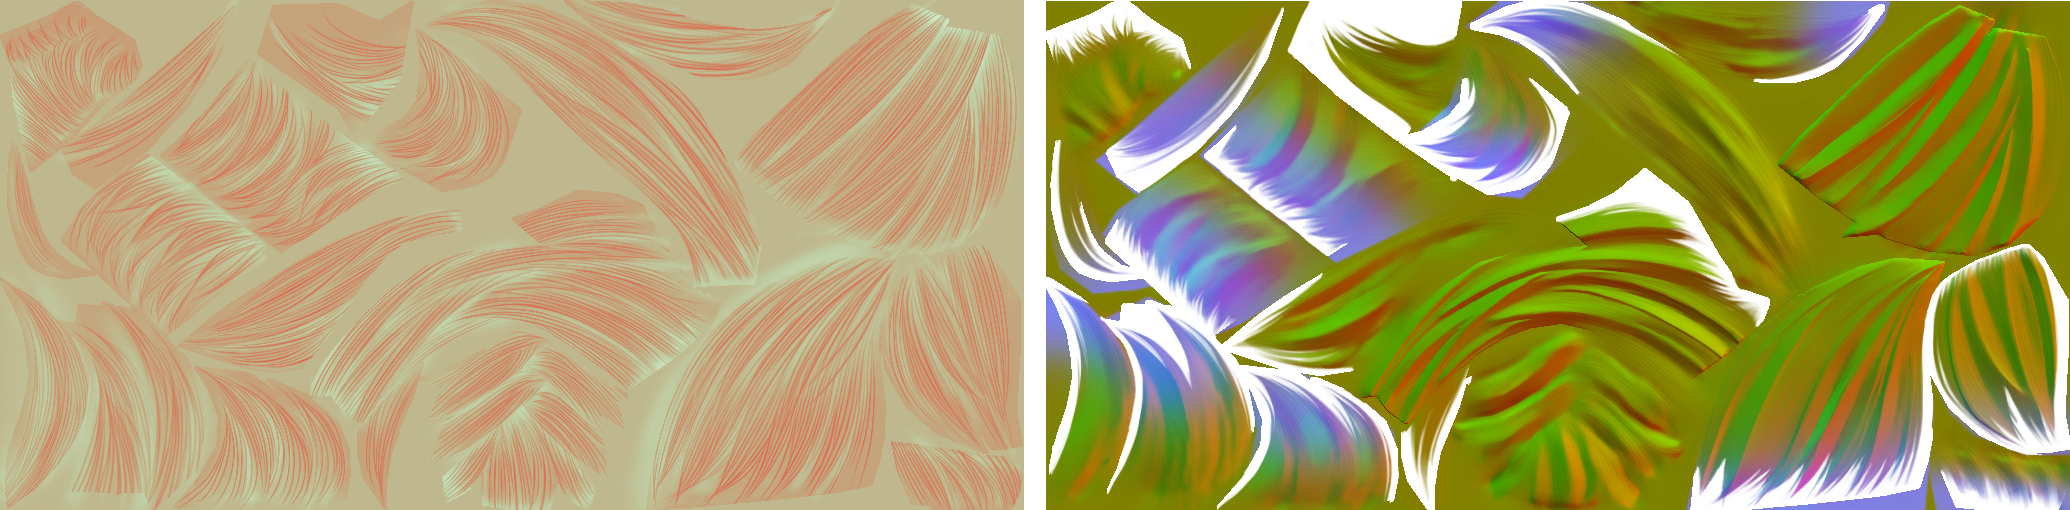
Examples of Incorrect texture exporting
Below are example images of what a texture looks like when it is incorrectly exported as PNG or incorrectly exported with alpha as transparency. If you export a texture and it looks like this outside of textools, then you exported it wrong and need to follow this guide.
Example of Hrothgar body textures. Normal map on left and Mask on Right. Depending on your settings this will be either black (dark mode), White (Light mode) or have a white and grey checkerboard pattern (PNG transparency)
Example of hair textures. Mask on left and Normal on right. Depending on your settings this will be either black (dark mode), White (Light mode) or have a white and grey checkerboard pattern (PNG transparency)
Example of incorrect face Normal Map texture for all Players except Hrothgar and Aura. Depending on your settings this will be either black (dark mode), White (Light mode) or have a white and grey checkerboard pattern (PNG transparency)
Finally, if you exported your textures and it shows the entire image but you still have issues in game, it's possible that you exported your textures incorrectly and lost the alpha channel entirely by having it set to pure white. This is incorrect for textures that use transparency as data. if this happens to you, please redo your edits following this guide.