
(TUTORIAL) How To Create a Custom Animation Mod in FFXIV Brio Style. (WIP)
Hello, and welcome to my guide on how to create a Custom Animation in FFXIV as a mod, but with the similar knowledge you already have from Brio. If you know how to pose this will be a very simple thing to learn as we'll only be using the bare minimal.
NOTE: This is not a guide on how to create a custom animation from scratch. This is a guide on creating animations similar to how you would in Brio
Before we start this guide, there are a few things you are going to need to start, and we'll go through some of the basic terminologies as well. So for the following guide you will need.
Blender: (To create the animation)
XAT (Standalone): (To Convert both the animation into a Blender Ready file, and to convert the Custom Animation into a FFXIV Ready File)
VFXEditor (Plugin): (To grab the Animation File and Skeleton, and create the Mod)
Penumbra (Plugin): (To Install as a Mod)
As for Terminologies we have
SKLB - The Skeleton file of your character.
PAP - Ingame animation file.
FBX - 3D Model File for Blender.
With that out of the way, if you have all these programs now, you're ready to begin. We're not going to be going over anything too intricate, as this is just a tutorial, not a full guide into 3D Animating.
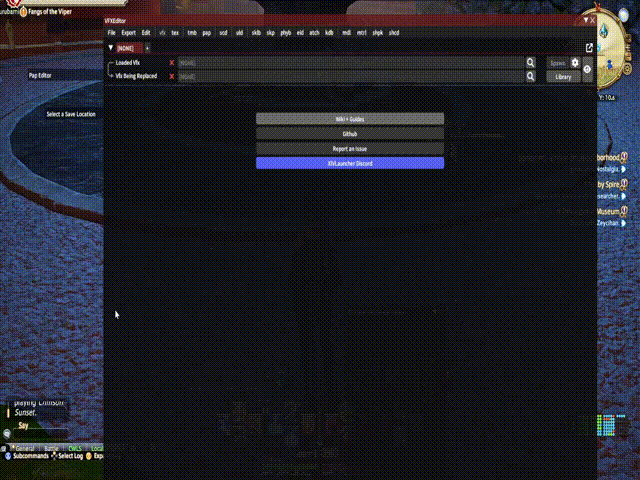
Step 1: Getting the SKLB File. (VFXEDITOR)
The first thing you're going to do is open up your vfxeditor, and on the list of tabs at the top click "sklb" from there you click the magnifying glass next to 'Loaded sklb' which will open a new window.
In that new window. under "Game Items" click "Character". Now a lot of Characters share the same Skeleton, and Midlander is usually the base most people go for. However if you're making this just for you pick your race and gender. For this guide we'll simply just do Midlander M. To the right near the top you'll see your race code ending with a b0001.sklb. This is the one you want, click the checkmark on that.
Now return back to the main window, and you'll see a big green button that says "Update" next to that you will see a picture of the hardrive with a down arrow. Click that to save your SKLB file and put it in whatever folder you desire.
Step 2: Getting the PAP File. (VFXEDITOR)
This is a very similar procedure, you click the "PAP" window at the top, and the magnifying glass on the loaded PAP. Now there are several options you have here. Action: Is for Skill actions. Emote is for character emotes, Character includes Idle and Movement and Job is for classes. For this one we're going to do a basic Idle. So click on Character, choose your race. Click on the check mark next to "IDLE" that appears on the right, and once again save it the same way you saved the SKLB File.
With that you now have both the PAP and SKLB file and are ready to move onto the next step!
Step 3: Creating the FBX File. (XAT)
With those two files gotten we're now done with FFXIV for a while, we're now going to be opening the XAT Program that you downloaded earlier!
When XAT Is Oppened, the first thing you're going to see is this!
The first thing you're going to want to do is click the page icon, and load in the PAP File that you've taken from FFXI, and then Load in the SKLB File into the second open box underneath it. Undrerneath "Animation Select" should show two options, click cmnm_id0 (Which stands for Idle, DMG stands for Damage these files are named super simply thank goodness) When both are done, go to the Export button, and set it to "Autodesk FBX" and click Export, save that FBX Wherever you want as well. None of these files need to be in the same folder.
Step 4: Importing Creating your Pose, and Exporting (BLENDER)
4a. Importing the FBX
This will be the longest step in the guide, Posing experience will save you a lot here.
This is where Blender comes in, Blender is an intimidating looking program however because of what we're doing you don't need any knowledge of Blender besides knowing how to import, and export an FBX!
In Blender Click File, go over to Import, and go to Import FBX and find your FBX to import. HOWEVER DO NOT IMPORT IT YET!
IMPORTANT: WHEN IMPORTING TO THE RIGHT YOU WILL SEE 'PRIMARY BONE AND SECONDARY BONE' MAKE SURE PRIMARY BONE IS "X" and SECONDARY BONE IS "Y" OR THIS WILL NOT WORK!
Anyways, if you've done it correctly it should look like this!
Unfortunately there's no way easy way to import this with the skin intact, so you'll be dealing with the bare minimal. On the bright side, these bones do help showcase where your body will be. (Body Mods withstanding) so you can get a good idea where your bones will overlap.
4b. Posing the character.
Now there are three things you're going to need to do when you start posing.
The first thing is click your skeleton so that it's glowing orange around it. When that's done, under the tabs you should see a solid Square with "Object Mode" Highlighted, click that and click on Pose Mode. There you will be able to click every bone individually like you would in Brio and Ktisis.
The second is more for convenience, to the left you should see a picture of a square with a mouse in the center being highlighted with a line of icons underneath it. Click the icon that is a circle going around with arrows pointing in a CounterClockWise motion. If you do that, the bone you have highlighted wlll have a rotation circle around it, very similar to what you see in your usual posing tools and works the same way.
The Third is the most important, to the far right you should see a list of icons including a green bone. Click it, if it's already highlighted click off of it to another tab, and then click on it to create a new tab on the right of it. If you see a bone name that is not N_Root in the black box above Transform than you did it correctly. If you see "N_Root" that means you need to click off the tab and click back on it.
IMPORTANT: Now there you'll see a Transform tab with Location, Rotation, mode and Scale. Ignore all of those and look at "Mode" and it will say "Quaternion WXYZ" click that and set it to XYZ Euler. It HAS to be on XYZ Euler or it won't work. For every bone you click, you will have to manually set it to XYZ Euler.
Once that's done, you can now pose the bones as you would in Brio, and as you see when you play the animation. The pose will remain to how you set it up. If you didn't follow the third step correctly, when you press play it will automatically swap back to it's default animation instead. So play around and make your pose as you would.
4c. Exporting
Once you feel satisfied, Go to File, Export, HOWEVER DO NOT EXPORT YET
IMPORTANT: WHEN EXPORTING, JUST LIKE IMPORTING TO THE RIGHT YOU WILL SEE 'PRIMARY BONE AND SECONDARY BONE' MAKE SURE PRIMARY BONE IS "X" and SECONDARY BONE IS "Y" OR THIS WILL NOT WORK! IT IS NOT AUTOMATICALLY SET TO YOUR IMPORTING OPTIONS
Step 5: Making it Game Ready!. (XAT)
So now that you've created your FBX, open up XAT Again, and we're doing everything we did before. Load the original PAP and the SKLB file the same way you had before, click id0. However instead of exporting, go to the IMPORT Option, And import the FBX File you JUST created. There you should see a 'Track' option. There should only be one option there called 'XAT' click that. There click Import, and after it's finished importing go to Save on the right and Save it as a PAP where ever you want it to, no special naming or anything needed!
As this is overwriting an already existing animation you don't have to worry about any of the extra options! With that done we're at the homestretch and onto the final point go back to FFXIV!
Step 6: Swapping Animations [VFX Editor]
Now we're back in VFX Editor! If you closed VFX Editor, you'll want to open it and click on the 'PAP' tab once again! First Click on Loaded Pap, and instead of 'Game Items' click on Paths, click on Local Path, and load in the new PAP that you created! Once that's done, go back to the Pap Editor window, and click on "Pap Being Replaced" and under Game Items choose the PAP you are replacing (Which is the original PAP you selected at the very start to extract in this case Midlander M Idle). Once both are loaded, go to Pap Editor one more time and click Update. It will redraw your character and their idle pose (OR whatever you replace) should now be updated to look like the one you've made! Congrats! All that's left now is...
Final Step: Making the Mod File
At the top of PAP Editor there's an 'Export' option to the far left. Click that, and choose Penumbra or Textools (PMP or TTMP2 file). There you can set the Mod Name, the Aurthor and what version it is, and there's a list of files underneath it. Pap will have 0/1, check the box next to it to turn it green and have [1/1] and then click the Export File, and save it (again wherever you want to) as a new file! Once done, you've done it! You can now install that file into Penumbra as a mod and your idle is now a bonefied modded file! Congratulations!
Food for thoughts:
- This is a very basic way to creating animation mods, so all the technicals you would normally need to know do not apply here. Making a full on animation mod will require a lot more know how.
- You are trapped to the animations motions just like you would be in Brio. This is not to create a full on 'custom animation' this is to just edit an existing animation to your liking.
- Please refer to Brio, Ktisis or any file that lists bones to know what bones go to what. These are now simply 'Elbow L, Elbow R' ect.