
7.0 Mashup Walkthrough
Intro
Installing TexTools
To start, grab the TexTools download from the site. It’ll have the most recent version for it, but you can also join the discord if you’d like to get it from there!
Installing Blender
I use Blender 3.6, but any version below 4.0 works just fine!
-
-
Changing Default Settings
When you boot up TexTools, it’ll have you navigate to where your game install is. You can point it to your base game, or, if you have the space, point it to a dummy copy.
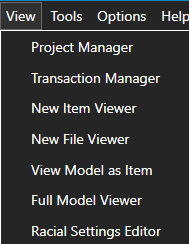
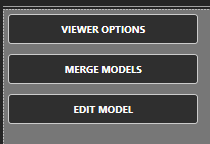
To find the settings, look at the top left space of TexTools, and you’ll see these 6 buttons.
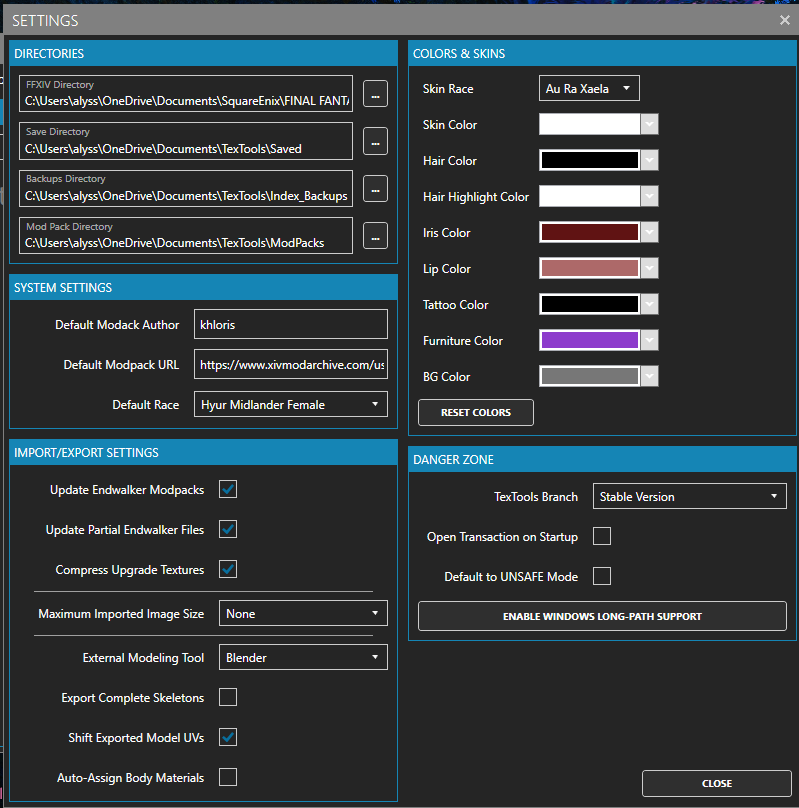
From there, click “Options”, and you’ll be met with these. They allow you to customize what your various export options will look like. They also allow you to change the default author, modpack URL, what race / gender model pops up by default, etc. Play around with these, they’ll help you in the long run! When you’re done, close it out! I’d recommend turning on “Default to UNSAFE Mode”, as that allows you to start modding without having to tick it each time you start TexTools up again.
-
- Here, you can also change where the game directory is, or where the mods will be edited / changed. This is NOT detectable server-side, it’s only client-side. If you have a dummy copy you made after installing / updating TexTools, you’ll want to change it to that directory here.
FFXIV Dummy Copy
TexTools Setup
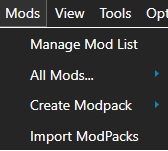
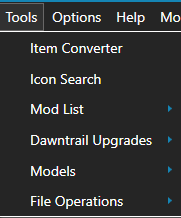
Let’s start with the basics. I’ll be covering what each of the buttons at the top left does, some in depth, some not, it depends on how much this information will contribute.
- Mods
Mods
Manage Mod List: Allows you to view the various mods you have installed onto TexTools.
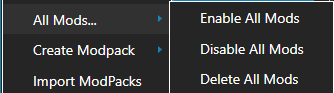
All Mods: Allows you to Enable, Disable, or Delete all mods. This just works for the modpacks you have installed. If you’ve made mods to publish, you’ll have to start over / disable those manually.
Create Modpack
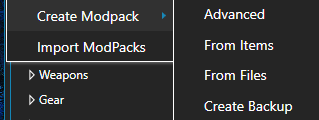
Advanced: Your new bestie in making mods! This is my personal favorite for making mods. This allows you to load basic modpacks to combine into one for options, import model variants, allow the people who download your mod to tick options, etc. It seems complicated, but it really isn’t!!
From items: A more basic form of creating mods! This doesn’t allow for options, but if you have a mashup with no options, this’ll be the easiest way to pack it!
From files: This is the most complicated one (in my opinion). It allows you to pack various files that have been imported / edited into one modpack. It essentially functions how a basic modpack did in Endwalker TexTools.
Create Backup: This combines every mod you have in TexTools to one modpack, for easier handling. You won’t be using this if you’re creating mods, but it is very useful if you have to move PCs!
-
-
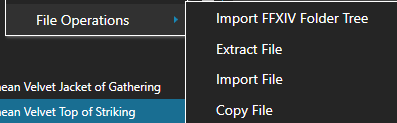
- Import Modpacks
The most simple of them, you click / select the mods you want to import into TexTools.
Exporting from TexTools
Your textures are stored in the Textures tab, at the very top right of TexTools when you’re viewing an item.
-
- To export your textures, click the dropdown box, and click on any one of the textures, you’ll have to do this for all of them.
At the very bottom, there’s an option that says “Save As”
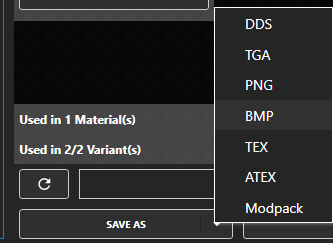
-
- You’re going to want to export as a PNG, especially if you intend to edit your textures later on. It’s possible to edit DDS textures, but PNG is used more widely, and it’s the one I personally use, since I use Procreate to edit most, if not all of my textures.
Save this somewhere easy to find! If you’re using multiple meshes in your mashup, I’d recommend naming the textures different numbers, correlating to the part number.
I use 1n, 1m, and 1i for the normal, multi, and index.
Do this for each individual texture, all of them are necessary!!!
Exporting Colorsets
Your colorsets are located in the Materials tab, in the middle!
-
- To export your colorset, go to the material, where you’ll see this menu.
-
- Go to “View/Edit Colorset.” Here lies your colorset!
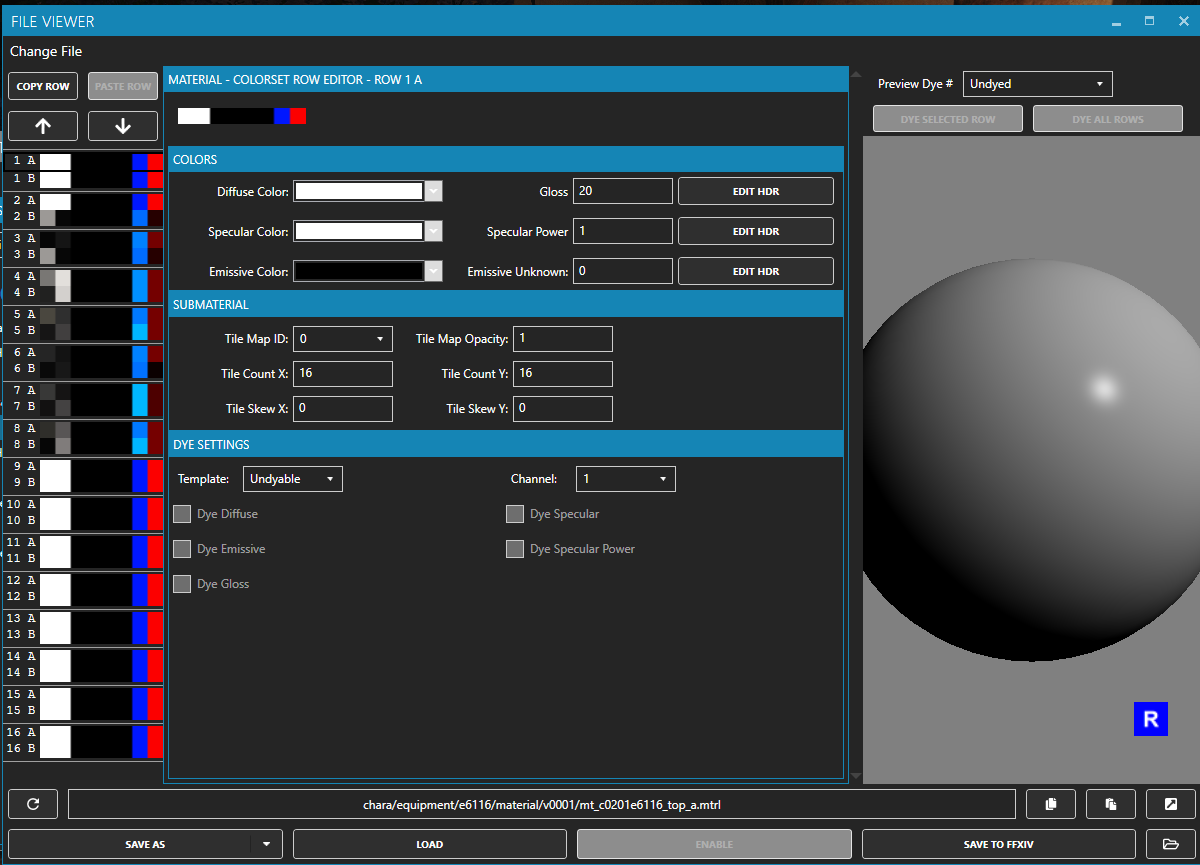
-
- To export your colorset, hit the dropdown next to “Save As”, and save as DDS.
If you want to include colorset options in your mod, you’ll want to save as a modpack! This is one of the methods of doing so, but I won’t cover that here.
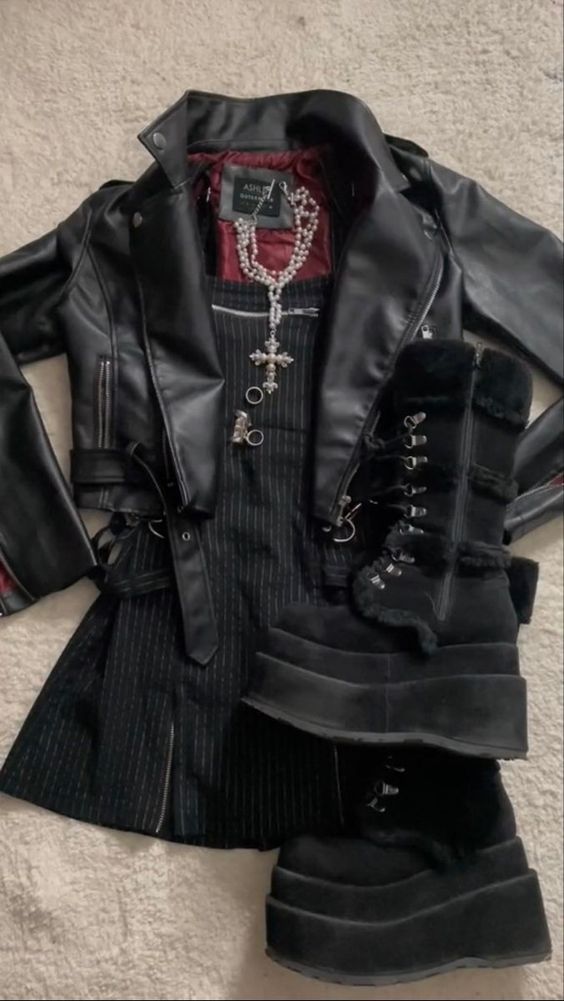
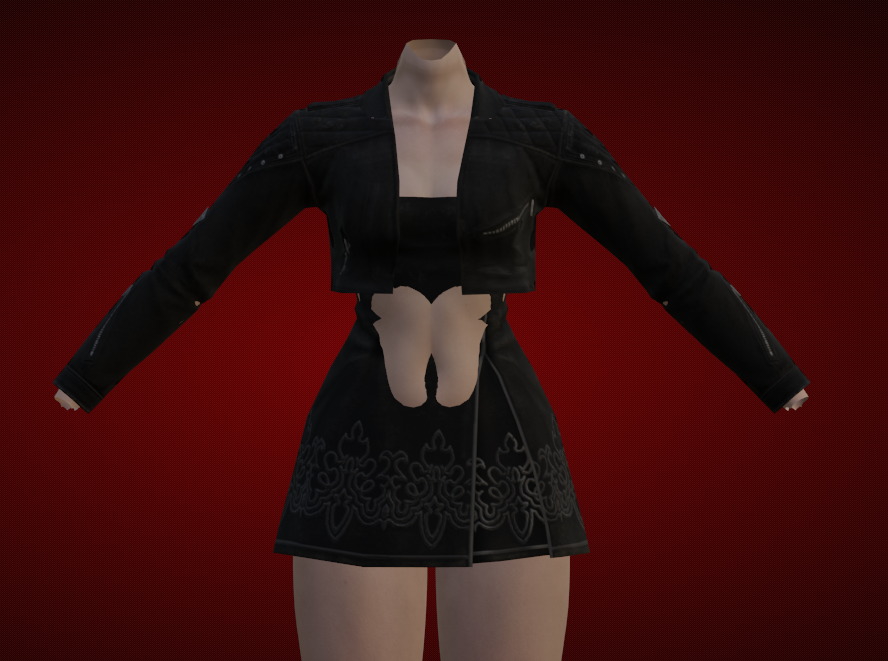
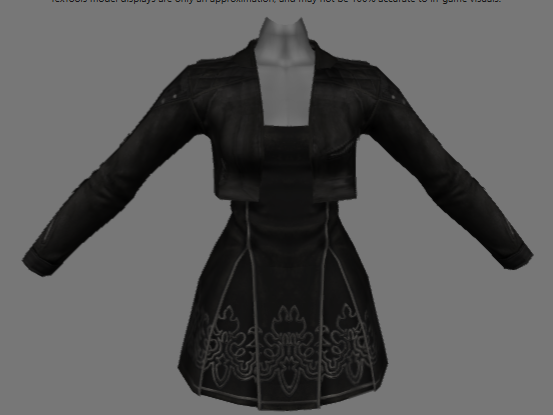
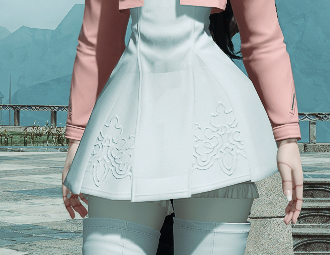
Navigate to the gear you’d like to be your base. I’m going off of this inspiration
picture:picture
-
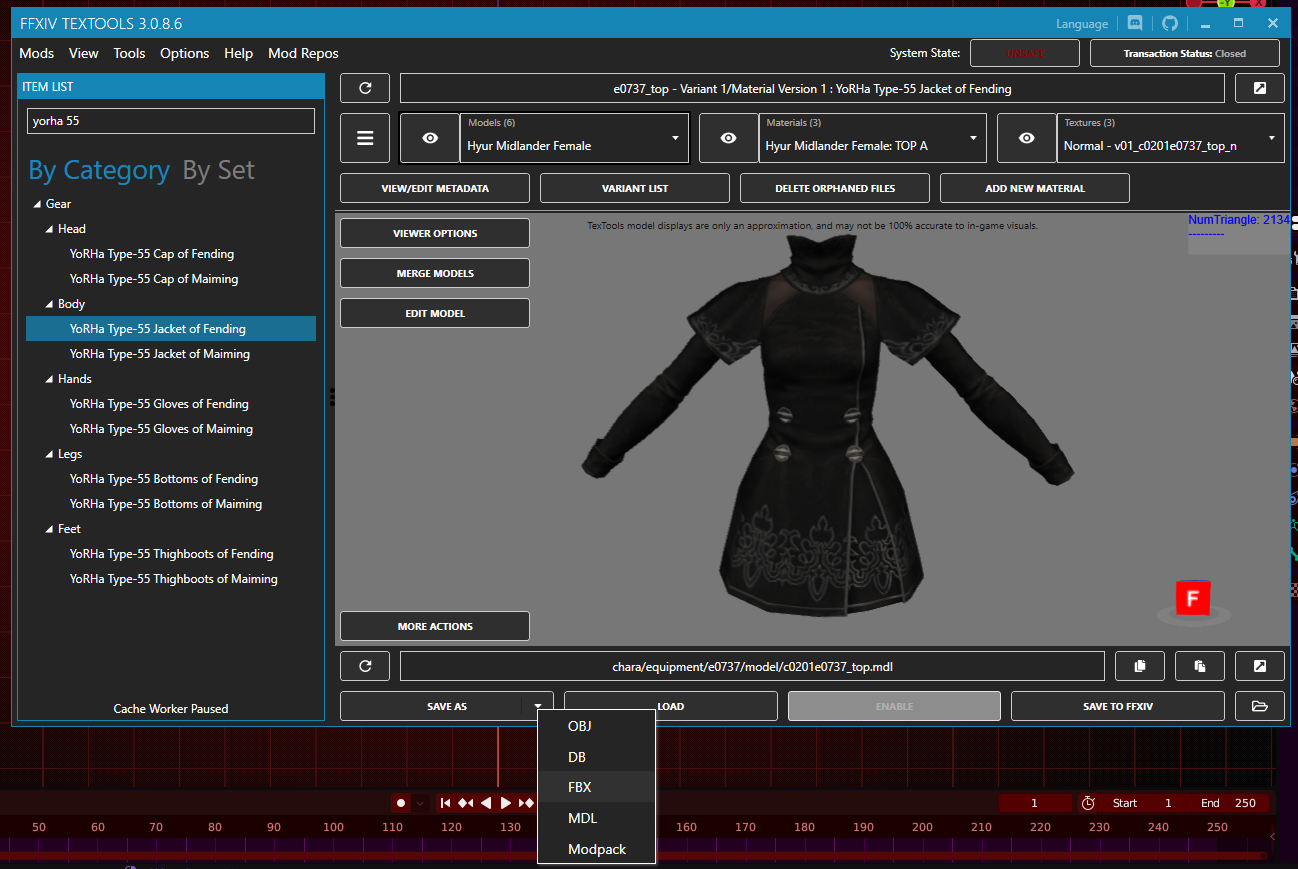
- I’m choosing to use the Yorha Type-55 Fending top or the base!
-
- Export this top as an FBX, and hit save.
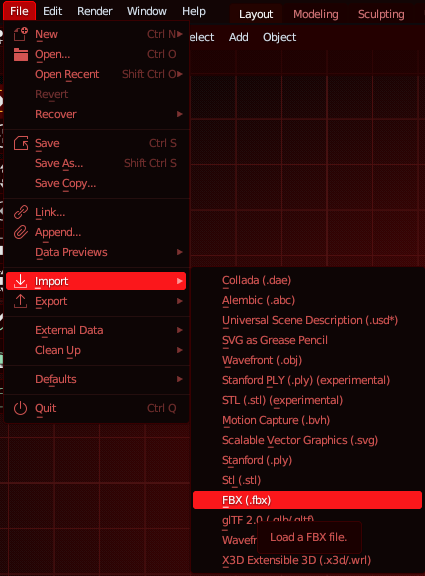
In Blender, once you have your base, you’ll need to import it!
-
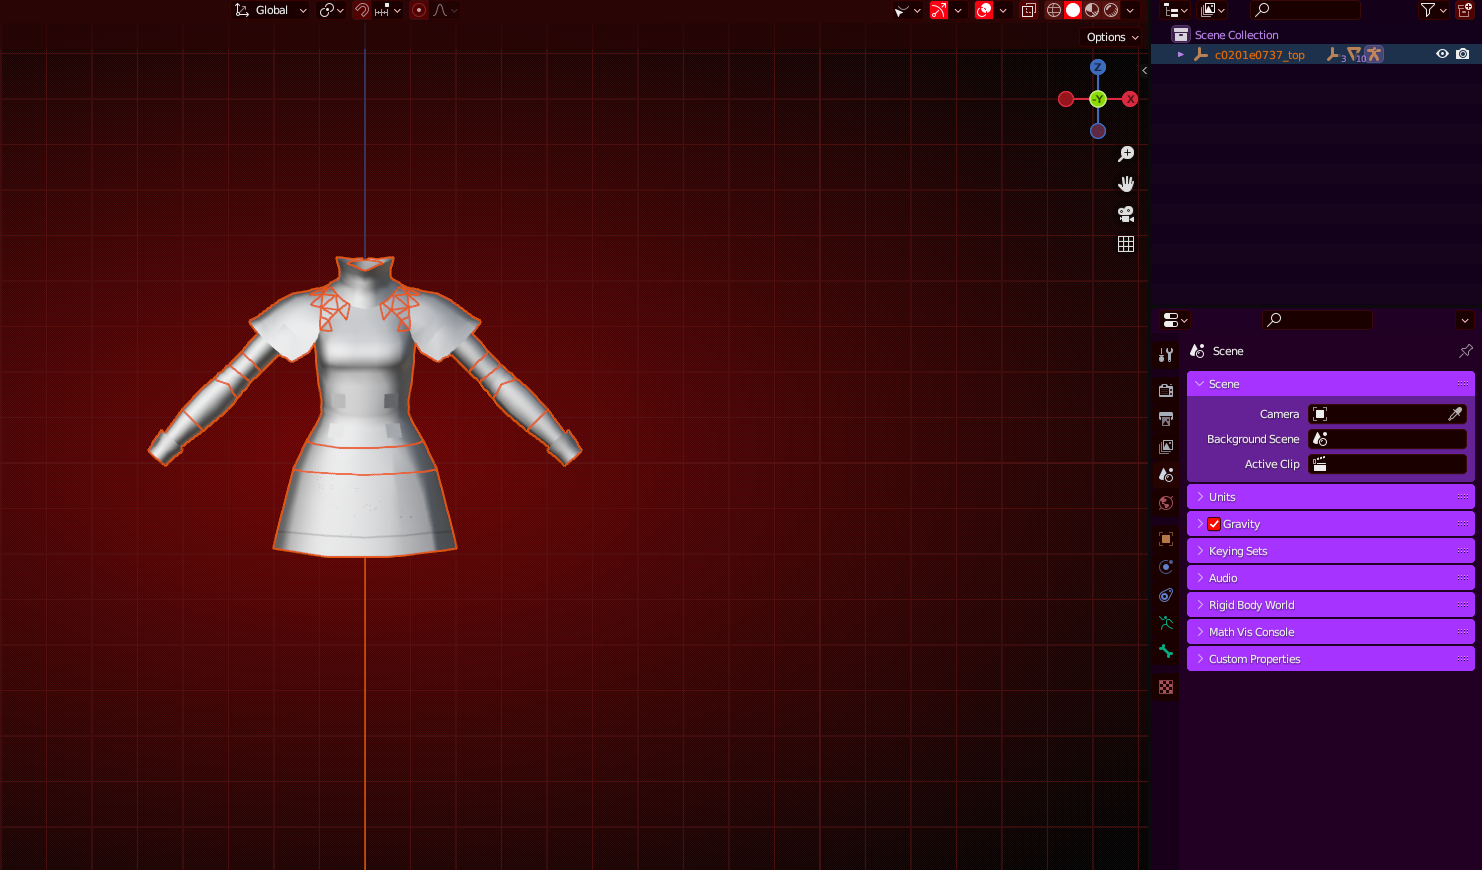
- Import your mesh using these settings, and you should have it in blender now!
-
- You’ll notice it’s a white, undetailed blob. Let’s fix that! Up in the top right corner, you’ll see 4 orbs! You want to change it to the 3rd option, that looks slightly checkered.
-
- You’ll notice that some bits of the clothes are transparent, like the 4 buttons. That’s fixed in the material settings.
-
- You need to click various parts to fix their material settings. Each part is divided into various bits (0.0, 0.1, 0.2, etc)
If you change the material settings on 0.0, it’ll affect 0.1 and 0.2, as they’re all bits of the same part. You’ll have to do this for each individual part, so in this mesh’s case, 3 times!
Below the meshes, there’s this box. Click on the checkered orb, and close the boxes until you see Settings.

-
- Check Backface Culling, and change the Alpha Blend mode to Alpha clip.
Once you’ve done this for all 3 parts, it should look like this!
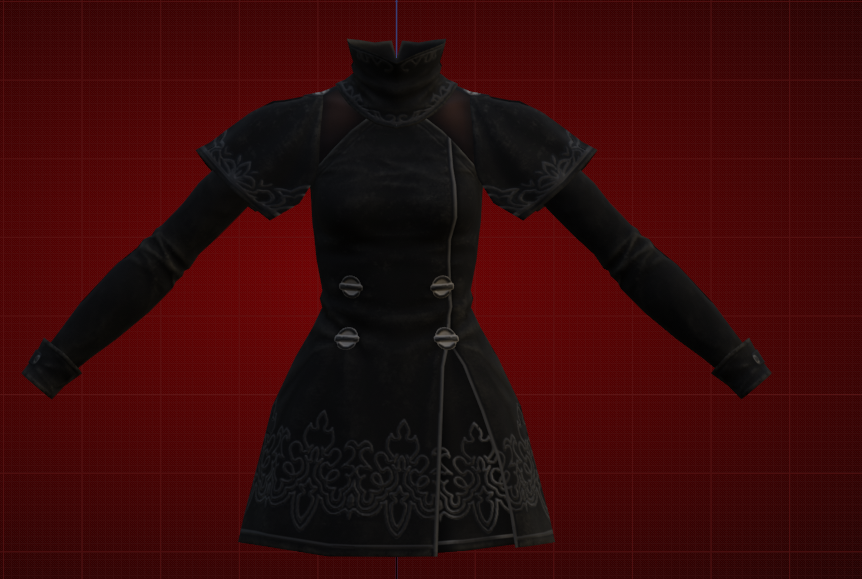
-
- We can get to working on our mashup now!
Typically, Vanilla items will use part 0 as their skin material. Always check before you do so, but if you intend to upscale your mashup to a Bibo, TBSE, or Gen3 body type, you should delete part 0 as you start!
I upscale to Rue+, so I’ll be deleting this part.
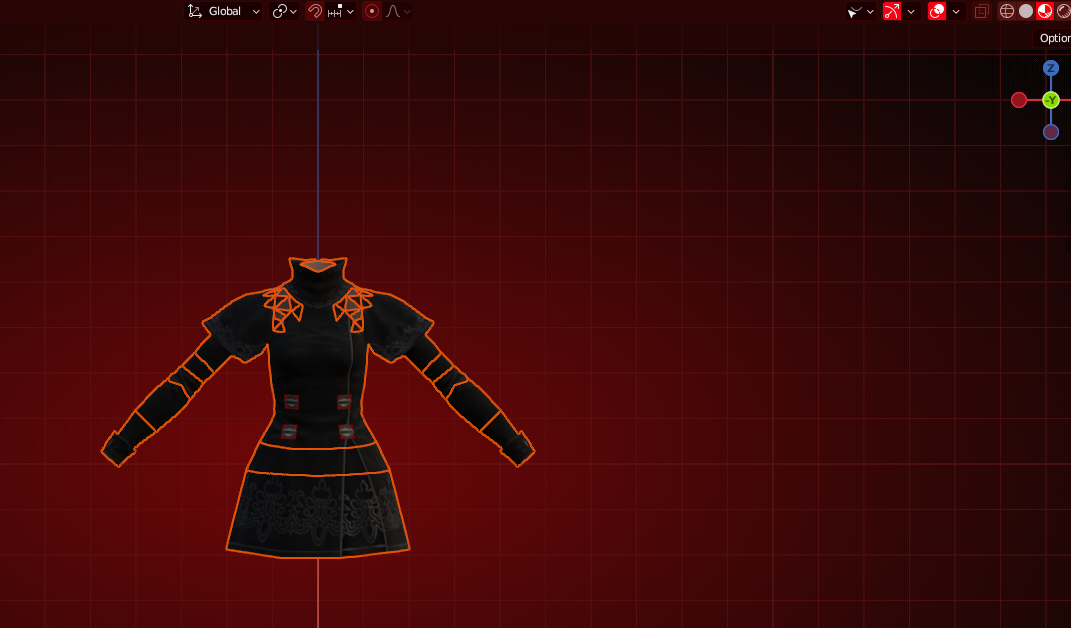
In my inspiration picture, I can see that my dress is strapless, so I’ll be deleting the sleeves / everything above the collarbones for a start.
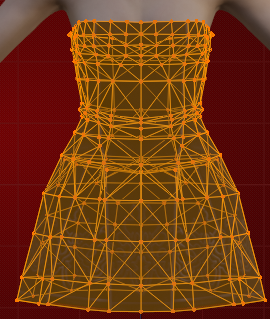
To select all of your mesh, hit A, and go into Edit Mode via the top left dropdown box.
You’ll notice some bits aren’t being selected. This is changed through the “Toggle X-Ray” option, next to the 4 orbs!
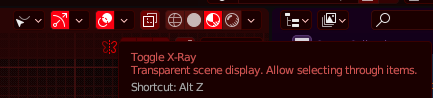
-
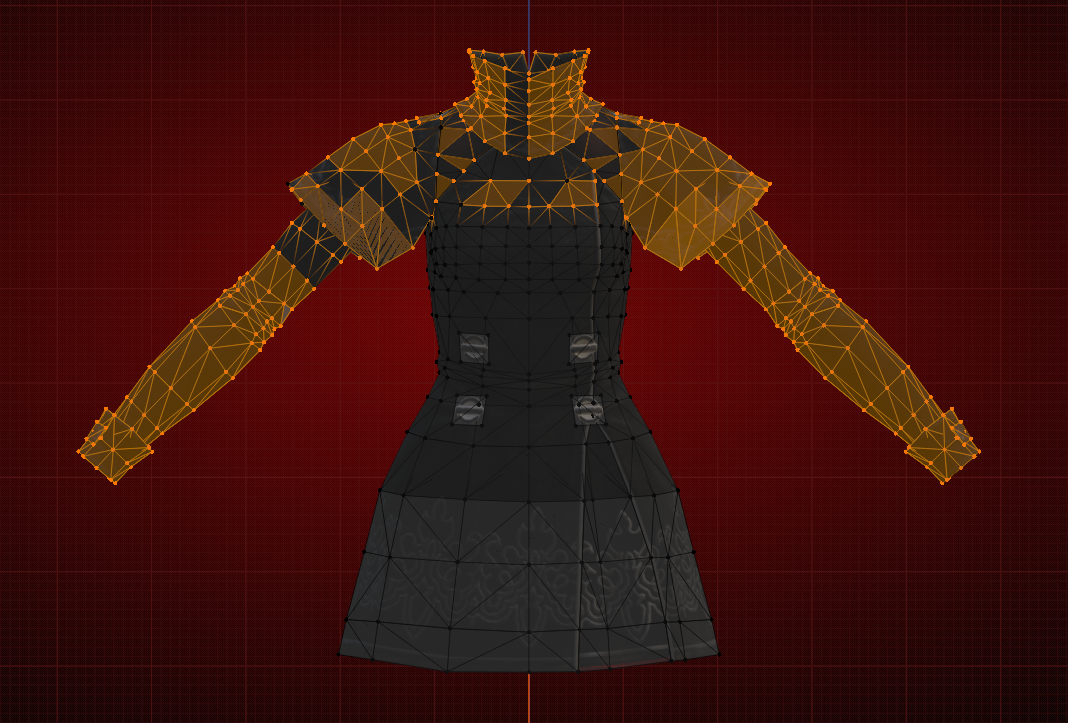
- Once you’ve turned this on, a LOT more vertices will appear.
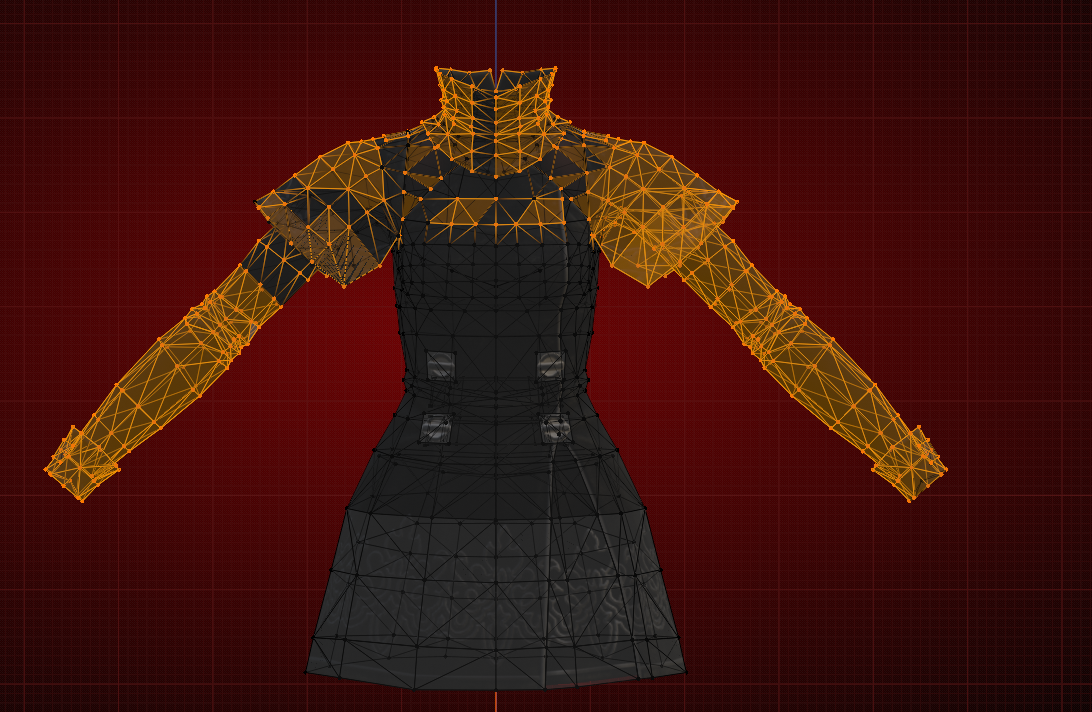
-
- Keep selecting the bits you want to delete, then right click -> delete!
-
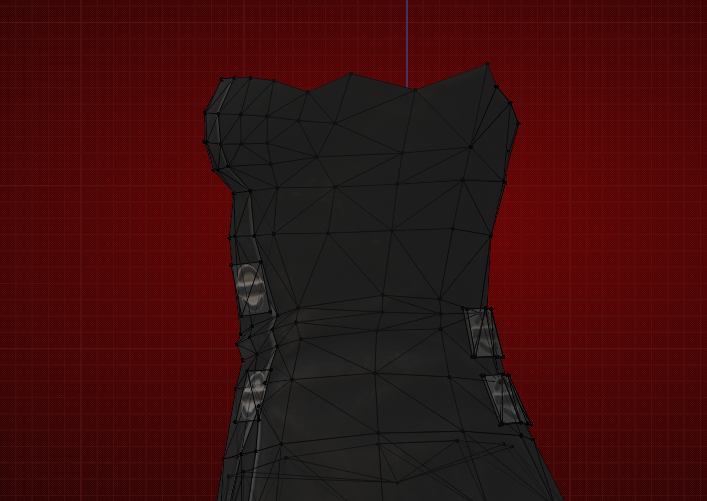
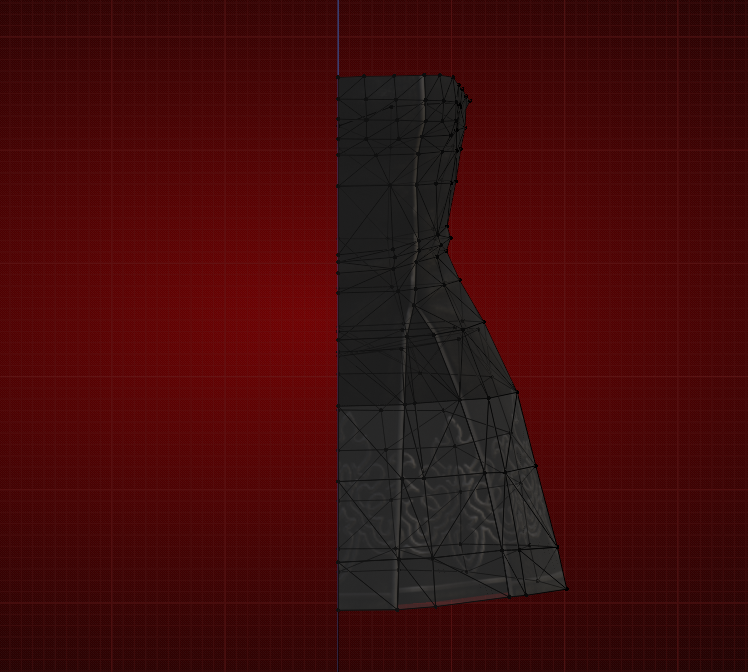
- You’ll notice, if you look from the side, that some bits are wonky looking. Select these vertices, and adjust them with the move tool until you’re satisfied! (you can also delete them, just depends on what you want to do!)
-
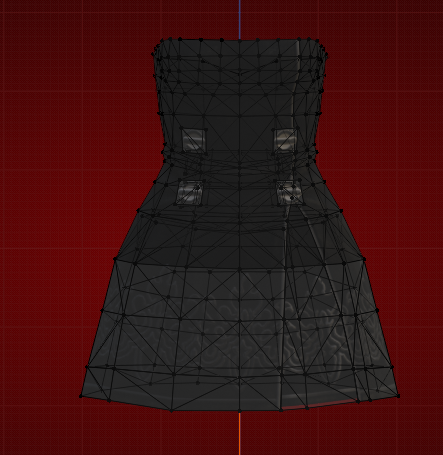
- From here, I’m going to delete the buttons on the front and the back!

-
- For the last touch, I want the dress to be symmetrical with the slits.
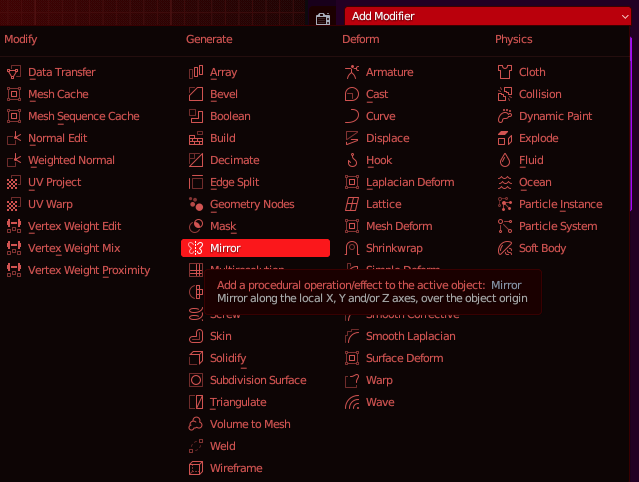
To accomplish this, we’ll be using the Mirror Modifier!
Firstly, delete the half of your mesh you want to replace. In my case, that’s the left half!
Make sure that this is directly down the blue line, or the Y axis!
Located under the wrench tab, you’ll add the mirror modifier, like so!
Apply the mirror modifier!
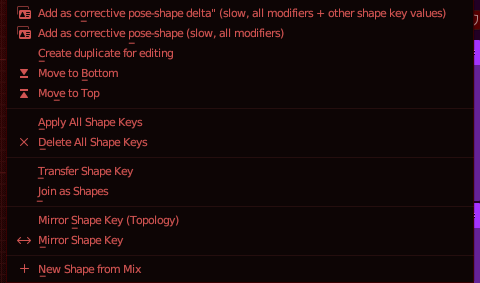
Note: you can’t do this with shape keys, if your mesh has shape keys, you can easily remove them! Navigate to the green triangle tab, underneath the wrench.
To remove the shape keys, you can hit the minus sign, or you can hit the downward arrow, and select “Delete all Shapekeys”
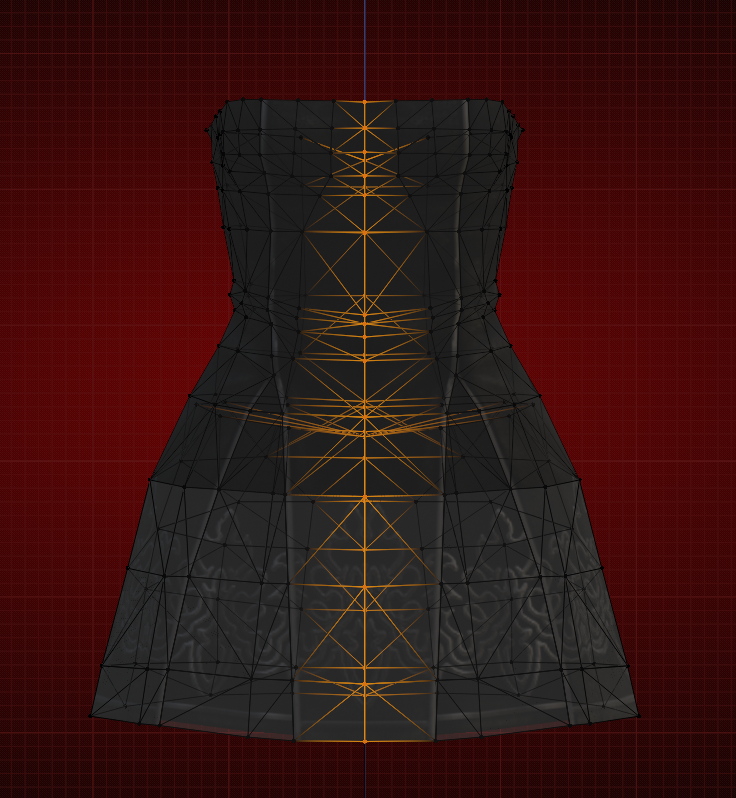
After the mirror modifier is applied, you have one more step: merging the middle vertices! It’s simple, but worth mentioning.
Using the “Select Box” option, select all the middle vertices that fall on the Y axis, like so:
-
- Right click -> Merge Verticies -> Merge Verticies by Distance
When you get the “Removed (x) vertice(s)” notification at the bottom of the screen, you’ll know it worked!
All done with the dress! I’ll be adding a jacket on, again like the inspiration picture!
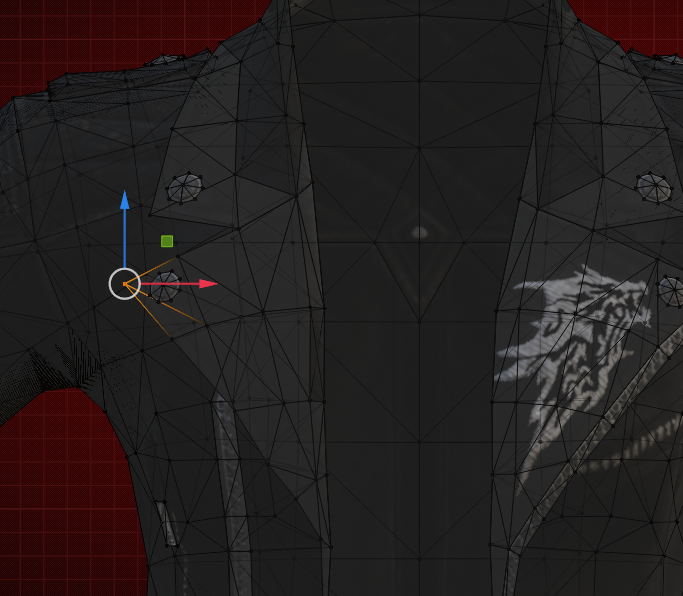
The jacket I’ll be adding onto the dress is invisible on the inside, let’s fix that!
Right click your mesh in the right tab, and copy it. Paste it, and expand the tabs again.
Select your new mesh, go into Edit Mode, and hit A to select the entire mesh.
In the top left corner, there’s a box named Mesh. Open it up, and navigate down to Normals. You’ll want to hit “Recalculate Inside”.

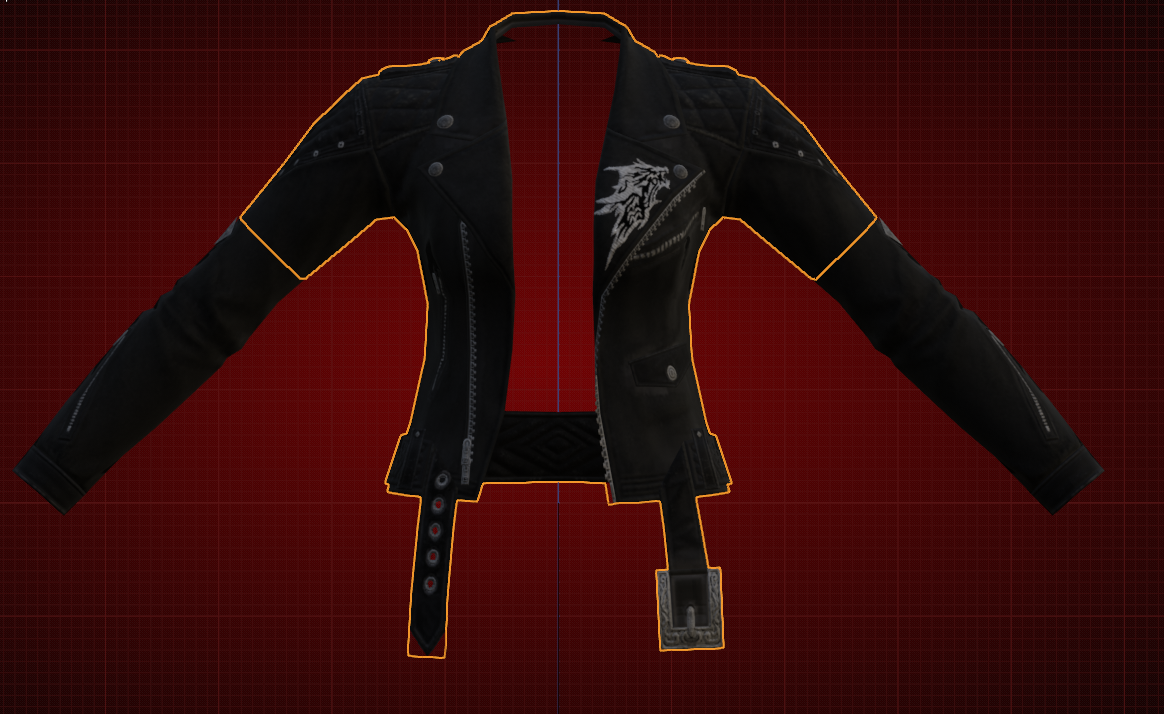
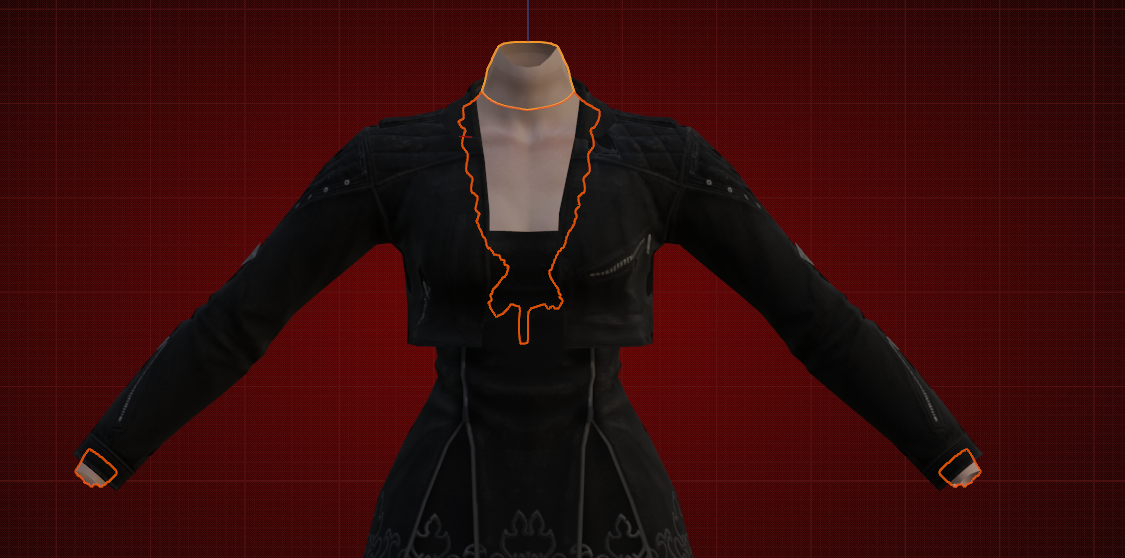
Afterwards, you’ll want to delete the bits that either wont be visible from the inside, or that already had backfaces. For this jacket, that’d be the collar bits, the arms up to the shoulder, the jewelry, and the dangly bits. You could technically leave them, but lowering your mod size is always a good idea!
-
- When you’re selecting bits like this, you can hit Ctrl + L, and it’ll select everything linked to it.
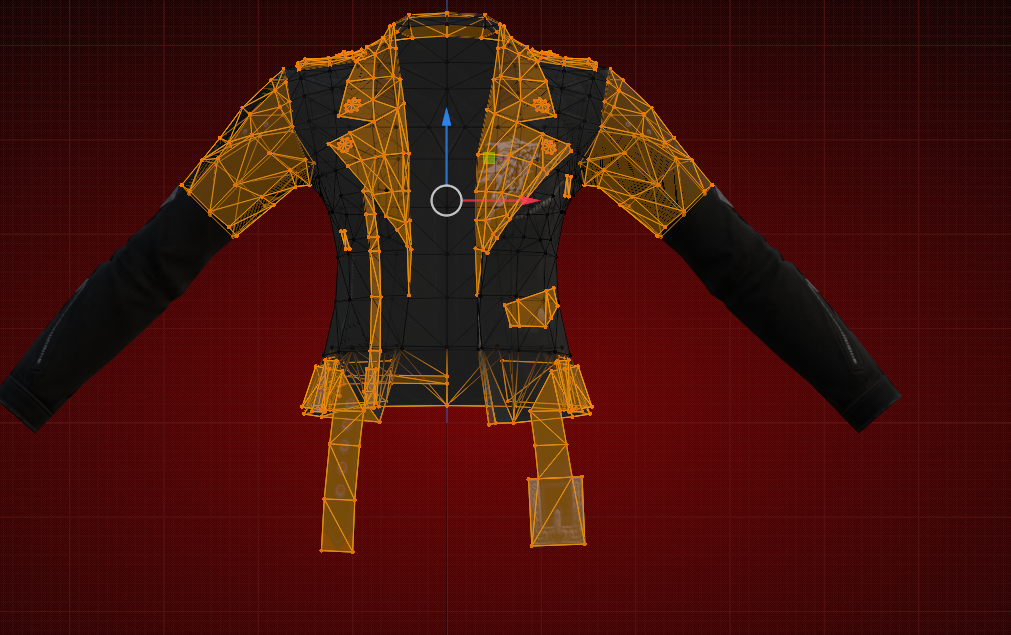
-
- Here’s everything I’ll be deleting off this mesh!
From here, it’s small edits. Select the copy of the mesh, and the original mesh, and move it around until you like it! Proportional editing is fantastic for this! It’s the little target option at the top-middle of your screen. You can also hit O to turn it on!
Afterwards, select a vertex and hold G, then zoom in. There’ll be a circle that decreases as you zoom in. This is the radius of vertices affected by proportional editing. Play around with this, find a radius you like. You’ll have to change it a few times to get used to it!

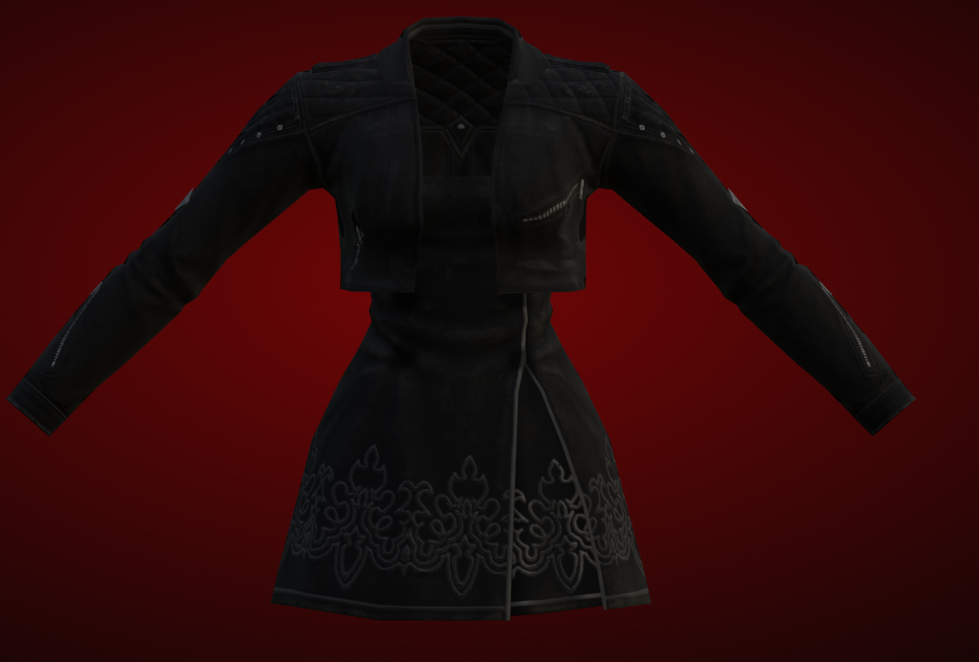
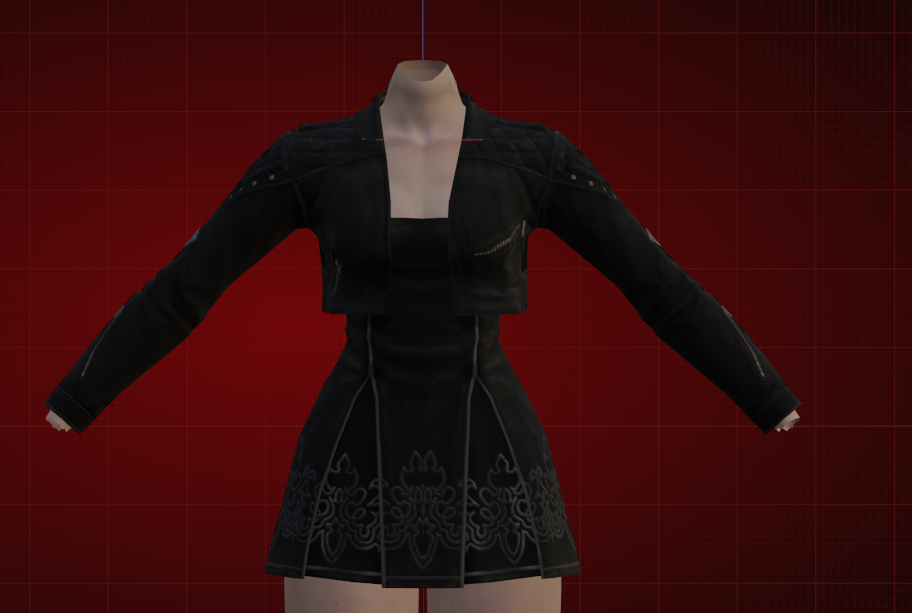
-
- In the end, I’m left with this, after all the edits!
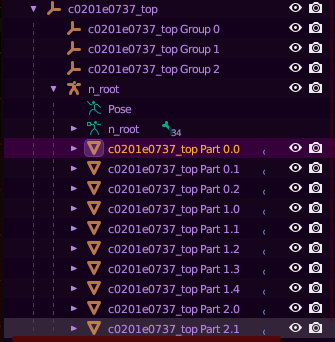
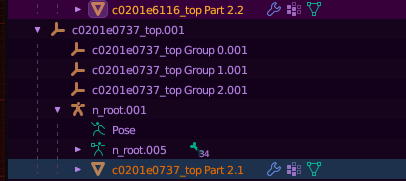
I like to move my meshes into one group + rename them before I work on refitting & weights! In order to do this, select all your meshes, drag them over one n_root, hold Shift + Alt, and drop them!
After you’ve moved them over one n_root, make sure that your armature modifier matches the n_root it’s under, like so:
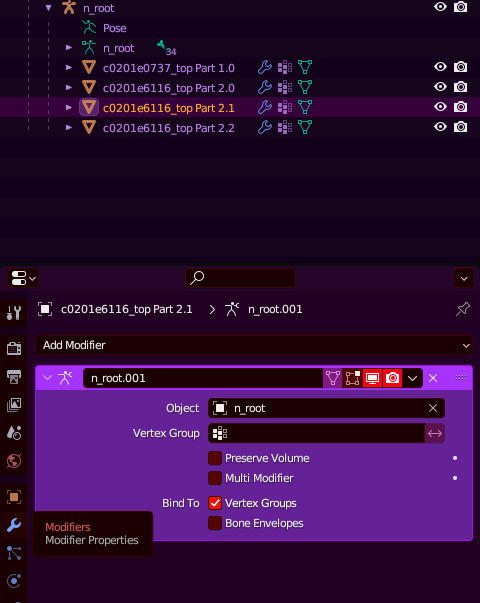
-
- If it doesn’t match, click the Object box, and make it match! If it’s under n_root, then the object needs to be n_root.
To rename, just double click the name. You want each mesh that comes from a different item to have a different number. For example:
-Skin: Part 0.0
After you’re done with your base mashup, you can move to refitting it to your body!
I use Rue+ small chest, and Skullcrusher legs. I already have those meshes exported, but if you’d like to grab them; import the base body, select your settings, and export the Emperor’s New Robe, Pants, and Gloves. Gloves may not always be necessary, but it’s good to have!
Import these into
blender!Blender!
-
- You’ll notice that there’s quite a bit of clipping. Same as when you made your mashup, you’ve just gotta go and move the vertices around until it looks decent. Don’t worry about getting it absolutely perfect, if you can’t see the skin, you can delete it afterwards!
A very big part of re-fitting clothes is Proportional Editing, so make sure you have that on for this!
The mirror modifier is also very useful here, and if I have to do a lot of refitting, I’ll use it here!
-
- After you’ve finished refitting, it’s time to cull the skin underneath!
Sometimes, in mods, you can see the skin was kept, but I’ve found it lightens the modpack size + the weights work nicer if the skin underneath is deleted.
Again, this process is a lot of moving vertices around, and looking at different angles through your mesh.
I’d recommend hiding the parts you intend to
deletekeep first, to ensure you won’t be deleting anything that’s visible!
-
- As you can see, the majority of the skin material has been deleted! We can move onto the weighting! Make sure to move your skin material underneath your mashup’s n_root before you progress!
We’ll be weighting our mashup through weight transferring. It’s the simplest method that I’ve found, and it works the majority of the time!
In order to weight transfer, we have to find an ingame glamour that’s similar in shape to what our mashup looks like. I’ll be using the Yorha Type-55 Jacket of Fending, since I have it on hand, and it’s a similar shape to begin with.
Import the item you’re going to weight transfer from. You want the item to be one cohesive part, weight transferring from multiple parts is a pain in the butt
Select the bottom part, hold shift, and select the bottom
part.part

-
- Hit Ctrl + J to join all these parts!
You now have an easy to work with mesh to steal the weights from!
Before we weight, we need to remove our mashup’s weights, otherwise they may go funky after weight transferring.
Move to the tab we went to for shapekeys. Vertex Groups, our weights, are also held here!
We’ll be removing all of these, for each part.
Similar to removing shapekeys, hit the drop down button, and “Delete all Groups”
You do not want to do this by hand, trust me, there’s like 20 groups, it really hurts afterwards.
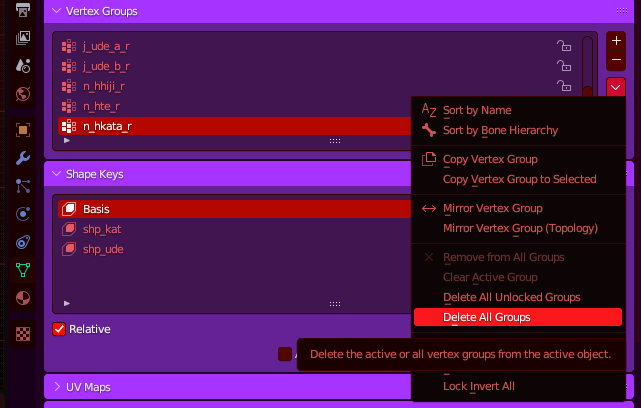
Do this for each part, until the Vertex Groups tab is clear. We can leave the shapekeys, if you decided to keep them!
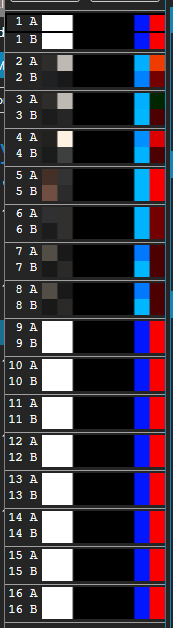
-
- If your parts still have the honeycomb icon, shown below, you haven’t removed the weights.
-
- This next part is tedious, unfortunately I haven’t found a quicker way to do this.
Select the mesh you’re stealing the weights from, hold Ctrl, and select one of the parts from your mashup, like so:
Move over to “Weight Paint” from the top left dropdown menu!
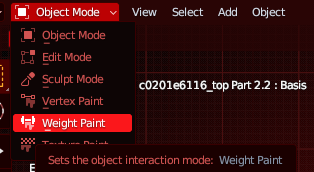
-
- The part you are weighting should be blue. If the mesh you’re stealing weights from is blue, you did it in the wrong order!
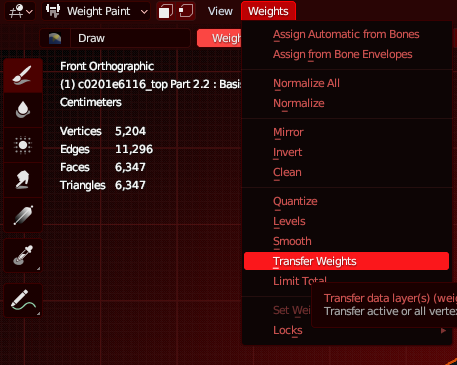
We’ll be using the weight transfer function!Go to the Weights tab on the left, and move down to Transfer Weights. Clicking this will bring up a little pop-up menu on the bottom left.
-
- Open this pop up menu! We’ll be changing the settings used!
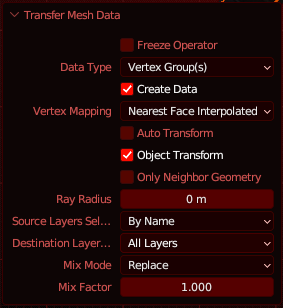
Make your settings look like this. These are the settings I personally use, and they’ve always worked!
-
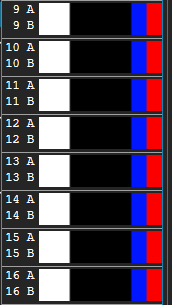
- After your settings look like this, you’re ready to weight transfer on each of your mashup’s parts. Again, it’s very tedious.
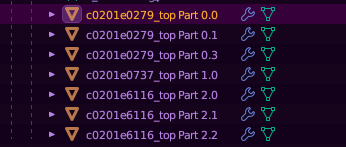
Your parts should all have the cute honeycomb icon back now!
Now, move your parts to the mesh you stole weights from using Shift + Alt, and re-set the n_roots. This ensures the weights you just transferred have the correct skeleton to use!
And with that, we’re done!
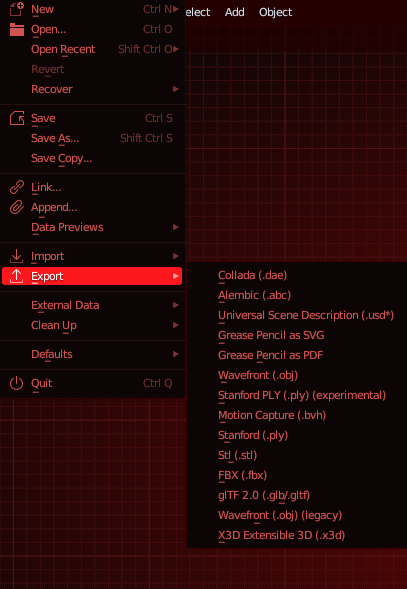
When you’re ready to export, go to the File tab, at the very top left corner. You will be exporting your mesh as FBX, or whatever file type you chose to export as.
-
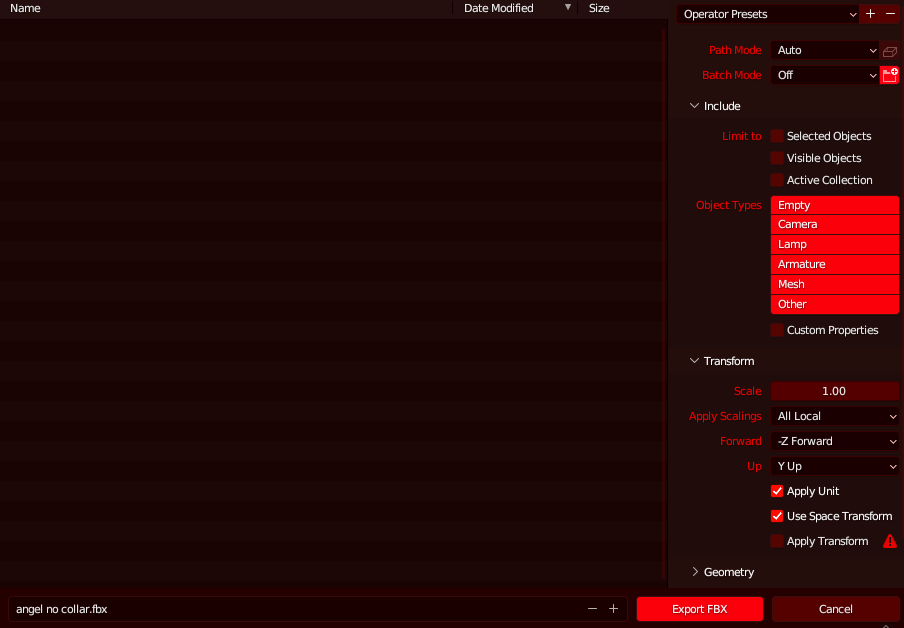
- Most of these settings, you can ignore. However, there is one setting that you should take note of. Close the include tab, and the transform tab, and open the geometry tab.
-
- “Apply Modifiers” and “Triangulate Faces” are the important settings to note here.
Apply Modifiers ensures that you can leave Mirror Modifiers, Shrinkwrap Modifiers, Armature Modifiers, etc. unapplied, and they’ll still work.
Triangulate Faces fixes your mesh if you choose to subdivide it.
Subdividing doubles the vertex count of the area you’ve selected, and makes it easier to work with. I haven’t done it in this guide, as it simply wasn’t needed this time around. If you subdivide your mesh in the future, however, you need to have this setting turned on, or TexTools will not take it.

-
- Once you’ve ensured that these settings are ticked, ensure that you’re saving your mesh somewhere you can easily locate, and hit “Export FBX”.
On the item you’re replacing, there’ll be 3 lines! Click that, and it’ll bring up this menu.
It doesn’t matter what you name materials, but I like to set my names to correlate with my part #s. Part 1 gets Material A, Part 2 gets Material B, etc.

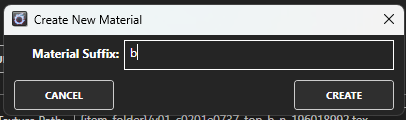
-
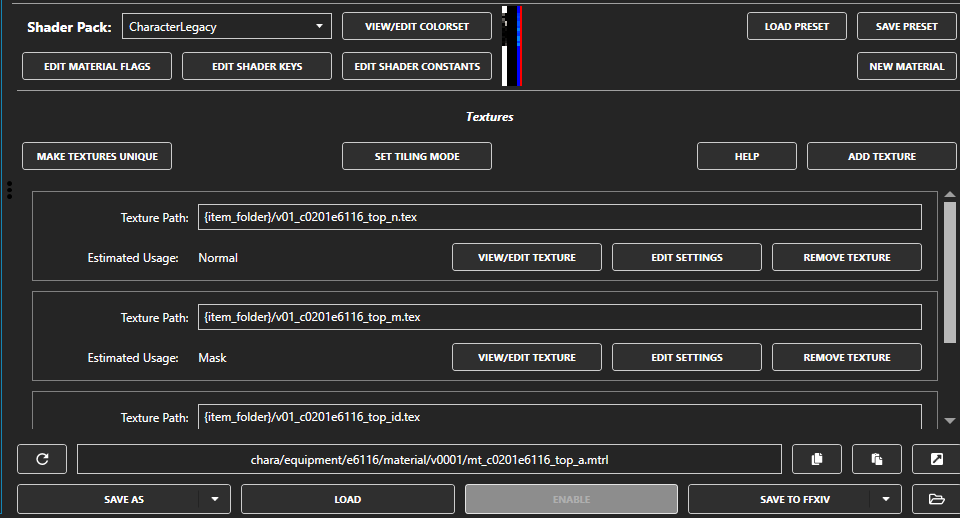
- Hitting “CREATE” will bring up a new menu, where you see these options! Here, you can load colorsets, add different textures, load presets, change shaders, etc.
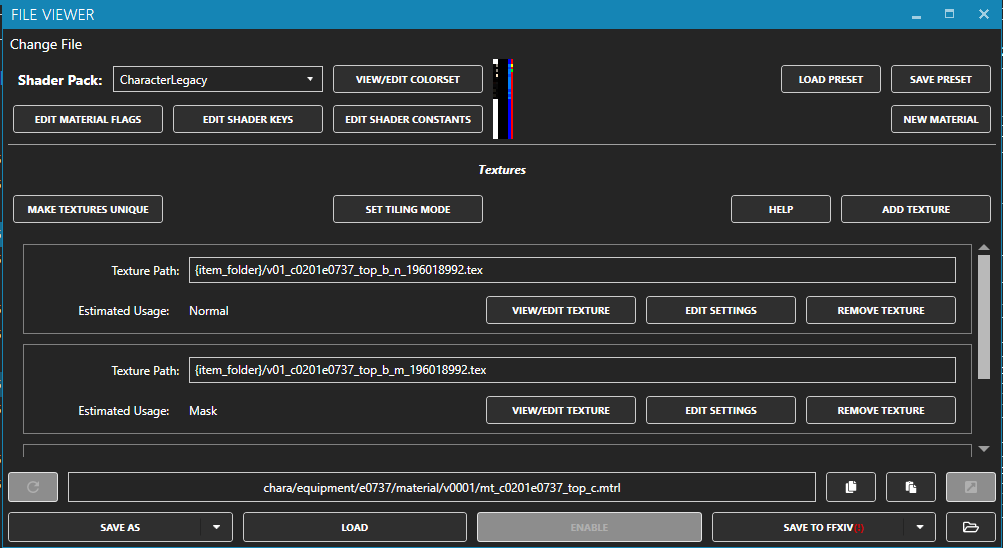
-
- For now, hit “Make Textures Unique”, and then hit “Save to FFXIV”.
From here, we’ll go to the Texture drop down menu again. Start with the Normal, and import the Normal you saved earlier. Remember to hit “Save to FFXIV”
Move to the Multi, load the Multi you saved, and hit “Save to FFXIV”
Finally, move to the Index, load the Index you saved, and hit “Save to FFXIV”
That’s it for textures!
We’re going to move back to our material that we just created!
When you’re at the Material tab, hit “View/Edit Colorset”
Load up the colorset you just saved, and once again, hit “Save to FFXIV”
Transparency is used for hairs, and for specific clothes. If your mashup uses any transparent parts, you need to have this on, or it’ll, at the least, look wrong, and at the most, won’t show up at all.
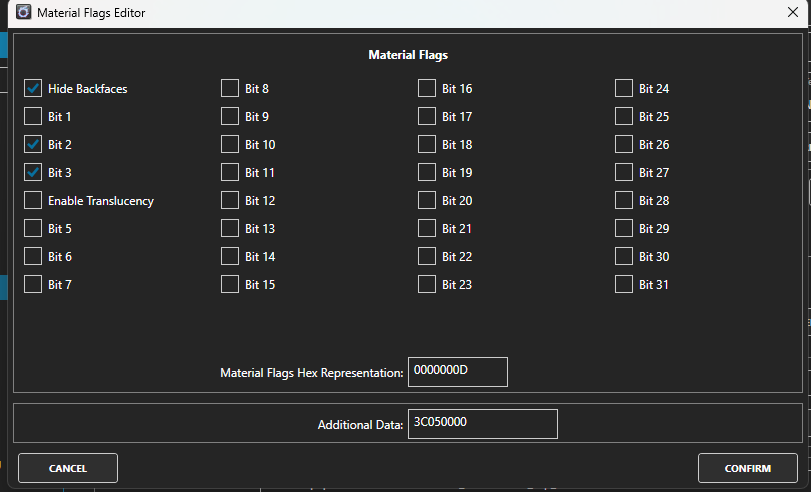
In the material tab, there’s an option for “Edit Material Flags”
You’re going to click on this, and it’ll bring up another menu.
As you can see, the “Enable Translucency” option is not ticked. For the mashup I’ve made in this guide, I don’t need translucency enabled. However, this is a good setting to note, as eventually, you’ll make a mashup with transparent bits, or you’ll make a mesh transparent yourself!

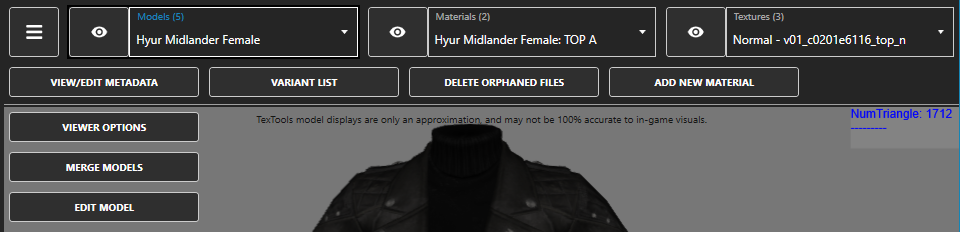
At last, we’re getting our mesh into TexTools. Move over to the models tab, and select the race / gender your mashup is for. Mine is on Midlander Female.
Your window should look like this, with an unmodded mesh. If the mesh is modded, hit disable. You may need to start over your TexTools, and that’s fine! Ensure you don’t have any other mods that you’re working on / cannot re-acquire before you do so.
-
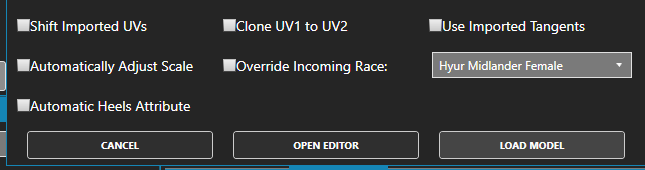
- To load our mesh, we’ll hit “Load”, and select the FBX we exported from Blender.
There’s a few settings to take note of here, specifically “Shift Imported UVs” and “Clone UV1 to UV2”
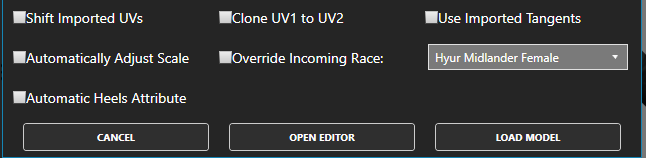
-
- For now, just tick “Clone UV1 to UV2” and hit “Open Editor”
You’ll likely see a warning that says “Group: 0 Part: 1 : : 4 Vertices had major corrections made to their weight data.” Typically, this can be ignored. It’s TexTools normalizing your weights, and unless it’s 200 vertices being adjusted, it’s just making sure that your mesh has proper weights.This can cause issues occasionally, but most of the time, it’s fine!
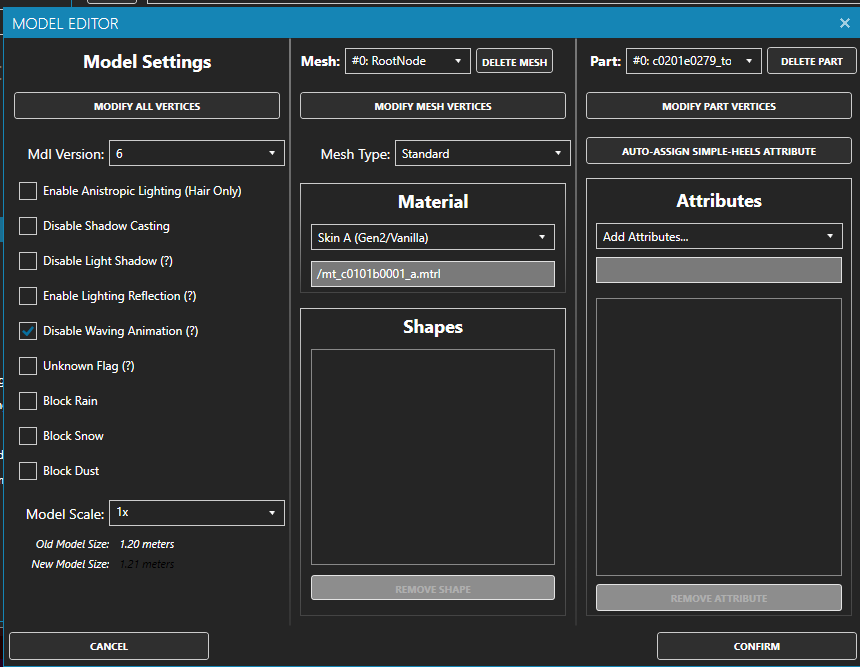
After you hit “Open Editor”, and waited for your mesh to load, you’ll get (yet another) window that pops up.
Here, we’ll be assigning our materials. Remember the order we set up, when we named our parts? You’ll have to remember that, and assign to those parts.
-
- Once you’re done assigning materials, we now will work on assigning attributes!
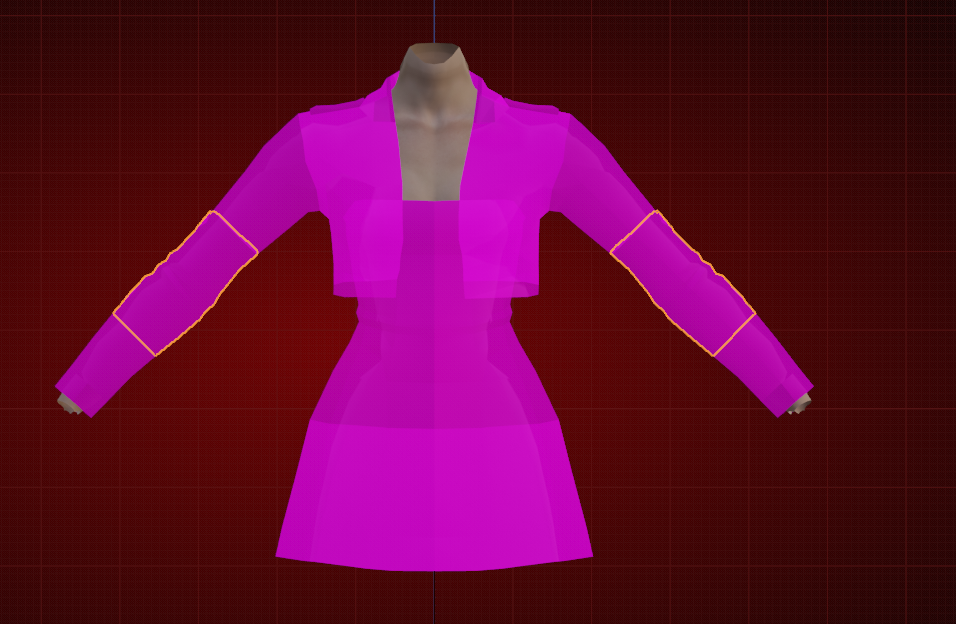
Attributes will dictate what is hidden when. The elbow attribute will hide anything under halfway up the upper arm. Think of how the Edenmorn Sleeve interacts with clothes.
Assign Elbow Attributes to anything that’s below halfway up the upper arm, but above the forearm.
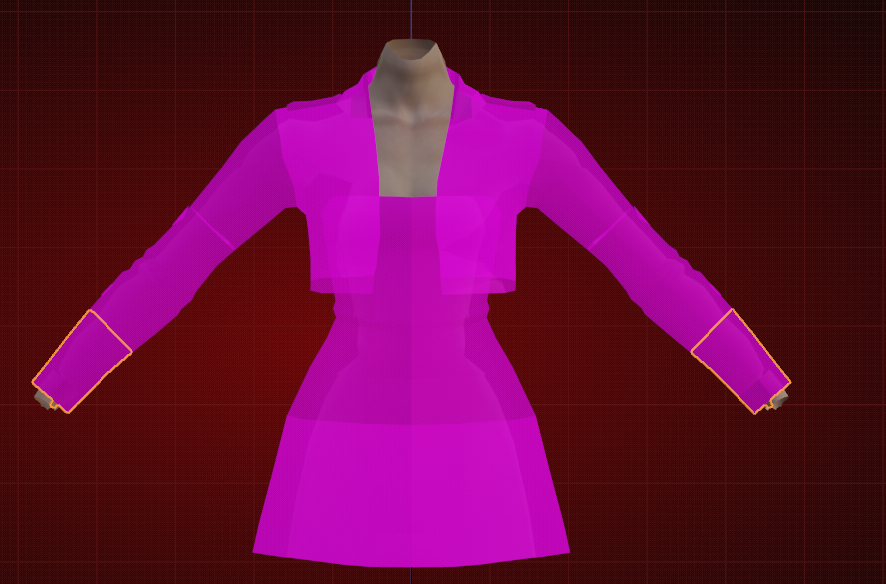
-
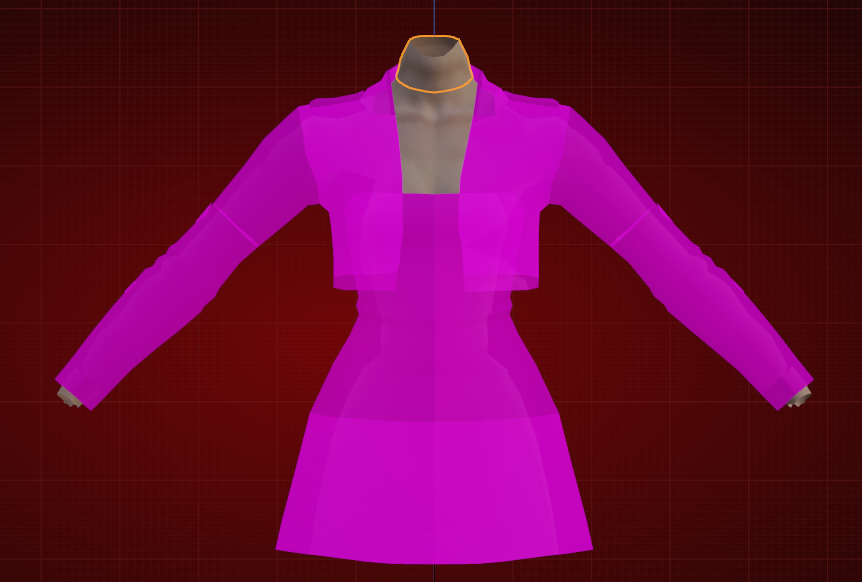
- Assign Neck Attributes to the neck connector.
-
- Once you’re done with assigning Attributes and Materials, click confirm. Your mesh should look cohesive and put together. If it looks warped, or wrong, you’ve assigned a material wrong. This is easily fixable by the new “Edit Model” option, in the upper left corner! Go into this option, and fix your material assignments.
-
- If your materials are assigned correctly, and your mesh still looks warped / wrong, that’s probably a case of “Dawntrail UVs are weird”. This is where that “Shift Imported UVs” option comes in.
Re-import your mesh with that option ticked, and see if that fixes it. If it does, but it only fixes one part, export that re-imported mesh, and import it back into Blender.
Delete the bits that were not fixed by “Shift Imported UVs”, and move the bit that WAS fixed over into the original mesh. Delete the original version of that bit, re-export from blender, and re-import into TexTools. This should, fix it!
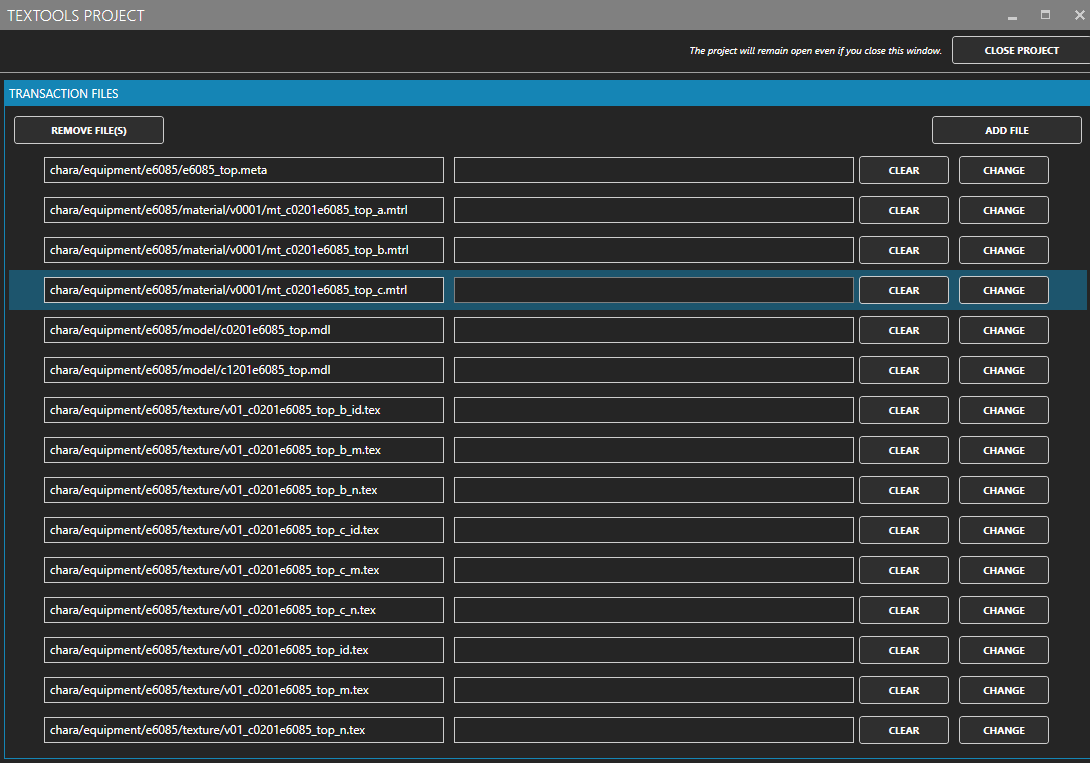
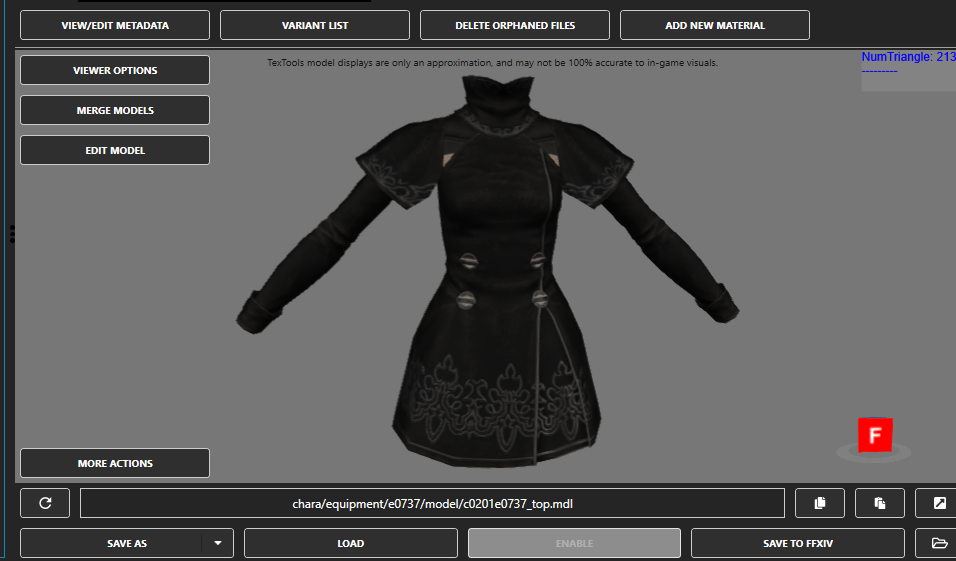
Metadata is the final step for your mashup to be complete. Open the 3 lines option, and go to “View / Edit Metadata”

-
- Going into Metadata, you’ll see this tab. There’s a few options to look at here, so we’ll work our way down.
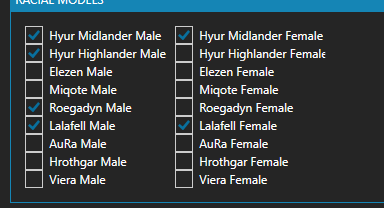
Firstly, racial models!
-
- Sometimes, meshes will have additional models for Miqote, Au Ra, Elezen, etc. You can disable these alternate meshes with very little issues!
These variants exist for skin-tight meshes, such as the swimsuits, or the Emperor’s set.
Next, “Extra Skeleton Settings”
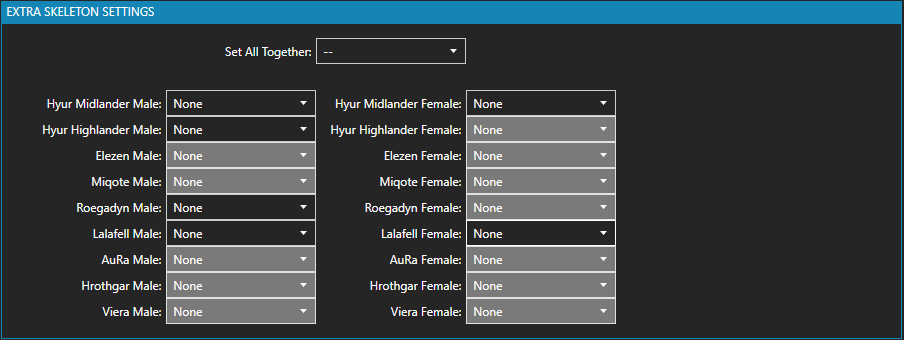
I’ve never used this option, so we’ll skip it! I figured I’d include it, as it’s worth covering.
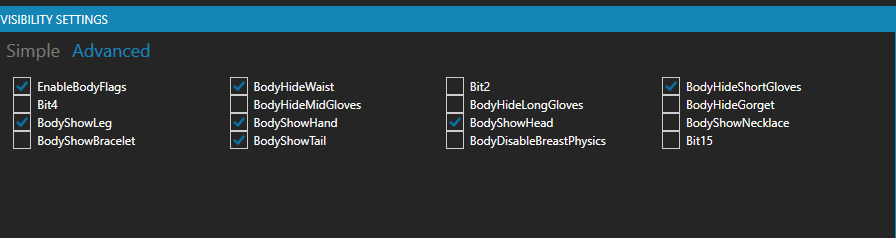
Visibility settings is one of the smallest things you can change that makes a big difference! The item you imported your mesh on may hide necklaces, bracelets, gloves, and tails, even if the mashup you’ve made would show those. Tick the options that would show realistically with your mashup. Keep in mind that lots of people attach extra accessories / clothing pieces onto bracelets, rings, and necklaces. If you want to turn on all accessories by default, feel free to!
-
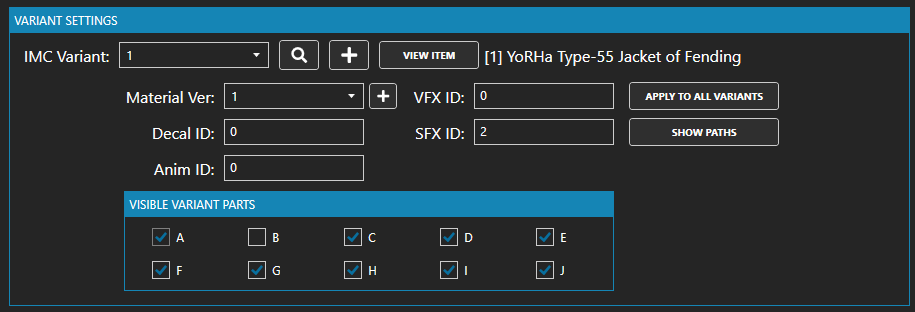
- Lastly, there’s “Variant Settings”
-
- Editing this will allow you to ensure that variants of the item your mashup has affected won’t break.
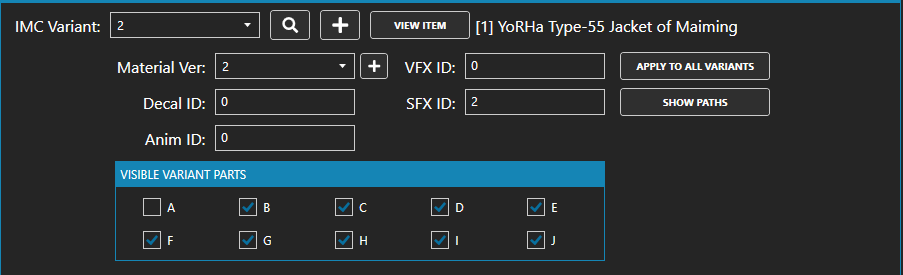
My mashup affects the Yorha Type-55 Jacket of Fending. The Yorha Type-55 Jacket of Maiming is a variant item of the Jacket of Fending, but it uses a different material version.
-
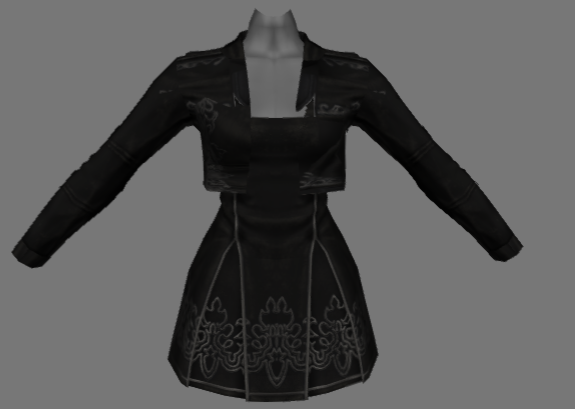
- As such, the Yorha Type-55 Jacket of Maiming is broken looking.
-
- This fixes the variant!
With that done, we’re all ready to modpack! In the top left corner, navigate back to “Mods”.
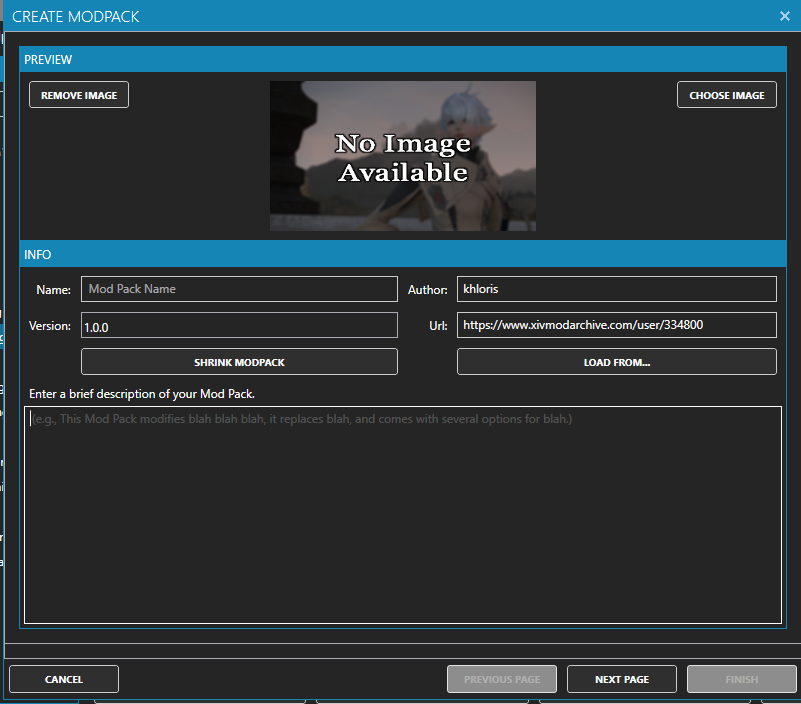
We’ll be making our modpack from the “Advanced” option, just to get you familiarized with variants.
Upon clicking the Advanced option, you’ll be greeted with this:
-
- Everything here is self-explanatory. Name your modpack, and include whatever you need to in the description! I’d recommend including what item your mod affects in the description for TexTools users!

-
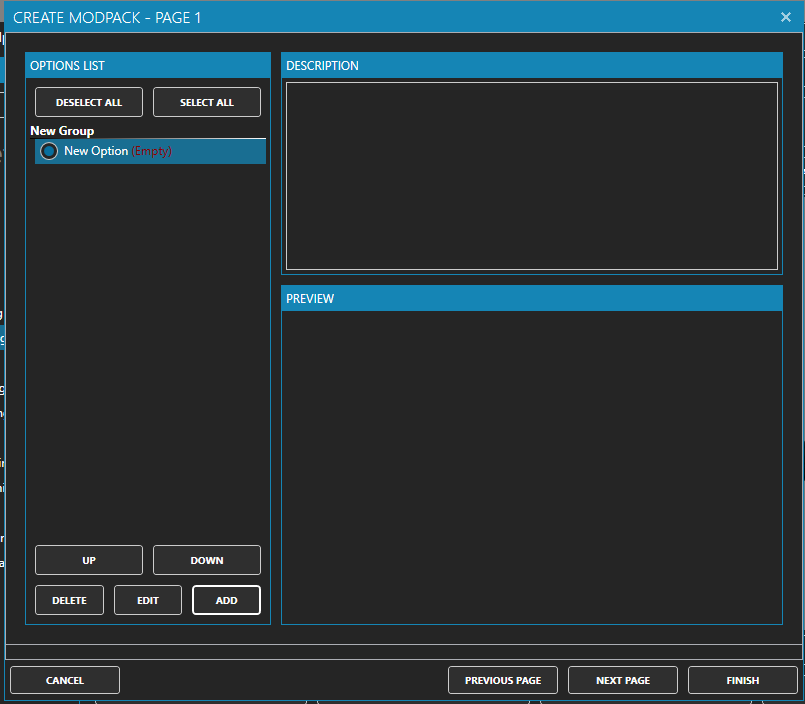
- Clicking on “Next Page” , you’ll be greeted with this. This is what your users will be greeted with, if they’re installing through TexTools.
At the bottom left, click “Add”, then “Standard group. You should have this.
-
- Select your group, and click Edit.
You’ll notice quite a few options, don’t get overwhelmed, move from the top down.
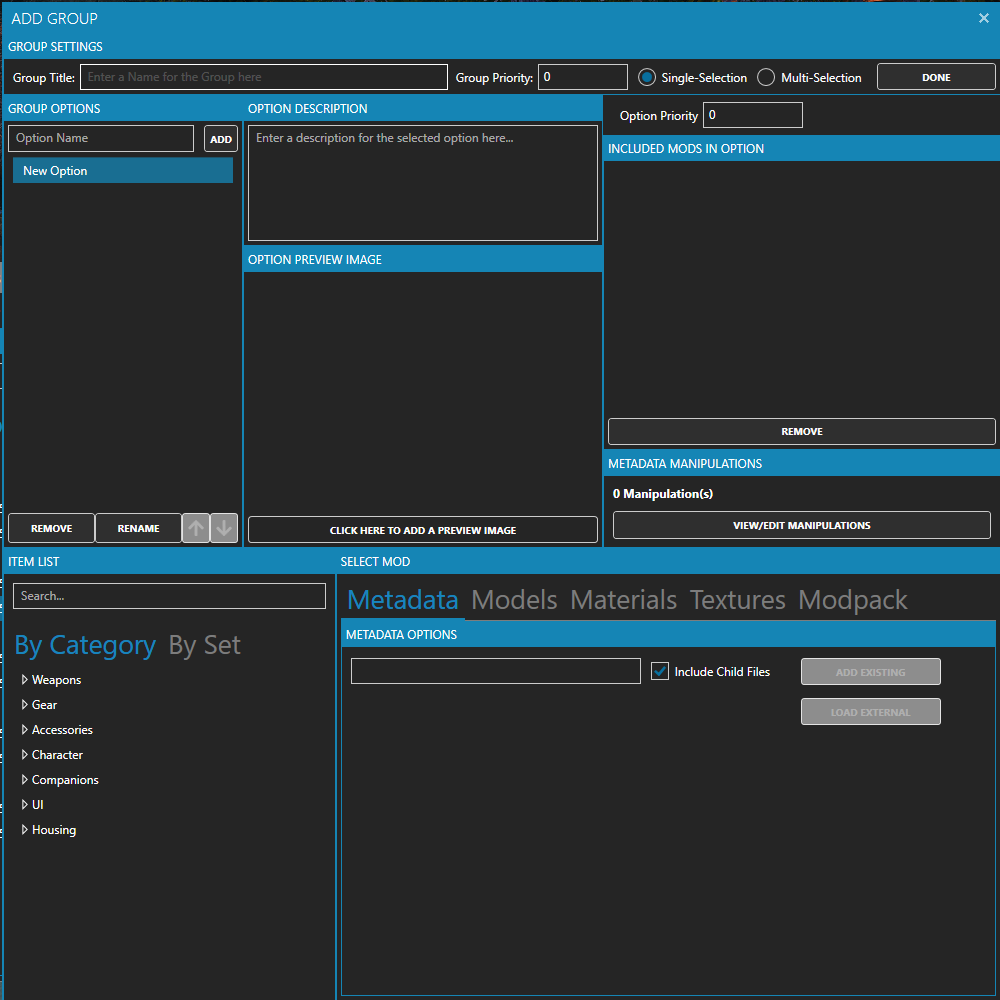
-
- At the top, there’s the name for the group, and the type of selection you can add for your users.
Multi-Selection is used for if you want to include multiple items, but make each of them toggleable.
Single-Selection is used for if you want to include options, but only have one of them toggleable. I’ll include this for different versions of my mashups, and I’ll be using this one today.
Rename your group option whatever you’d like, I’m naming it “-dress-” because it’s pretty c:
In order to rename your option that you’re given, double click it, or click the “Rename” option at the bottom of the bow.
To add new options, type in the name you’d like, and click “Add” on the right.
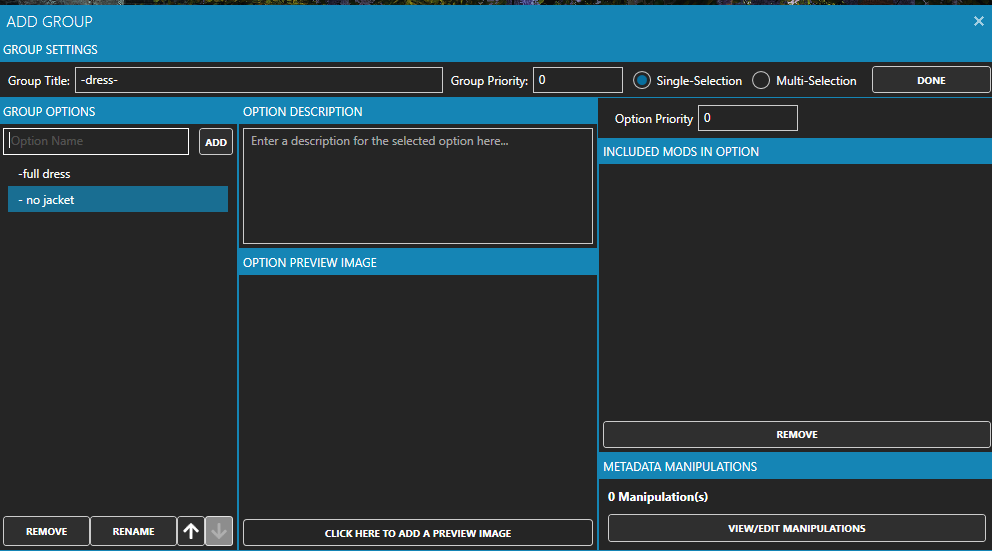
-
- Now, we get to add the contents!
Click your first option, and move to the bottom of the window.
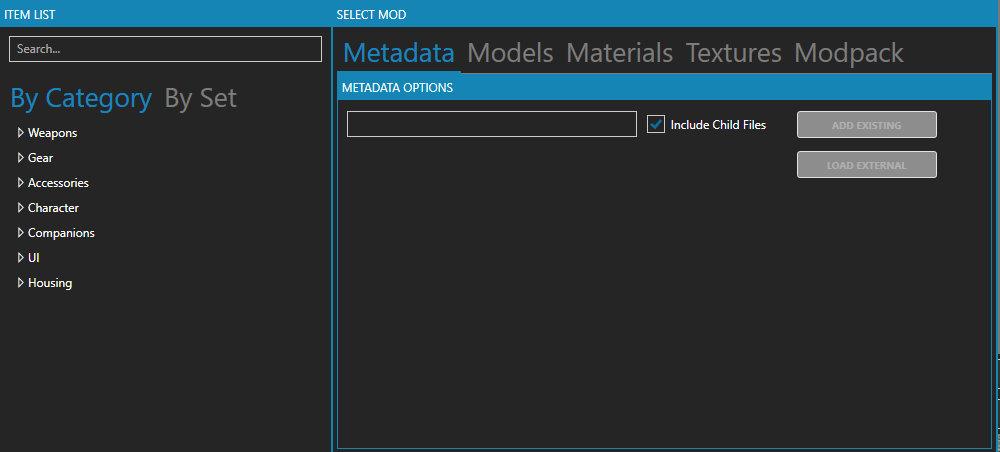
-
- Search for your item, click on it, and click “Add Existing”
This will add all the components of your mashup. The metadata, textures, materials, and model.
If you want to only add textures, or models, you’ll have to move to the Models / Materials / Textures / Modpack option. I won’t be covering that here.
The modpack option allows you to add colorset options, and it’s why you can export colorsets as modpacks.
For your option, if you choose to include options, do the same process.
My option is a model option, where the jacket isn’t included. As such, I’ll move to the models tab.
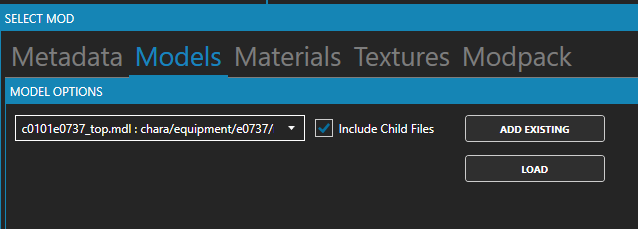
This tab allows you to import new models during modpacking, on any race.
Make sure you’re loading your model on the correct race / gender.
The Model Importer will tell you what race / gender you’re loading on!
-
- Make sure your attributes + material assignments are correct, and then load as usual!
When you’ve loaded your new model, it’ll give you this warning. Hit yes, and close the tab!
This is the last option for the modpack, so we can click “Done” at the top right corner, and click “Finish” to export our modpack!
-
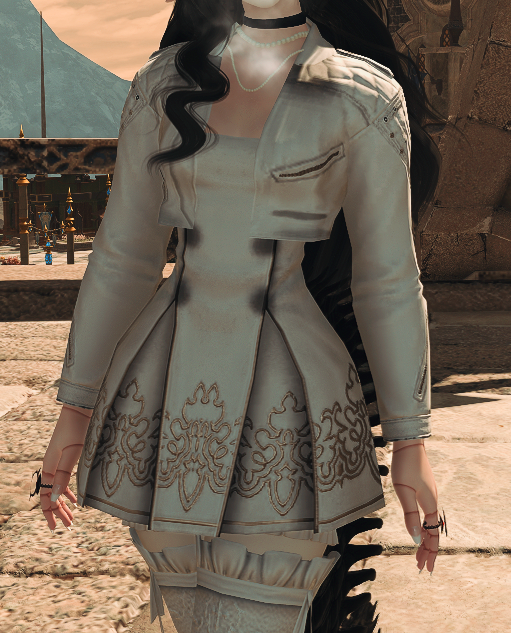
- And just like that, our mashup is done! If you see any issues with your textures, like the black spots that you can see on mine, I added a walkthrough on editing your textures below!
You’ll want to begin by exporting the PNG of the normal you want to replace. If you still have the normal from setting up your mashup, fantastic!
Open this PNG in your art program. For me, I upload the PNG(s) to Google Drive, and download it from Google Drive onto my iPad.
Do not send this PNG over discord. Discord has a funky compression, and it’ll change your image dimensions and the alphas in the image. Sometimes, it’ll just corrupt the normal as a whole. Email the png to yourself, use Google Drive, etc, just no
discord!Discord!
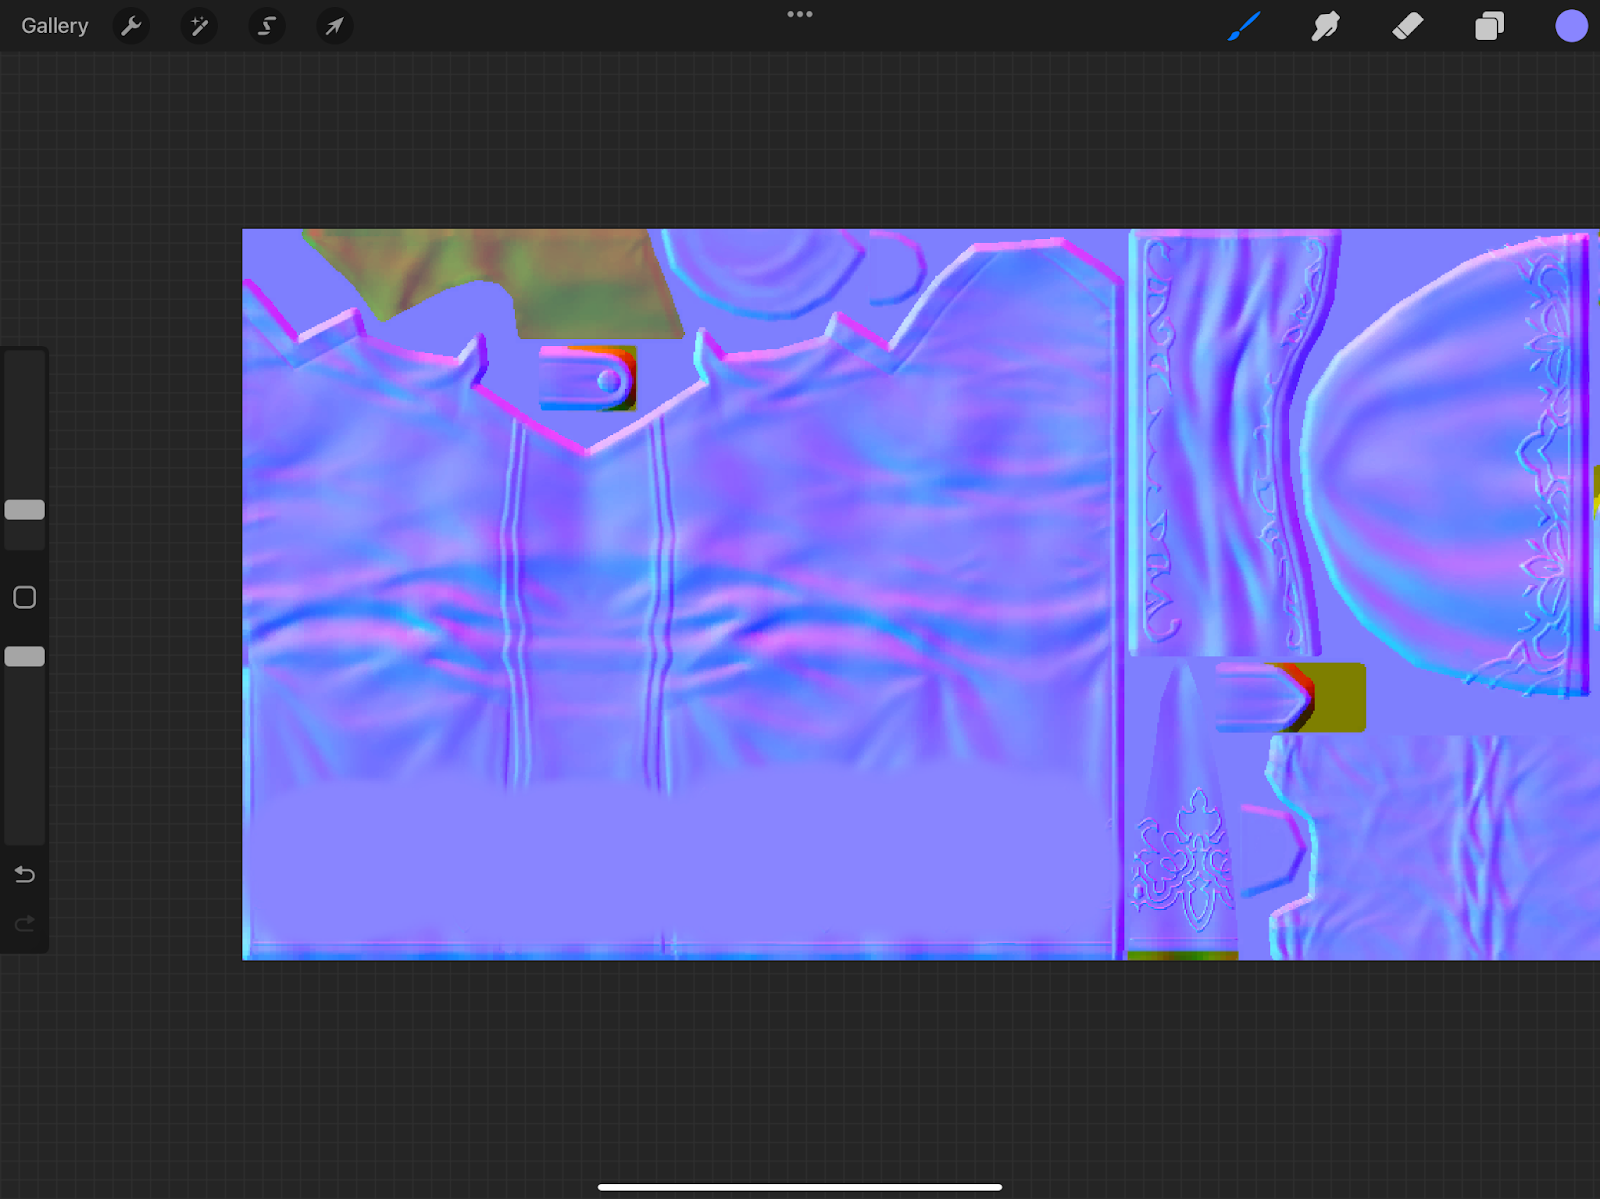
To remove details, color pick one of the purples around the detail you’d like to remove. Color over these details with an airbrush, like so:
-
- You’ll notice the texture difference, the lack of ruffles / seam. My recommendation for this is keep color picking + drawing over the details until you believe it matches well enough!
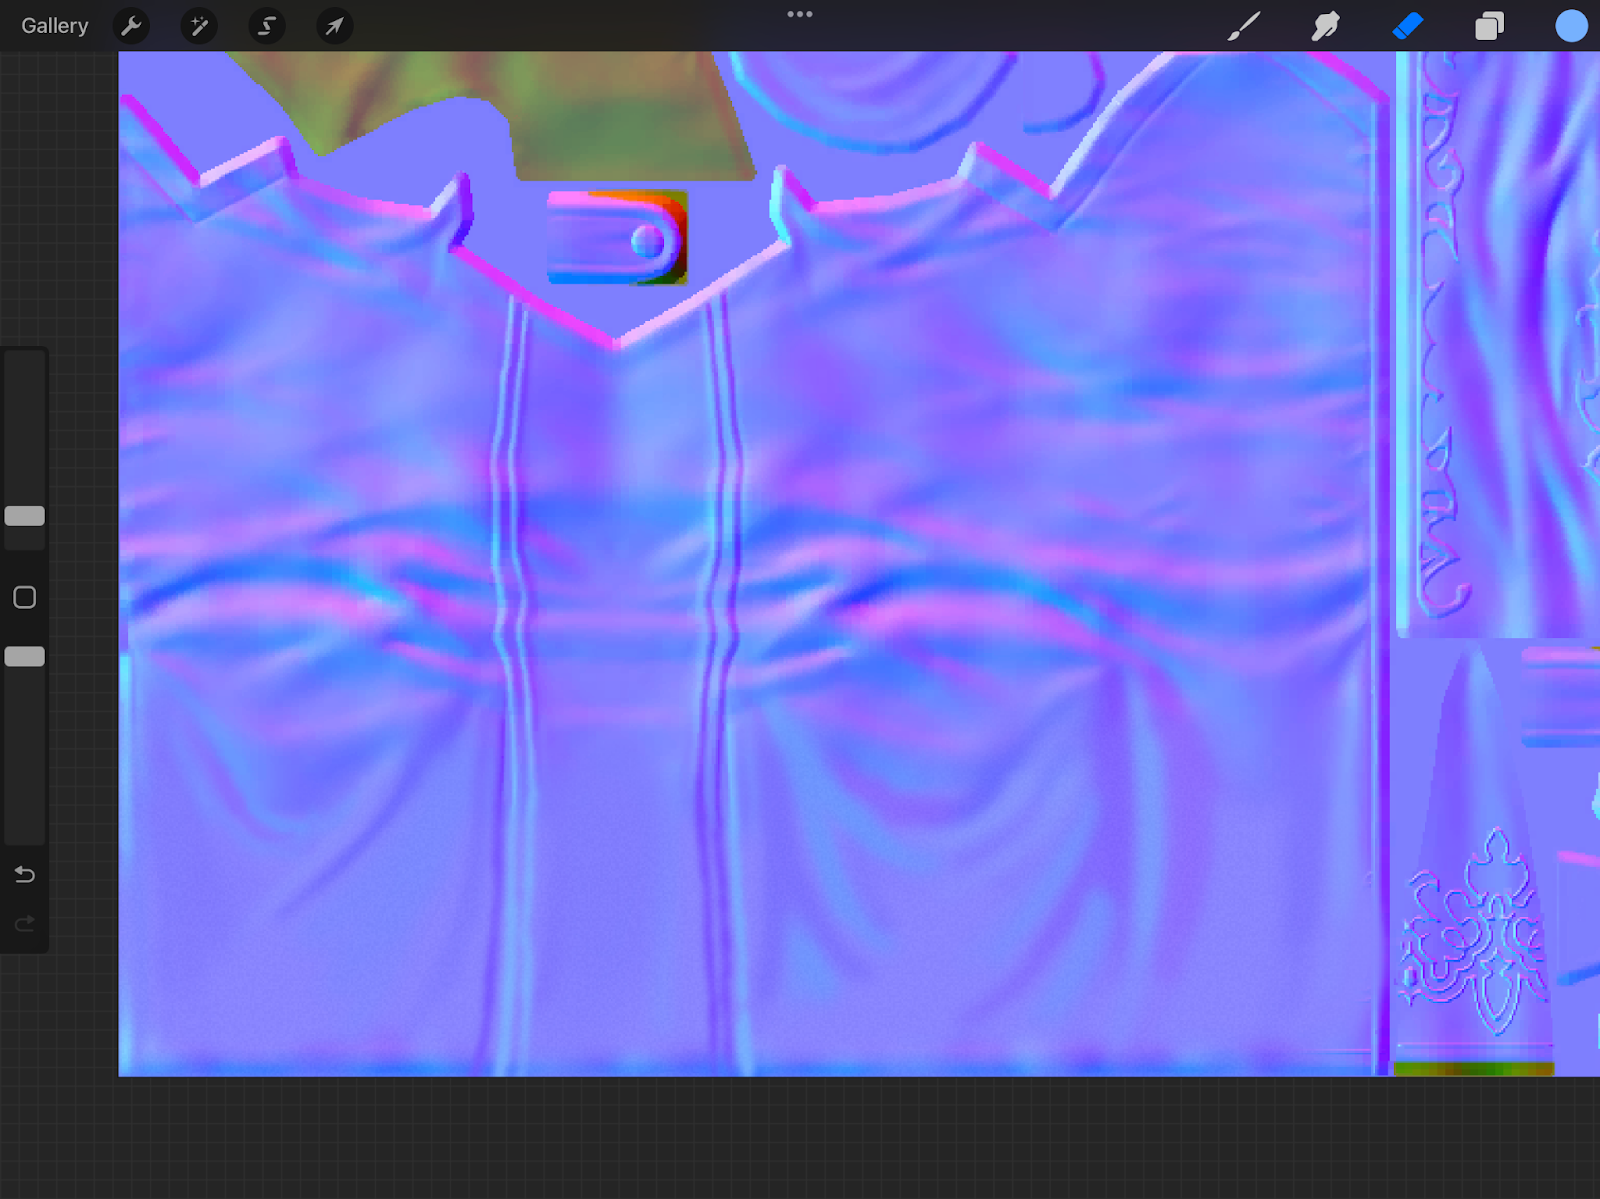
Add a noise filter, and increase / decrease the noise level until it matches. For me, 1-2% is normally more than enough!
As for making the normal transparent, that’s achieved by editing the blue channel! You turn it all the way off, or partially, it depends on how much you tone down the blue!
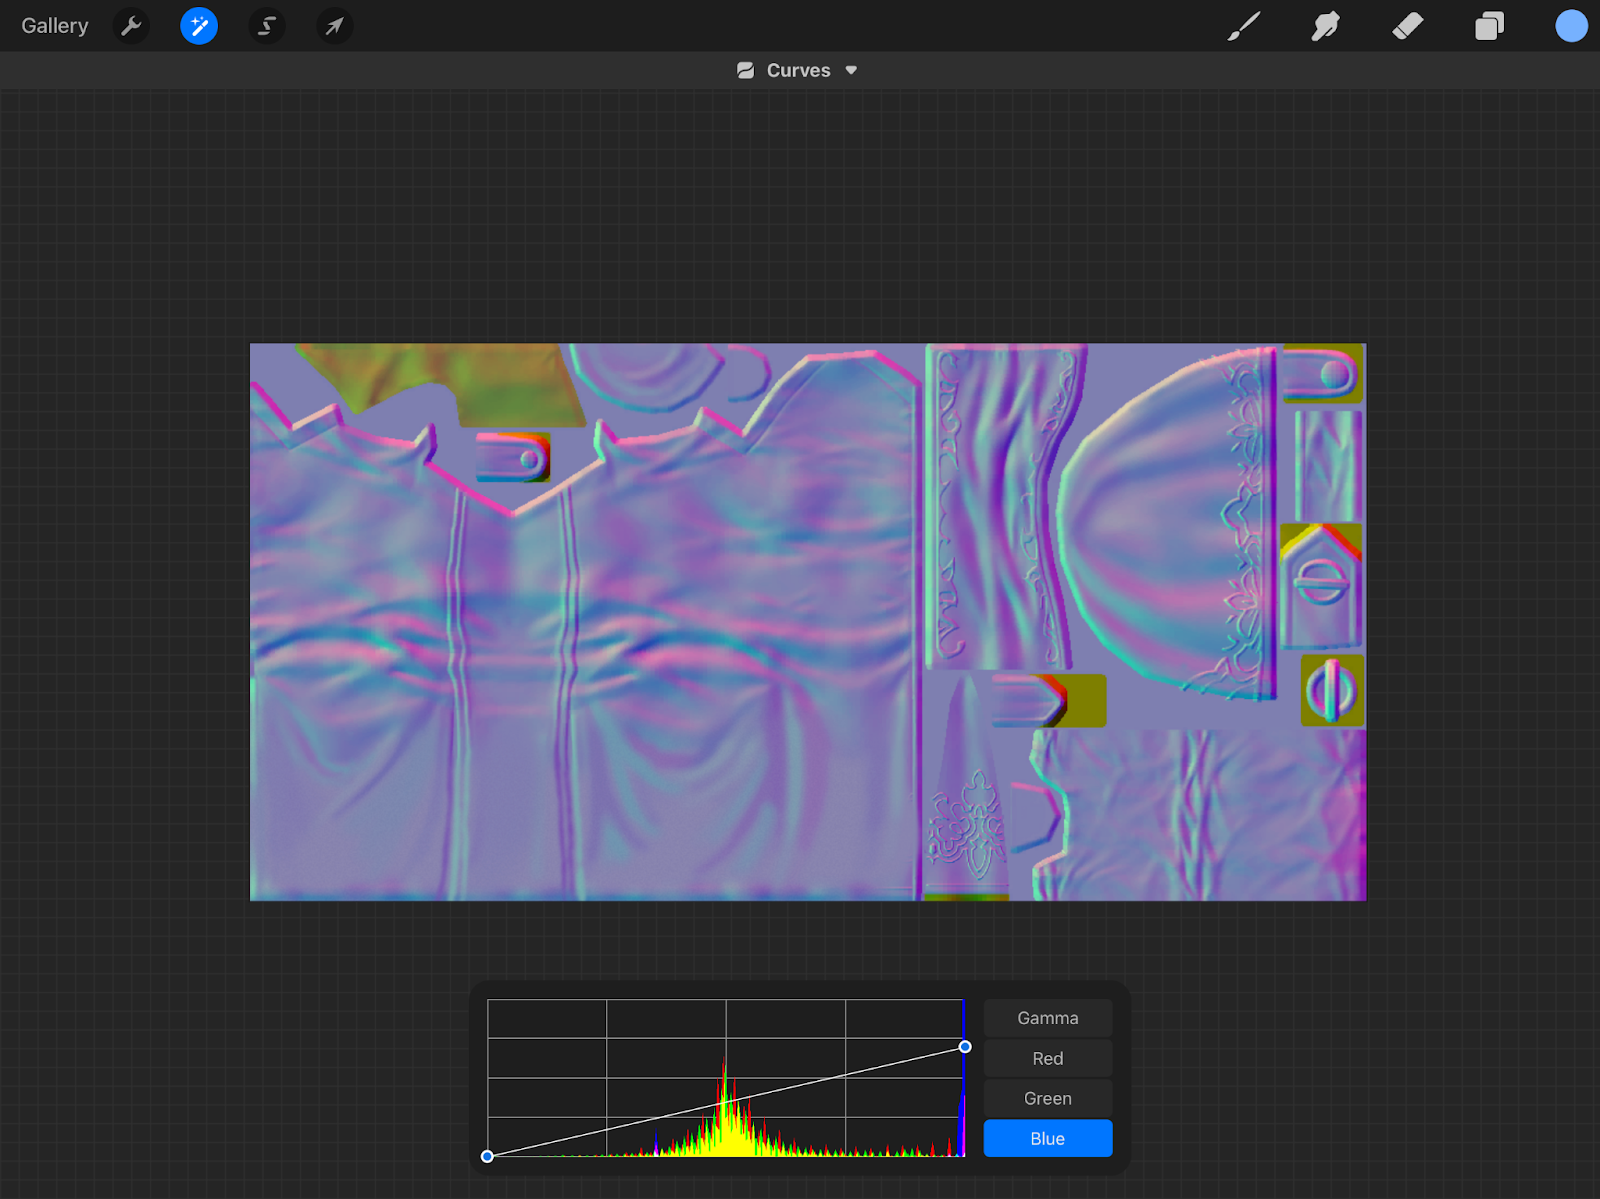
-
- In this picture, I’ve turned the blue channel about 25% of the way down. As a result, this mesh will only be ~75% visible.
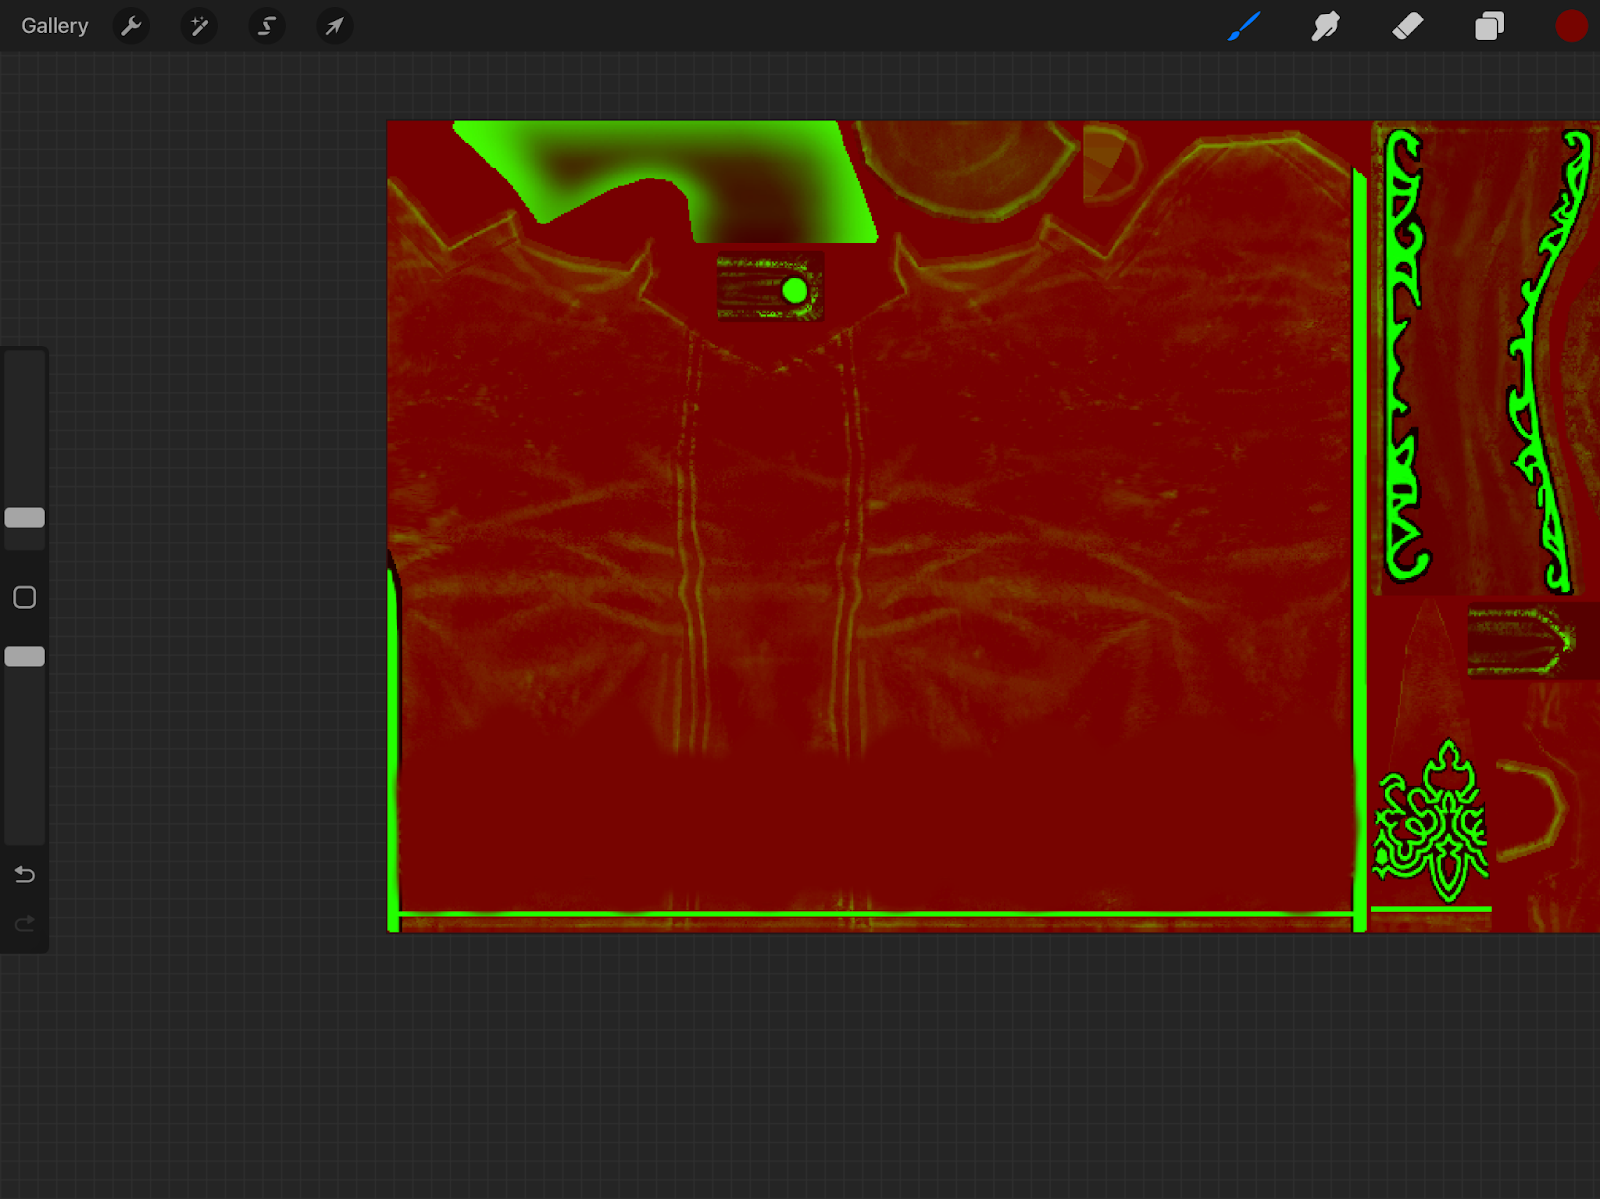
Once again, export your png to your PC, upload to Google Drive, and import into your art program. Color pick the light green color, and draw over the dark green spots. These dark green spots are where your ‘shadow’ would be.
You don’t have to be as exact with this. The multi is a very small picture (256x512), so most of the details / lines that you’ll leave will be blurred / lost in compression.
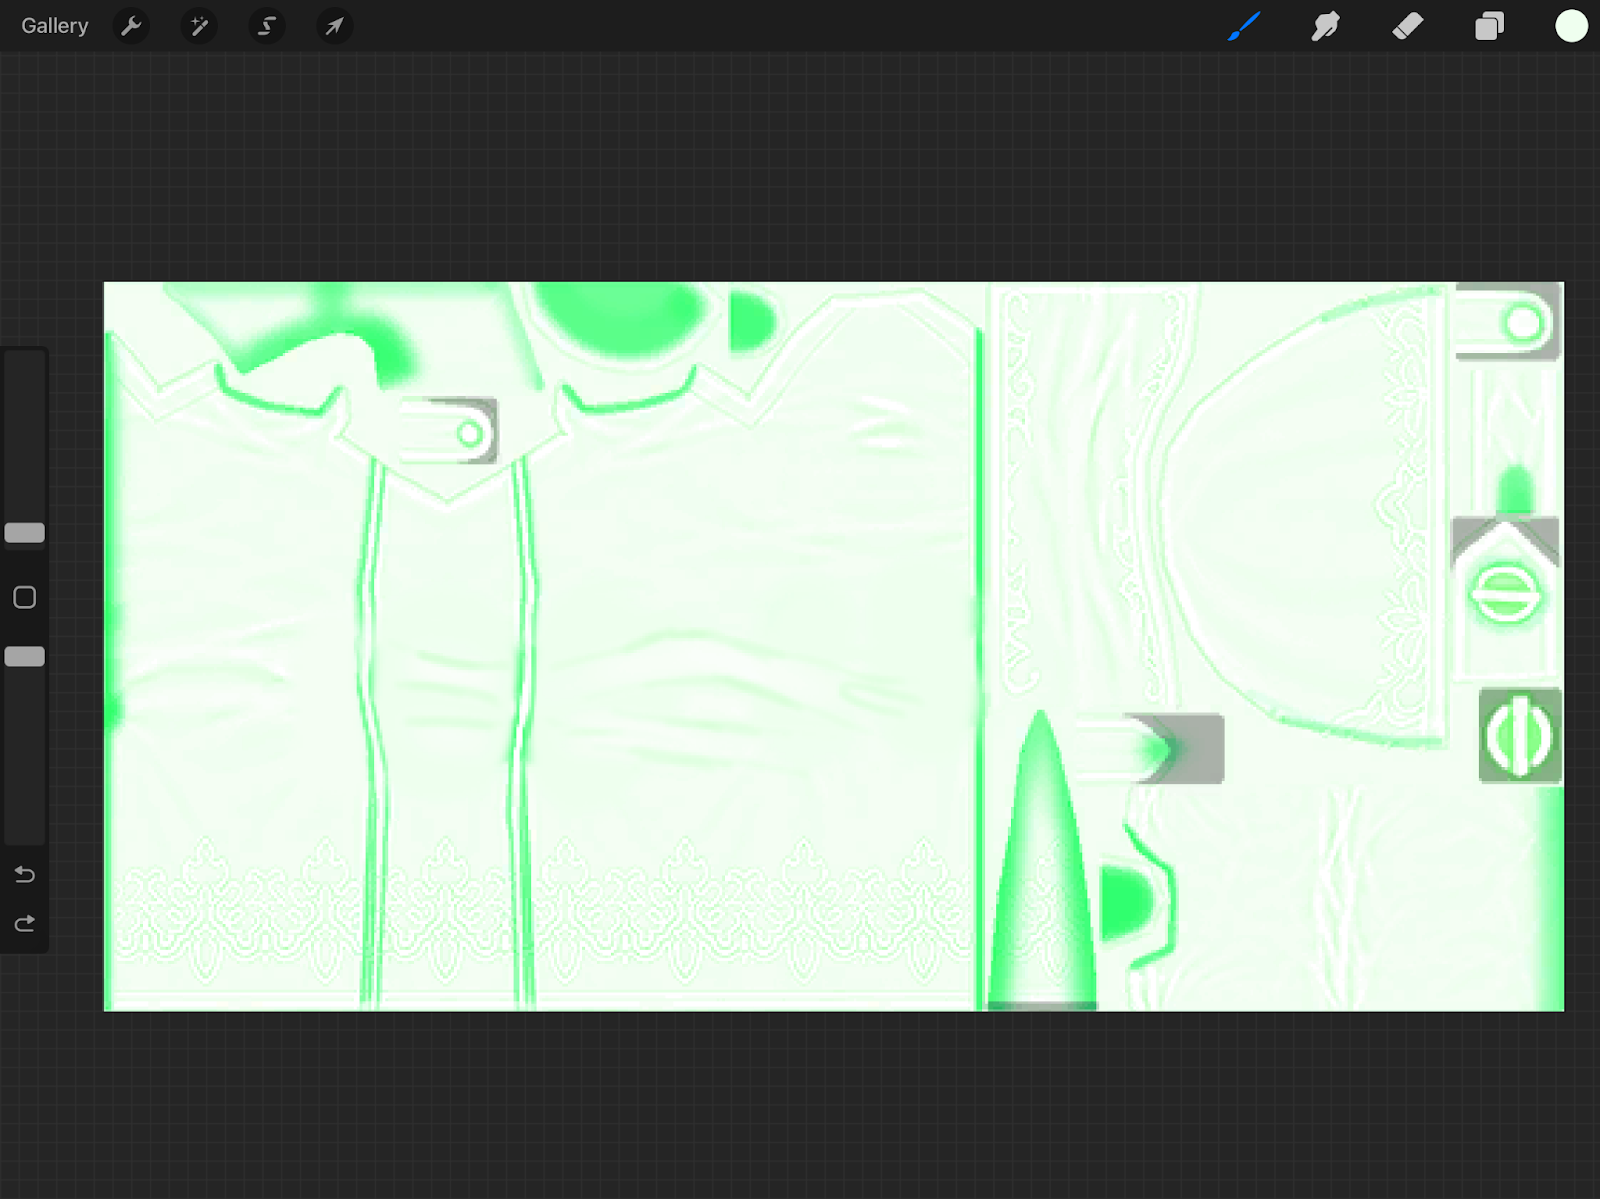
Attached picture for example. My lines are by no means perfect, but it gets the job done.
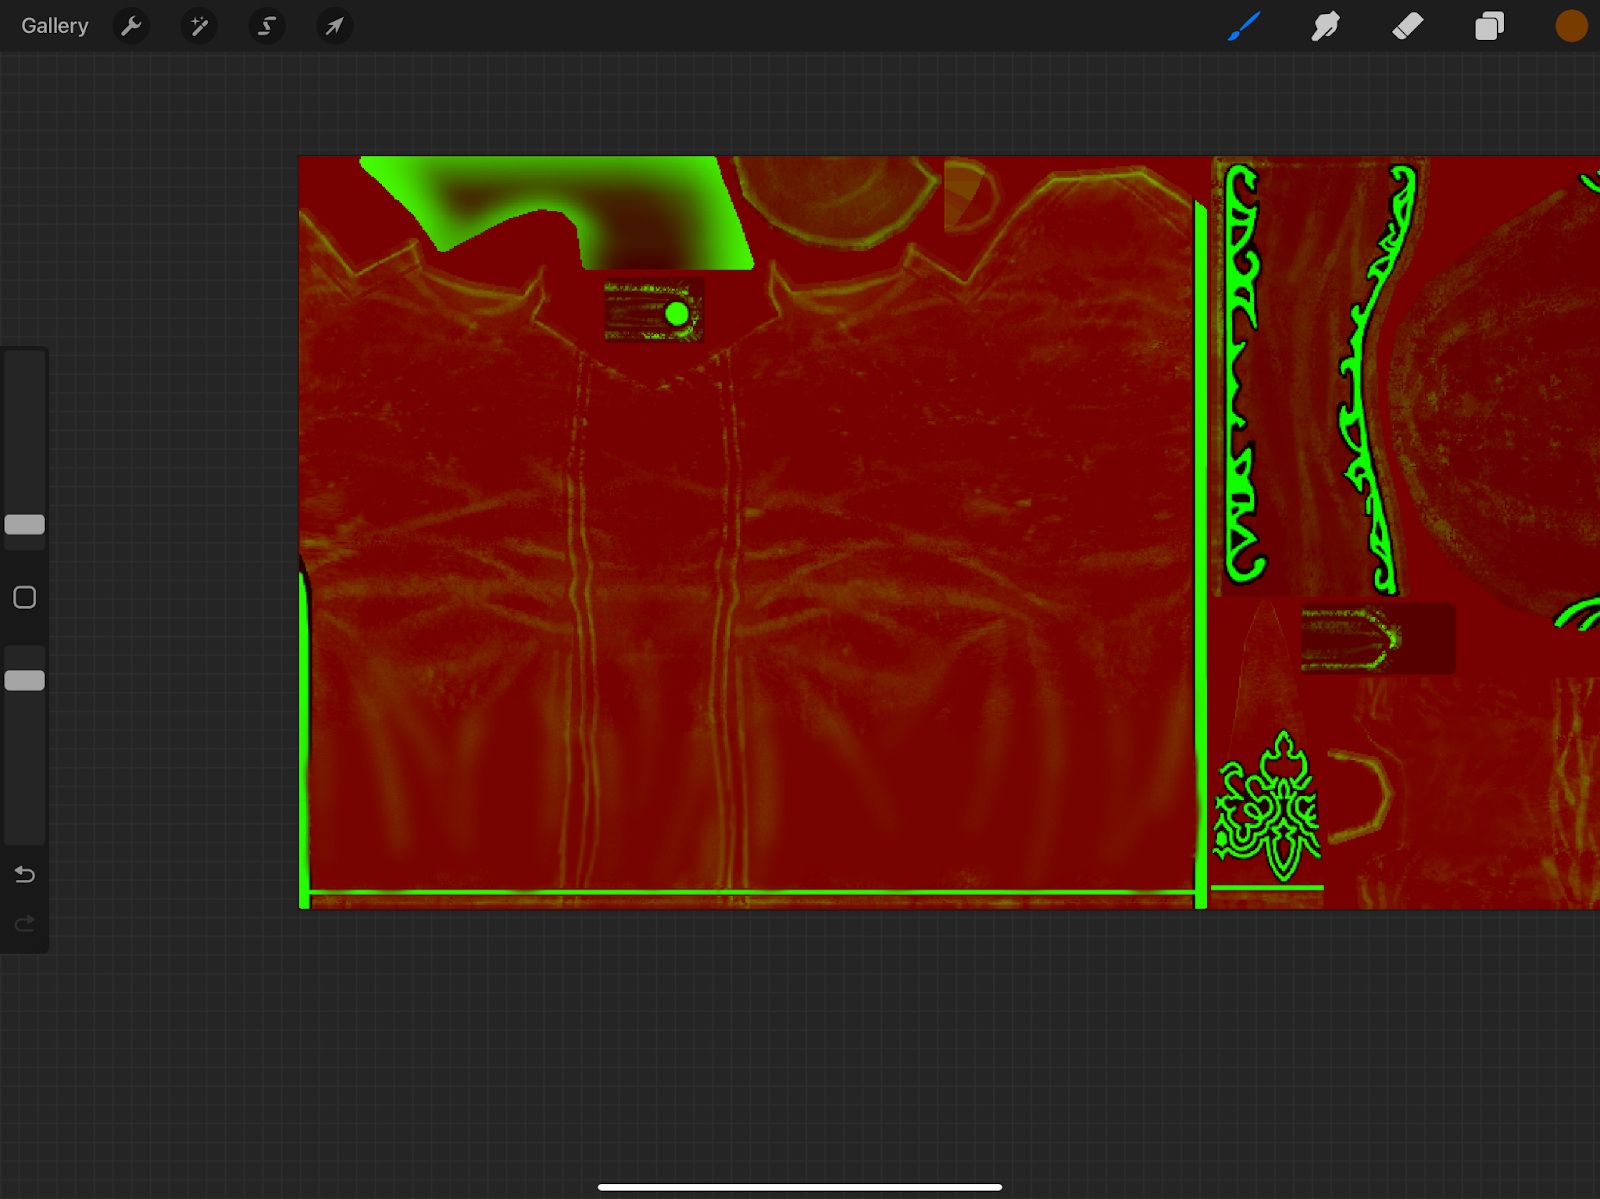
Editing your Index
-
- In this index, I’ll be getting rid of the same details that i did with the normals. Once again, I’m color picking from the colors around the details, and filling in with that color.
-
- Then, I’m going to go through and clean it up a bit, adding the seams + creases back most importantly.

Sometimes you can see these seams in Blender or TexTools, but most of the time they’re only visible ingame, like so:
I’ll fix these seams by various methods!
Setting the Mesh’s Normals from Faces
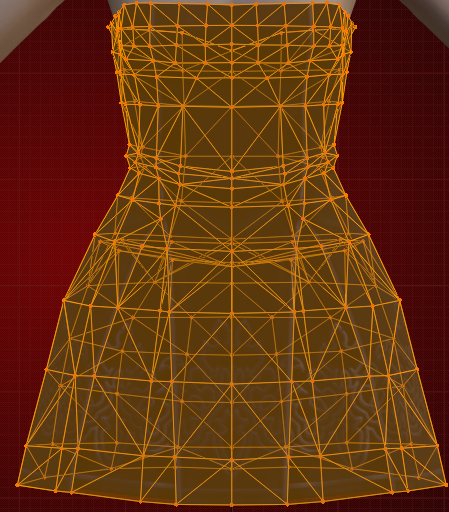
In blender, go into “Edit Mode”, and hit A to select your entire mesh.
-
- From there, look at the top left box, and find the one named “Mesh”. It’ll be to the right of the dropdown box where you go into edit mode!
-
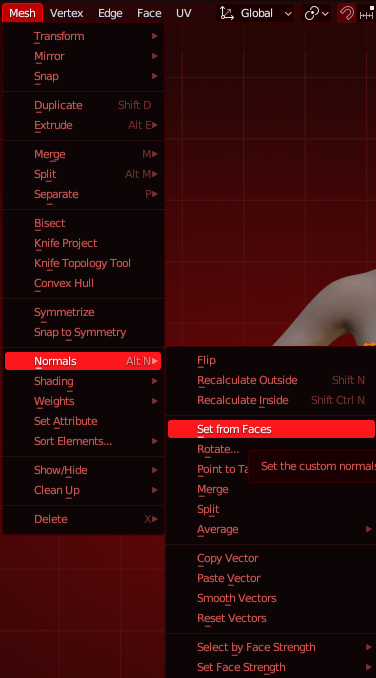
- Click “Mesh”, and go into “Normals”, from there, you’re looking for “Set from Faces”
Click this, and your mesh in blender may go funky looking, or it may just fix the seams! It’s always a bit of a gamble, but the result is the same.
Import this back into TexTools, and once you’re done, test it ingame! Your seams should be fixed!

Similar process to setting the normals from faces, but different buttons!
Once again, hit A to select your mesh.
-
- From there, look at the top left box, and find the one named “Mesh”. It’ll be to the right of the dropdown box where you go into edit mode!
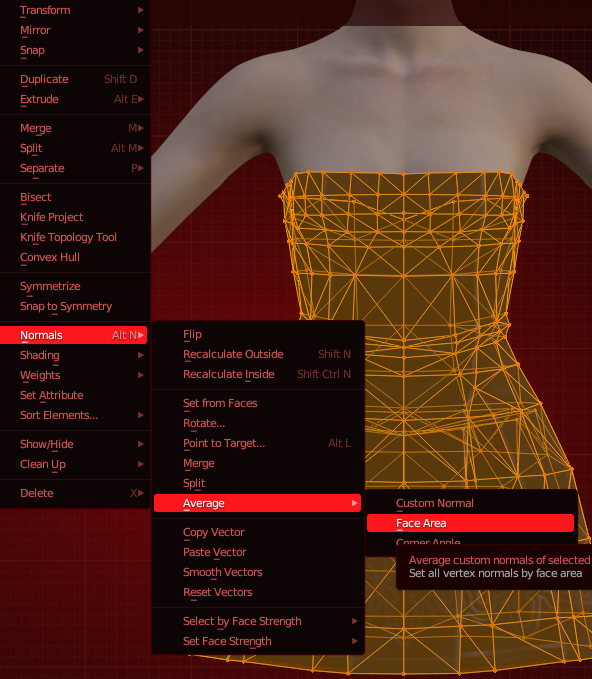
Click “Mesh”, and go into “Normals”, from there, you’re looking for “Average” and then “Face Area”
Click this, and it’ll be done! Export into TexTools, and test to see if this fixed your seam.
By far, this is the most complicated method, but also the one I find to be the most consistent.
Make sure you merged all your vertices by distance beforehand, otherwise this won’t work!!
Right click your mesh, and copy + paste it. Move the new duplicate mesh under the n_root, and name it x.1 (for me, this will be 1.1)
Click on Part 1.0, and select the entire mesh with A.
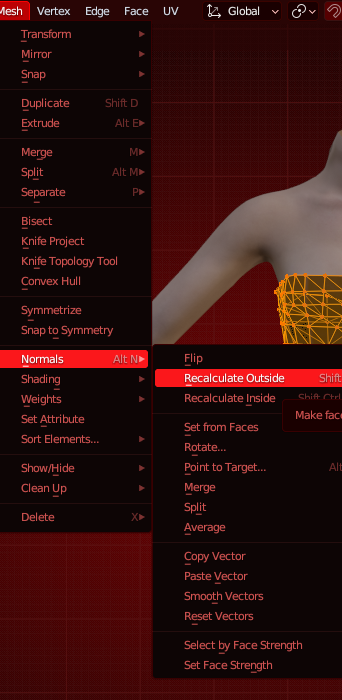
From there, click on “Mesh”, then “Normals”. You’ll have two options here, doesn’t really matter which. You can recalculate outside, or inside. Whichever one you do to 1.0, you have to do the opposite for the other.
If you Recalculate 1.0 outside, you have to recalculate 1.1 inside.
As usual, export to TexTools, and see if this fixed your seam.
Additional Links
I’m including links to guides & servers that may help with creating your own mashups / modpacks! If my guide doesn’t work for you, please give these guides a look!
Guides
XIV Mods:
https://www.xivmods.guide/
Ezo’s Mashup Guide: https://youtu.be/widThuFoVPw?si=YsNdVG86qVb3OM7y&ref=xivmods.guide
Ezo’s Adding Patterns Onto Gear: https://docs.google.com/document/d/1k2Rv8bio3dsAJG8OpzF1wUpyevKfM9lg31yF0FTazIA/edit?usp=sharing
Xochii’s Mashup Guide: https://docs.google.com/document/d/1MHqhtEm_9S7tafzi0Jl4I8-Tse1NpexL8jZI5P6JWZw/edit?ref=xivmods.guide
Atlasing Textures: https://docs.google.com/document/d/1I__FLHNnik3VgETopXRy7OAiFiTjZmjODvs7NZQZPZ8/edit?usp=drive_link
Rasp’s Hair Mashup Guide: https://docs.google.com/document/d/1c5_f2MIJ4d4exXzWEHskFOhOa-6zgsxMMWXX41lHpVs/edit?ref=xivmods.guide
Lialee’s Hair Mashup Guide:
https://youtu.be/NEzuB32B4sA?si=9WGsiQkDCF4B1MA-
Rasps Modding Tips & Solutions: https://docs.google.com/document/d/1qCAwMLU23G-kXLvDqLpMs8dwDL9E0Rt9Ej-9fN7V3zo/edit?usp=sharing
Rasps’s Hat Compatibility Guide: https://docs.google.com/document/d/14ilv6pUa8afrw3CxcFyrwyiOilJ1FP_GMKv6q891Uzc/edit?usp=sharing
Long Glove Compatibility: https://docs.google.com/document/d/1bKNHm1fcRR68IFZHD-SV6Ued2qShyDhSd90irin2ghk/edit
TexTools Metadata Guide: https://docs.google.com/document/d/1M04dbdV1qUt0EzRalvwbB1oI3aPT6t8KEf9KgQfGn6E/edit
Sparrow’s Advanced Modpack Guide: https://docs.google.com/presentation/d/1MEYV2ez6vvND3GWrXGNY6etcj5tUBuetwbRvuW3q4e4/edit?usp=sharing
Servers
Vanilla Creatives (dedicated to Vanilla Mashups, has a guide channel, FAQ channel, 2 mod help channels, and is very active!):
https://discord.gg/TB8h6nFbxr
XIVMods & Resources (consists of a website and Discord server, has a catalogue of guides, plus help channels!):
Modding 101 (a server fully dedicated to learning and teaching about mods! Several help channels, guides (videos and written), etc!):
https://discord.com/invite/Mx8TnSCzRz
FFXIV TexTools (catalog of resources, channel for helpful tools, and several dedicated channels to various parts of modding):
https://discord.gg/ffxivtextools
Elsewhere (guides, resources, links, mod help channels, and a tips channel where odd tips and tricks are dropped!):
https://discord.gg/4cqpCRT7HP
WCIF (has a threads channel dedicated to fixing bugs / helping with modding errors, also has a guides channel, plus compilations of various mod types (F3 au ra sculpts, wedding dresses, etc!):
https://discord.gg/3EhAa79btN
The Catalogue (similarily to WCIF, has a channel dedicated to fixing bugs / helping with modding errors, also has a guides channel!):
https://discord.gg/thecatalogue
HexMods (has an active mod help channel!):
https://t.co/6Vfz7QTUoP
Lunar Tear (has another active mod help channel, and a questions channel, both of which are active!):
https://discord.gg/lunartear
B+ Mods (has a guides and questions/help channel, both of which are actively updated!):
https://discord.gg/kEq8KDJYF3
Rue+ (has several help channels dedicated to upscaling, general mod issues, and guides!)
Yet Another Body (has a mod help + resources channel!):