
(Dawntrail) Shader Reference Table
This page is a list of tables with explinations/annotations of how the New shaders in dawntrail work. Most of this page has been adapted from the Textools Reference Document by Sel. Extra information is added based on research and conversations in modding creation discords, mainly the TextoolsTextools, Penumbra, and Bibo+ Discords.
This page is partially incomplete as we still do not fully understand every shader. Shaders with entirely blank boxes are those that we know exist, but do not understand how they work. Any important notes or observations about these shaders will be notated below their shader tables in Red.
The following explains how each color/data channel is used in each shader.
Channels are listed by their Default Behavior whenever variable.
Channels listed in Purple are variable and affected by shader keys. These will be listed Below each main table for the shader, before any notes or annotations.
SubSurface Scattering (SSS) and Fur Settings are controlled by the same channels/fields when applicable
Please note that all textures making use of an alpha channel for non-transparency should be saved as either .DDS or .TGA when bringing it in/out of an art program. PNG frequently gets mishandled by programs and ends up "eating" the alpha channel or forcing it as transparency, which destroys the data used.
FFXIV uses the OpenGL format for Normal map direction (Y+ up if you are using a software with diffuse to normal generation capabilities)
For easier editing using this document as a reference in penumbra, Please grab and use Nylfae's Penumbra material development kit. this only works for penumbra, but the data in this document is tool-agnostic and will work regardless of tool used. this kit renames constants and data in penumbra to make them more Human readable, though for clarity, all data names will use both the textools and penumbra kit variants. https://heliosphere.app/mod/bktfny69y57gf4y42bp4tn5z38
As of dawntrail, FF14's shader useage is similar to Unreal Engine 4, but slightly modified and different. It is closest to UE4's ORM and ORS formats, for those familiar with UE4 (Thank you to Bacara)
This is the standard shader used for most things you would mod (gear, minions, mounts, weapons) that are not options tied to the CHaracter creator. This shader will probbaly be the one you look at most often. There are a few other things that this shader can do based on keys, and I will explain them below.
This shader can make use of a field named "Effect ID". There appear to be 5 total shader effects, and number 3 Is what's used for a holographic/iridescent effect seen on some new gear. In order to utilize these effects, you must also set a value for "Effect Opacity". 0 means there will be no effect, 1 is full effect, and over 1 appears to be multiplicative. This effect is only possible on gear with the new Character shader, and not Character Legacy (the endwalker compatability version of this shader).
Number 1 seems to apply a "clear vinyl overlayer" effect
* It is believed from further investigation that the mask map Red channel is actually closer to metallic useage than specular power, however due to the fact that metallicity is also controlled via the colorset values, This chart will continue to mark it as specular power, as it is also what the community has found to work fairly ok. (thank you to Bacara for this information)
This is the Character Legacy shader. It is a port of the old endwalker shader for compatability with old assets that have not been updated by Square Enix. It is Not reccommended to continue creating anything for this shader, as it is not able to do all the things that the new Character shader can. Most Assets will still be using this shader unless updated by Square Enix or a modder. This shader is to our knowledge, not capable of handling some of the extra shader effects that the new Character shader can.
This is the Shader used for Body skin, Faces, and Hrothgar Skin with Fur.
- As a note, When both Skin influence and Hair influence are set, Skin influence wins out.
When working with this shader for body mods, Keep in mind that as of writing this, Body mods on the Female base (bibo, tf gen 3, etc) use skin type Body/standard skin. However, Male body mods (TBSE) Use the Hrothgar shader key for skin to allow for body hair that changes with head hair color. As such, authoring of maps for these two may differ slightly.
You can create a faux metallic effect on skin by confusing the Subsurface shader (though be careful). To do this, set the blue channel of the mask to a value close to 255. This creates an effect that is both metallic and subsurface at the same time. This method should only be done by Power users who know what they are doing. All other users should instead use the shader ID 10 method listed below for metal on skin.
WhileNew research has shown that skin has an opacity mask, This can not be used to create a semitransparent bodyopacity, part, as the opacity has a "clamp" on it's values, effectively turningbut it fromrequires aspecific scaledshader valuekey intoassignments and constants. Without these keys and constants, skin is a yes/no.no Moreon researchopacity. isWhen neededI tohave seelocated ifthese thisconstants canand keys, they will be changed.listed here.
As emissive is a shader key on the same level as hrothgar (body hair on skin) you cannot use both emissive and dyeable body hair on skin at the same time using vanilla shaders. this is non-negotiable.
- When Shader ID is set to 10 (default value is 1) this activates "proper" metal on skin, and changes the Mask blue from Subsurface/Fur parallax to Metalness. When authoring with this shader ID for metalness, all skin/non metal must be PURE BLACK in the blue channel (causing it to look yellow in RGB mode). The closer the value is to white, the more metalness it has. The Green roughness channel must also be given special consideration. values closer to black cause the metal to be more shiny/polished looking, but due to how 14 has implemented this, it will also pick up more color from the skybox/environment lighting, to the point where it will change the color of the metal entirely if the roughness value is too low. To avoid skybox discoloration but keep the metal looking shiny, it is reccommended to keep the value closer to a midtone grey. The skybox tinting effect with low roughness is more pronounced and visible on any metallic bits facing up towards the sky, so anything on the chest, or if the arms are bent at a 90 degree angle (such as folded at the chest).
This is the hair Shader. Many things have changed and unlike character, there is no legacy version of this shader. All old hair mods must be converted to use the channels described in this section. Hair is also used for Miqo'te tails.
At this time, the shader does not seem to be responsive to whatever value appearance plugins and tools such as Anamnesis, Glamourer, and Ktisis used to use for their "hair glow" parameter. This indicates something was shuffled around, but we are currently unsure as to what.
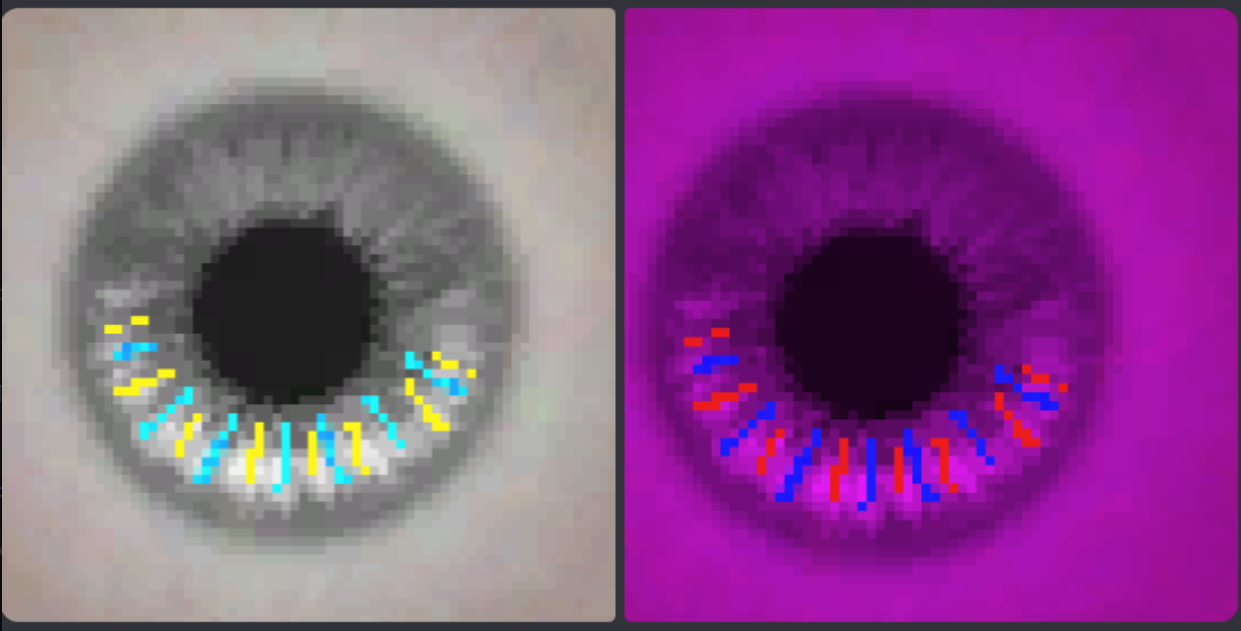
This is the iris, or new eye shader. There is no legacy version of this shader that can be used on players, so ALL eye mods must be thrown through a converter such as Loose Texture Compiler or Textools' Eye saver. This is non-negotiable.
The new iris shader allows for Sclera and Iris to be on the same map, allowing for some interesting effects
A large thing to note compared to old eye mods is that the catchlight is no longer an editable texture, and is now permanently part of the shader. All catchlight mods or edits can no longer be used. If you want to create a fake catchlight, you can draw this onto the diffuse, but it will be static and not move around. This is not fixable, and we do not currently know if catchlight will ever be editable, even using shader parameters.
Likewise, Au Ra limbal rings are also part of a shader now, and no longer part of a texture. Any mods that altered the Au Ra limbals must be scrapped. While shape cannot be changed, there is a shader constant that allows them to be turned on and off, and this is availible for all eyes, not just au ra. The parameters to change are
| 7DABA471- g_IrisRingEmissive |
0-1 (au ra at 0.8) |
||
| 58DE06E2-Limbal Color |
Red (0-1) |
Green (0-1) |
Blue (0-1) |
Furthermore, Sclera can either be changed by drawing on the diffuse, OR by changing shader constant 11C90091-g_ White Eyes Color. the 3 values are RGB going from 0-1 in each box.
Emissive is now included in the eye shader for ALL eyes, but in order to activate it, you need to mask out where you want glow on the mask RED channel, AND turn the shader constant 3BA64362-g_Emissive color on by changing the 3 values to not 0. the three editable boxes are RGB values that you may choose, that go from 0-1. emissive strangth is not known how or if it can be edited.
Finally, due to the eyeball now being a diffuse texture, it is possible to get multicolored eyes without having to sacrifice heterochromia. This both makes them more compatible with a variety of heads, and allows for more than 2 colors. because FF14 overlays the eye color closest to the layer style Multiply, it is best to check how colors will interact by simulating in an art program. You can either draw with color on the iris portion of the diffuse, and then allow eye color influence to change those colors, or draw with color on the diffuse, and then mask off the same areas/gradients on the Mask Blue channel, to stop those portions from changing with your eye color.
This is an example of simulating how placing colors on the diffuse and then allowing the game to put color on top can change the colors. This is a simulation in an art program, but it's enough to show what the effect will do when you do not mask out the colored parts on the multi.
There isn't much to edit about this shader, but it is important to keep in mind, as Facial ETC textures have multiple materials that all point to the same textures, but have different shader keys and parameters. Before changing any, please check this table, or make the texture path for the specific one you want to change unique.
As of 7.1 This shader is being adapted to player gear which allows us to research it more. This shader is nearly identical to the character (gear) shader, with a few exceptions. The main thing is that this shader utilizes UV channel 3 to copy and put skin underneath the "stockings" using only one mesh instead of the double layer mesh technique previously used. This is hardcoded to skin material A however, which means it will always be the symmetrical skin.
Texture wise, "opacity" on the normal map's blue channel is no longer overall opacity, but determines where and how much skin is shown "underneath".
Do NOT enable transparency in the material flags for this shader though, as it will crash your game.
The "nylon" texture and effect used on most gear with this shader is tile material 43, and you can get a nice stocking effect using a negative sheen value. Finally as of current research, sphere maps (like the holographic effect) seem to be disabled for this shader.
As of current research (12/03/2024) It seems that there is a strange link to material A used for this shader. When a modded skin mat A is loaded via textools into the game, the modded mat A shows correctly underneath the stockings, however when a modded skin mat A is loaded via penumbra, it does not. we are currently looking into why this is and how to cause the textools behavior on penumbra. The mod type (ttmp2 vs pmp) used does not change this behavior, nor can the penumbra behavior be circumvented via using textools' attach to penumbra system. for now a partial sort of fix is to have your modded skin in the default collection (this will mean everyone has your skin) in order for the stockings' mat A to properly reflect your skin. we don't know why this is the case, but it is likely due to how penumbra handles loading files vs textools. This has been tested on and works well on middie based ladies, but we could not get it to work on men. if you would like to test, please do and post a comment on this page of the results. (thank you to Virgo on discord for this research)

There isn't much to say about this shader.
According to recent testing, Passthrough visibility is conditional on dithering being active. That is, if the dithering key is not present (alongside the additional data bit value "00 80 00 00" being enabled), the passthrough effect will not do anything, even if the key is toggled on. To fully activate dithering, the shader key must be enabled, AND the bit value in the additional data section of the material editor must be enabled. (thank you arghblargh for this info)
As with Character Transparency, This shader is highly sensitive to opactiy values in the textures, and special care must be taken to ensure that your texture map opacity strength is dialed in correctly, as there is no way to control or edit it with material constants in textools or penumbra. The shader and material constants are extremely important for this shader for your glass quality, as well as the Sphere ID and Tilemap selections.
Sphere map IDs can use color influence from your specular color (set in the colorset/color table) on this shader, and the tilemap selection can break the spheremap ID visuals up, leading to different results. When planning to use this shader, the meshes must be authored/created specifically for use with these shaders, as any accidental backfaces or face normals pointed in the wrong direction will cause visual artifacts and issues. That said, purposeful use of this can allow for neat effects for items like clear gemstones and glass dishware. (especially those with stacked transparency such as a wine glass with wine inside) (Thank you to Bacara for this information)
For glass, it is possible to manipulate and author specific IOR (Index of Refraction) values to create gems and other more mystical or stylized items. to use and manipulate IOR, you must set a tile map. this is non negotiable and will not work without one. any tilemap will do. Then click back to 0 or set 0% opacity if you need. It MUST be written on/in the material to let you do refraction values. From testing, these values are 10 times the usual strength of the values set in Unreal Engine. (thank you to Bacara for the information and Kthonia for testing)
This shader is still being researched. WeIt mainly functions similarly to the standard Character shader in terms of Texture channels, but uses different constants and math to achieve different effects. There is currently no Automatic ways to convert a pre-DT mod to post DT with glass and have a general idea of how it works, but not enough for any automatic texture conversions to look good.good, Ifso youusing havethis anyshader observationswill orrequire aremanual willingauthoring. to research it, please let us know.
This is a new shader introduced in 7.2, first seen on the Historia Chokers. It is assumed that it acts similarly to the standard character shader but uses a few additional shader keys for better transparency effects.
When these shaders are overlaid with certain other effects (like byakko's falling VFX) Character Glass will dither, but Character Transparency will hide completely. This could be a reason to use one shader over the other.
According to recent testing, Passthrough visibility is conditional on dithering being active. that is, if the dithering key is not present (alongside the additional data bit value "00 80 00 00" being enabled), the passthrough effect will not do anything, even if the key is toggled on. To fully activate dithering, the shader key must be enabled, AND the bit value in the additional data section of the material editor must be enabled. (thank you arghblargh for this info)
As with character glass, This shader is highly sensitive to opactiy values in the textures, and special care must be taken to ensure that your texture map opacity strength is dialed in correctly, as there is no way to control or edit it with material constants in textools or penumbra. The shader and material constants are extremely important for this shader for your glass quality, as well as the Sphere ID and Tilemap selections.
Sphere map IDs can use color influence from your specular color (set in the colorset/color table) on this shader, and the tilemap selection can break the spheremap ID visuals up, leading to different results. When planning to use this shader, the meshes must be authored/created specifically for use with these shaders, as any accidental backfaces or face normals pointed in the wrong direction will cause visual artifacts and issues. That said, purposeful use of this can allow for neat effects for items like clear gemstones and glass dishware. (especially those with stacked transparency such as a wine glass with wine inside) (Thank you to Bacara for this information)
This shader makes use of :field 6" in penumbra (the textools name for this will be added later)
This shader isfor newthe andmost notpart properlyuses researched.all Anythe informationsame hereTexture ischannels tentative,as andthe weCharacter would appreciate comments about this shader if you know more.shader.
So far, we know that this shader does not seem to utilize vertex color for anything special, and seems to utilize a mask map for the special effects. (Thank you to Ulli for this information) This shader is currently being researched by Bacara. So far it has been found that some shader information for this shader cannot be currently read correctly in penumbra and does not allow you to save the file. It is assumed that textools similarly will have an issue with this shader. It is currently (as of 05/30/2025) only used for pictomancer VFX and the Sugar Riot raid boss. It is assumed that this shader will be good for latex, as well as the intended use case of fluids/liquids/slime/gummy materials.
This shader has been in the game since 7.0, but was first used on non-VFX in 7.2. We do not have any information on this shader and will be updating this portion when more information is found.
This is a version of the character shader that uses the second UV channel to allow for an emissive texture to animate across the mesh using UV2. The speed and axis can be changed. UV2 must be a straight and flat run along one axis with everything oriented in the same direction.
If you are using this shader on a skintight clothing mesh, or a mesh that is otherwise on top of another, make sure to offset the scrolling mesh by 0.03 to avoid LOD and Zfighting errors.
The easiest way to author with this shader is to use Bacara's mjolnir mod as a preset, or use the NPC gear E9242 as a material preset. this will give the texture path to something with Unknown_o, which is your scrolling emissive. When authoring this scrolling texture, you want it to be a tileable or seamless texture so it is not obvious when the pattern repeats.
The shader key for this shader to also enable opacity is
Important Colorset constants to know when authoring-
This shader's information was adapted entirely from Bacara. If you would like a more tutorial style explination of how to use this shader with some examples, please check out thier guide: https://docs.google.com/document/d/1Z_ao7r2hREzQBW1_5uXJF_2g-9ePB-MItj42CGyp6qQ/edit?tab=t.0#heading=h.echx7hlozmu
This shader is not fully understood.
This shader is not fully understood.
Notes courtesy of Vincent on discord:
Keys:
9A696A17 - Velocity of the scroll. Positive values are left & up direction. Parameter 1 & 2 are Diffuse A's X & Y scroll respectively, and 3 & 4 are the same for Diffuse B.
Emissive, Diffuse, etc. - Affects these values on Diffuse A (the overlay layer.)
MultiEmissive, MultiDiffuse, etc. - Affects these values on Diffuse B (the base photo layer.)
BFE9D12D - A master emissive multiplier. Setting this to 0 turns off the lights on the whole thing.
The apparent 50% opacity on the Diffuse A overlay seems to be hard-coded. None of the other constants seemed to do anything at all.
Changing the alpha threshold parameter or alpha of the images had no effect.
This shader is used on the Phasmascapes.
We are assuming that this shader works the same as the non-dyeable furniture shader, with the addition of a second diffuse and scrolling parameters.
Additional Data Values Table
|
Additional Data bit Value |
Function |
Relevant Shader |
Bit Interactions |
Other Notes |
|
00 80 00 00 |
Enable Dithering |
Glass, Transparency |
Glass often has this enabled and shadows disabled. Assumed that this also affects transparency in character shader. |
|
|
00 40 00 00 |
Disable Shadows |
Global (?) Glass, Transparency, Character |
||