
Anamnesis: Creating poses
Creating a pose from scratch can seem pretty daunting. Fortunately, it's not as difficult as it might appear. This page goes over the creation process and details of what it takes to achieve a universally good result.
Following this article does not require any prior knowledge with the tool.
Preparations
Undress your character
Fully clothed characters disguise their imperfections, and as a result, bones can end up twisted and broken. Before you begin posing, it's strongly advise for you to outfit your character in skin tight underwear. In this state, you can clearly see how your adjustments are affecting the model's bones.


This method is ideal for creating perfected poses that can be shared with others, adapted to different races, and reused in the future. If you have no intention of doing these things, do what is comfortable for you.
Using references


As with any art form, incorporating references can help you with the creative process. It can also ensure you produce a proportionally sound end result. It is far easier to pose a character using a reference than it is to sit down and figure out a pose by moving limbs around at random.
But a reference is just that: a reference. Your aim shouldn't be to create a 1:1 replica; drawn references might not always be feasible to recreate due to stylistic choices concerning the anatomy. These types of stylistic choices may not always translate well into the semi-realistic body proportions found in XIV. Not to mention, you may also simply want to add your own personal touch.

To keep your reference in immediate view, a tool such as OnTopReplica is recommended if you haven't got a second monitor available to you. This tool will allow you to float images on top of your game.
Base emotes
A pose has to start somewhere. A common practice is to find an emote that is similar to what you want your final pose to be. You don’t need to do this for every pose, but it can significantly shorten the creation process.


A prime example are poses that require a lot of movement of the arms. The pose above is based on the Warrior Battle stance emote. Instead of elevating the character's arms from the side, they were moved from a comparable position, saving time. Additionally, other areas of the body offer no greater challenge than if the pose was created with the idle pose as its foundation.
Exploring Anamnesis
Starting up Anamnesis
In order to use the posing element of Anamnesis, enter Gpose. You can do so by typing /gpose in your chat window. Alternatively you can reach it through the Actions & Traits window > Extras > Group Pose.
Posing tab


First and foremost, you will have to disable motion in Gpose itself. While this isn't necessarily needed, it will prevent your character from floating and potentially snapping back into position when you move them. If you forget to freeze your character, you can still do so after you begin editing your pose.
In Anamnesis, you will want to enable “Posing mode” through the toggle switch located on the top left of the window.

When everything has been done correctly, the window should appear as it is shown above.
This is the GUI view. It's one of three viewing options. Aside from the GUI, there are also Matrix and 3D views. To switch views, click one of the three icons next to the posing mode toggle. The GUI view provides a user-friendly experience and is intended for general usage. The other views are handy for finer details and/or when combined with other mods that add more bones to your character model.
Within the GUI view you'll find your a character silhouette covered in outlined circles. These circles are called bones. By clicking a bone, you'll be able to edit said body part using the movement tools located on the right. These movement tools being the Gizmo and the first set of XYZ sliders.
Perspective


Before moving onto making adjustments to your character's pose, we should look at the GUI a little more closely. Besides your character's silhouette you will find a large L and R. These letters represent the left and right side of your character's model, in the character's PoV.
You'll find a checkbox towards the top (next to the view buttons) that will say “Swap Sides". With this setting turned off, when the character is facing you, the left and ride side in the GUI will essentially be flipped from what you see on your character. You may want to consider enabling “Swap Sides” to have the GUI display according to your PoV. This however, is a personal preference.
Moving bones
[ video here ]
As previously stated, the outlined circles visible on the GUI are referred to as bones. Bones are the "joints" that allow you to move certain parts of a character's body. To move a bone, select one of the circles.
First, we will move the right arm (our POV). If you look to the right, you will notice an orb with sliders underneath it. This orb is known as the Rotate Gizmo. The three lines encircling it reflect the bone's X, Y, and Z coordinates (or, if no bones are selected, the character's).
By clicking and dragging these lines in a specific direction, a selected bone or, if no bones are selected, your character will move in that direction.
There are three sliders underneath the Gizmo. These are the XYZ sliders that move the bone in the same way that the Gizmo does, but in a slider form. These sliders are ideal for making smaller, more accurate modifications. However, you can still choose to make all of your modifications using only one or the other. This really depends on personal preference.
Creating a pose
Rotating your character.

To create a pose with the above reference in mind, we'd have to adjust the angle at which the character is standing at. To rotate a character, ensure no bones have been selected.
Using the Gizmo, push the green line (Y) towards the right. You can also use the Y slider.
Bulk movements

"When creating a pose, start with the largest adjustments and work your down. Certain body parts being moved will have an impact on the final position of others.
Here you see how the waist is tilted until it matches how far it's pushed back in the reference picture. Afterwards, the legs and moved and re-positioned so that they're making contact with the floor. Rather than ensuring the pose looks perfect in relation to the reference, it's about getting a general idea down."
Commentary by Nya Nya

"For the arms you follow the same concept; adjust the torso then focus on the arms. As is with the waist, the way you position the torso will affect where the arms end up. Positioning the arms before positioning the core of the body will prove to be extra work.
In the video you'll see the left arm (our POV) being edited by making gradual changes to several bones. To avoid accidentally breaking an elbow, it's better to make adjustments in smaller increments."
Commentary by Nya Nya
Adding finer details
With the larger details out of the way, I begin to add details. I start from the top and slowly make my way down. I rotate the head into its correct position after which I add an expression to the face. I adjust the fingers to be somewhat like the reference, but not entirely; I always find that fingers are harder to replicate than anything else.
I make my way down the character and choose a leg I'd like to use for a reference point for the other. To clarify, I always take one leg and make it stand correctly on the ground. The other leg I will then match accordingly.
Commentary by Nya Nya


"So far I've gotten a solid pose, or at least, it looks that way. As you're able to see in the video, I rotate the character around constantly to ensure that what I'm doing looks good at all angles. Because of this I am able to spot the flaws in the pose I'd like to correct.
Although I replicated the position of the legs decently based on the reference, I don't believe this translates well onto my character. When looking at my character from the side, she feels like she is slouching. Not to mention, from the front it looks like the character's left leg (her PoV) is raised.
Besides these major issues I'm taking mental notes on what else I'd like to adjust. I was having issues replicating the lowered arm without breaking it. I don't mind what it looks like right now, just that the wrist looks a bit awkward. I also think the fingers need some adjusting as they currently look like she is holding something (which isn't the intent)."
Commentary by Nya Nya
“At this stage I fix the aforementioned issues. At this point I have no more need for a reference. If I were having issues keeping everything proportionally sound then I’d probably reach for it again. However, at this point I feel like using the reference would restrict me more than it would help me.”
Commentary by Nya Nya
“Finally, all this has lead us to our first finished pose. Although the difference isn’t major, the fixes I applied made everything look less cramped up. The pose is now more in line with something we’d be able to emulate ourselves, rather than an exaggerated drawing. That said, don’t let me stop you from living your best life.”
Commentary by Nya Nya
Posing with a weapon
Weapon base poses


This page has already examined starting poses, but it has not yet covered the issues of posing with a weapon. When it comes to weaponry, your initial stance, like a regular pose, will influence your final output. More specifically, the starting pose determines where the weapon ends up in your model's hands.
In the pictures above, the hand's position in the idle pose is reflected back to us in the custom pose; the hand is just beneath the weapon's blade. Another thing to keep in mind is that if you were to change this weapon from a Dragoon's spear to a Reaper's scythe, it may not appear properly. As a result, your starting pose will be critical to the final product.
Moving a weapon
Posing weapons freely & Invisible models


Sometimes you'll want to freely move a weapon. For example, in the above images the character's scabbard has been moved from the character's side into the characters right hand, while the sword has been moved from the right hand to stick into the ground. There's several options to achieve this.
Enabling the position slider

The straightforward way to do this is by enabling the position slider. In the posing tab on the right, you'll find three checkboxes. R, P and S. You will want to check P to enable editing positions.
Common obstacles
When using this method there are a few things to take into account.
What bones are relevant

To edit your weapon's position, you'll first need to know which bone to select. This isn't particular complicated, and if you're ever unsure you can hover a bone to check what it's called.
In the image you'll see several bones you might end up editing when moving a weapon. The bone you choose depends on the weapon's location on your character's model.
Is your character holding the weapon, then pick the appropriate hand bone. Is the weapon sheathed to the side? Use the bones on the side of the clothed silhouette. Is the weapon resting on your character's back? Use the back bones—once again—on the clothed silhouette.
Making an invisible character
The alternative option would be to create an invisible character. This method is primarily useful for when you want to include more than one weapon in a scene.
There’s two steps to creating an invisible model.
This will prevent your neck from randomly showing up even though the rest of the body is invisible. Set the head and body slot to the invisible items.
This will turn your head and body invisible.
Alternatively, if you don't want to repeatedly do this you can either create an invisible character model file.
Loading a weapon onto the model

Loading a weapon onto an invisible model is the same as if you were to do it to a visible one. You only need to keep in mind the different states the weapon can be held in, as you no longer have a model for clear reference.
To have the weapon appear in its sheathed state: Enable the display of sheathed weapons on your character.
You want to unsheathe the weapon? Go into Actions & Traits and hit “Stance”.
Hiding the sheathe

If you want to pose with only the weapon and not the sheathe (or visa versa) go into the character tab while being loaded into Gpose. Go to the piece you want to hide and set its scale to 0.
Posing challenges
Tilting your character
There’s the straightforward approach of rotating your character with either the Gizmo or the XYZ sliders. You could use the flat lying green line on the Gizmo or the Y slider. In their default states they will do the same thing.
Now you might ask “Ok, so why don’t we? What’s the problem?” Technically, there isn’t really a problem. If you are creating this pose just for yourself then this won’t matter too much. Rather, this is something I feel is more of an issue when it comes to poses that you’re creating to be shared with others.
To explain this better let’s intentionally “mess it up”. To achieve this “messed up version” I’ll be moving the X and Z lines on the Gizmo.
Looking at the demonstration on the right, you can see that the green line doesn’t lay perfectly flat anymore. Rotating the character with the Gizmo now causes the character to detach from the ground in a weird way. There’s two easy enough solutions to this, but the problem is that the person who downloaded your pose might not know this.
The first fix would be using the Y slider underneath the Gizmo. The second fix is to click the (L) to the right of the Gizmo, turning it into a (W). This changes the rotation mode. When you click it you’ll see that the green line will once again lay flat.
As I said before, these fixes are easy enough to apply. It’s a matter of knowing that you can do this. When creating something to be shared with others, I like to think from the perspective of a novice user of the relevant software.
Let’s say you’re designing a website for the local library. You understand the website just fine. If you want to put a book on hold you’d know exactly where to click. But now try and put yourself in the shoes of your 80 year old neighbor. Would they be able to find the required page with the same ease?
Of course when creating poses in FFXIV it’s not all that serious. For me this is about being accommodating. I don’t want people to be frustrated that what I offered them doesn’t work well even if that’s due to a fault of their own. Which in the end is my personal preference. I wouldn’t be able to tell you if others do this. If you feel it’s worth the effort, keep on going.
To deal with this “issue” we’re going to edit starting from the waist and adjust the rest of the body accordingly. In the video you can see me tiling not the character, but the waist bone. From there I move up to the lumbar and thoracic bones. I inch everything into a tilted position without losing the ability to rotate my character with the Gizmo.
Elbows and other major joints
If you’re more experienced making poses you will most likely have some pretty horrible experiences with elbows and the other major joints. That’s OK, we all go through it at some point.
The way I go about pose making leads me to rarely have these issues anymore. By applying these techniques from the get go you prevent the joints from messing up to begin with, which saves you the effort of having to fix them.
Move surrounding bones and work gradually
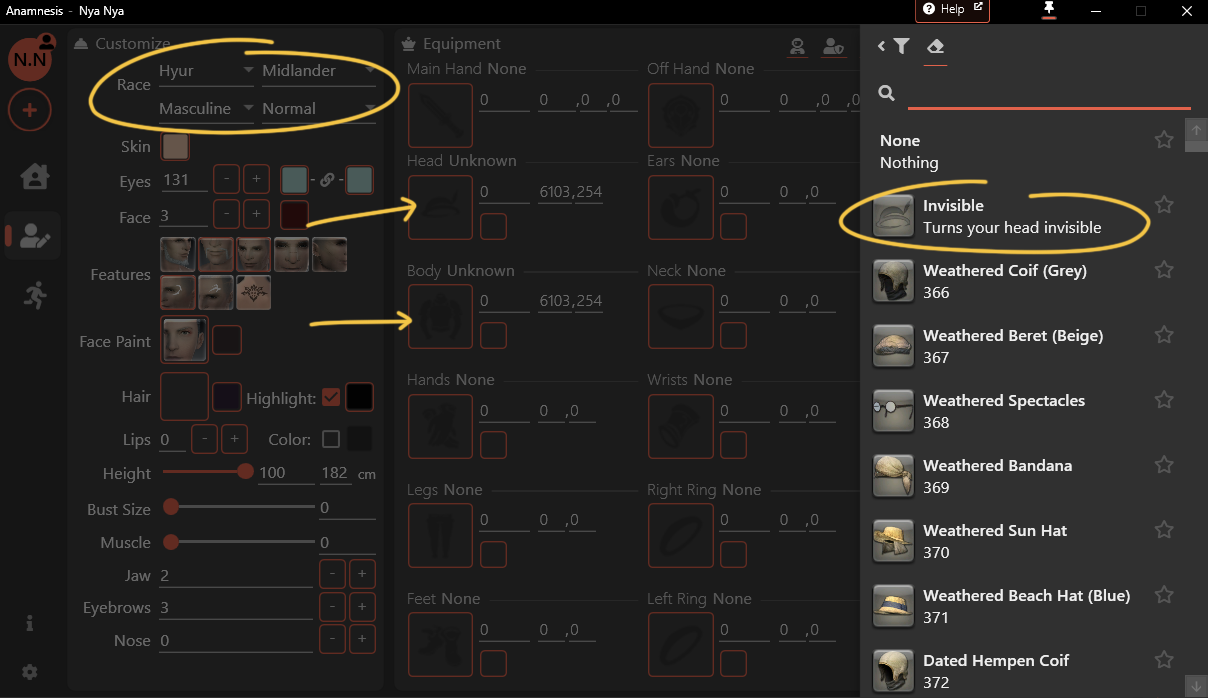
If possible, stretch your arm out in real life. Now, while keeping it stretched, lift it into the air. As you’re doing this, try to pin point exactly what is moving in your body. Rather than just your shoulder, you’ll find that muscles connected to your shoulder will also be moving. This brings us to the question, if in real life moving our arms takes multiple muscles, wouldn’t that be applicable to our character too?
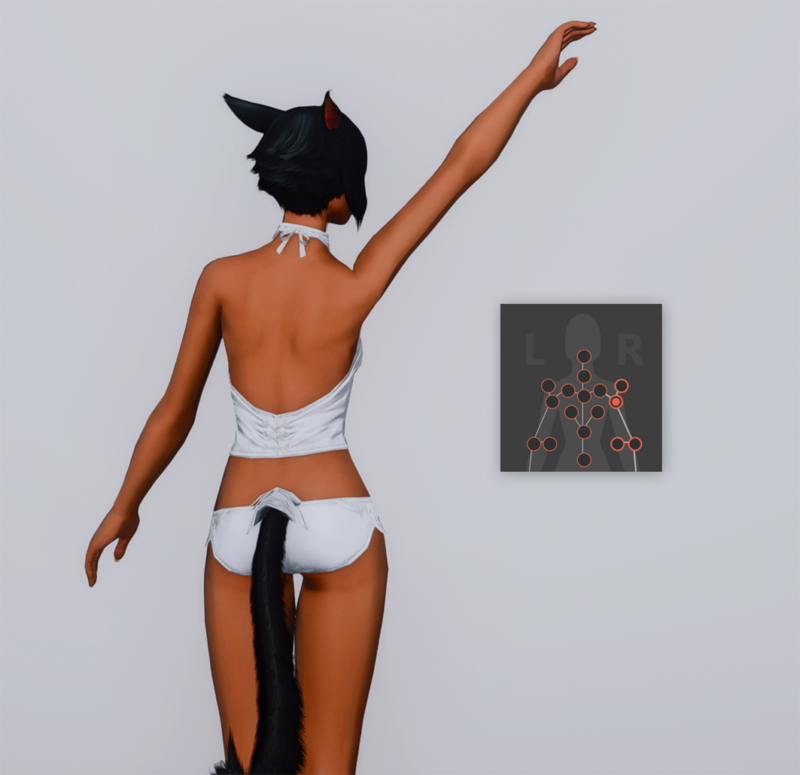
On the left here I lifted the arm only using the arm bone. You can clearly see how this mangled the shoulder. On the picture to the right, I adjusted three different bones. Rather than just moving the arm, I moved the shoulder, clavicle and arm together in small steps, bit by bit until it reached about the same height as the previous pose.

Bending the leg only using the calf bone

Bending the leg both the calf bone and the knee bone
Same idea for the legs. If I want to bend the knees I don’t push just the calves or the knees up by themselves. I push both to where I want them to get a natural finish.
Let’s put this into practice. Here you can see how I gradually move multiple bones. I inch stuff into the direction I want it slowly and move to another bone. I do this little by little until I am satisfied with the result it gives me. At no point did you see the bones go into an awkward position and thus I was able to avoid issues with the joints all together.
Another something I’d like to point out is that when I rotate the hand rather than using the wrist bone, I use the hand bone instead. The wrist bone (and elbow bone) are two bones I leave alone most of the time. But I’ll explain that a little bit further in a bit.
For now let’s do it all wrong on purpose.
Instead of gradually pushing it into the right direction with the surrounding bones, you can see how by trying to force just one bone to turn around I start breaking it.
Like I already mentioned a little bit before, there’s two more bones we need to talk about when it comes to moving the arm. These being the wrist bone and the elbow bone. When moving an entire arm, you don’t tend to use these bones too much. The elbow bone tends to cause frustration more than anything and when I move the wrist bone it feels like there’s no actual bone present in the forearm.
Either way, they’re still useful. Sometimes you need a tiny little push into the right direction that you just won’t get from any of the other bones. That’s when these bones come into play.
Clipping: use it to your advantage
I’ll be pretty short and to the point about this. At certain thresholds some joints just tend to look weird. Instead of trying to force it into submission, I’m better off just pushing it a little further to hide the problem area a little. You can see in the above pictures that there’s a weird gap in the elbow, while by pushing it in a bit more that gap disappears. I didn’t do anything special to remove the gap, it’s just hidden by the clipping.
Loading in selected bones & flipping the pose
One of the perks in Anamnesis is that you can select multiple bones and load part of a pose onto them. This is extremely useful for stuff like expressions, but we’re going to focus on using this option (combined with flipping the pose) to pose arms.
First things first, let me explain how you can selected specific bones and load onto them.
By clicking and holding left click you’ll be able to get multiple bones selected. For a more specific selection you can click the bones one by one. By holding shift or control you retain the bones you already selected. You won’t be able to edit them, but if you go to the load menu you will see the option to load a pose onto the selected bones.
Although this is fairly on the nose, you can use this to combine different poses. But as it is a bit on the nose, we’re going to do something a little different with it.
If you’ve drawn on a PC before, you might have done this before. You copied the eye you just drew and flipped it to avoid having to draw it on the other side. What I’m doing here is essentially the same. I raised the right arm and want to do the exact same with the left arm. I save the pose but if I were to load it onto the left arm, nothing will happen as I’ve made no adjustments to it.
Instead, I click “flip” without any bones selected. My entire character now flips over and the right arm is now the arm that’s down. The pose I saved however, has the right arm raised. I select the appropriate bones and load in the saved pose. Now both arms are raised.
This is an easy way to quickly move limbs. Even if you’re not planning on having these parts the exact same, you can use it to save some time if they need to be in similar positions.
Flipping the character is also useful in checking if anything looks awkward, just like in drawn art.
Quality assurance
Defying gravity
More often than not I catch myself putting a lot of weight on one side of the character. If I were to do that in real life I’d without a doubt end up flat on my face. So as I rotate around a character I ask myself, would they fall over? Now the pose we’ve been working on doesn’t really seem to have any balance issues. Despite the pose leaning towards the right and putting a lot of weight that way, due to the pose being a “motion” shot it doesn’t look unnatural.
Having a character in motion is an easy fix for balancing issues. Technically they wouldn’t be able to hold the pose you put them in, but we can see that there’s going to be a “follow up” frame after this, albeit imaginary.

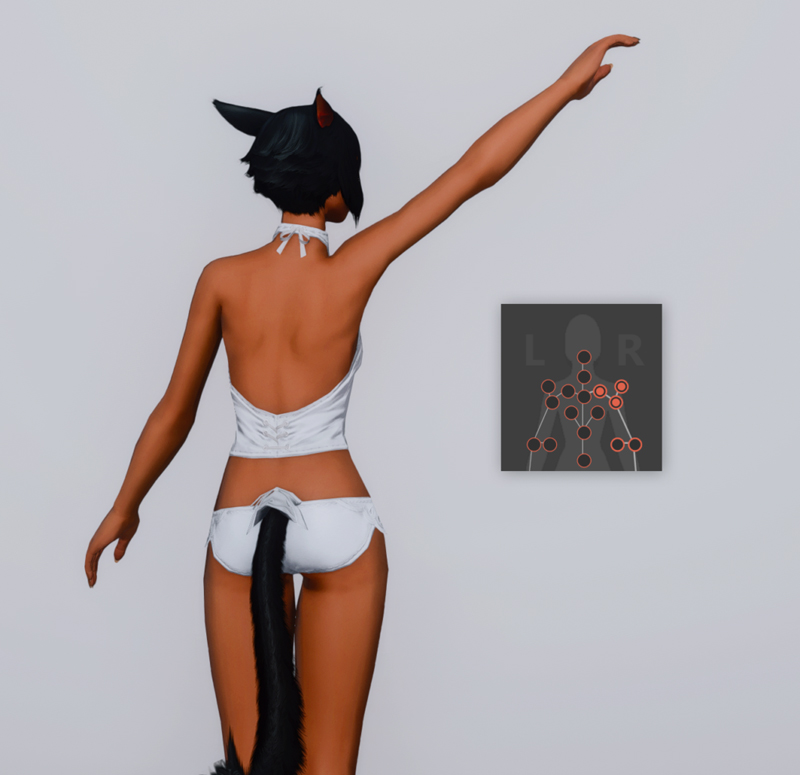
Unbalanced
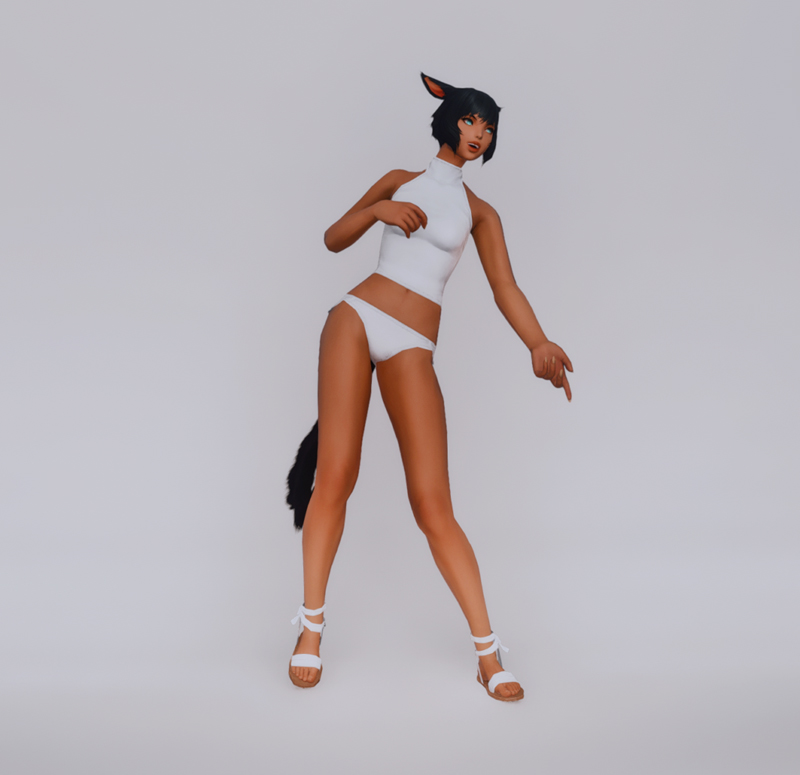
Balanced
That doesn’t mean putting a character in a “motion” like pose is a get out of jail free card. You still have to imagine that the movement required to not fall down is something that is feasible from the pose the character is in. In the above images, you can see how incredibly awkward the unbalanced pose feels. She’s leaning too far over to the right without her legs to support her. As she is leaning right, gravity would also make her fall over to the right, which, would make it really hard to move her leg into the position of the balanced pose to catch herself from falling.
Adapting poses to other models
Sometimes you'll find a pose that would be ideal for your intended screenshot, but it isn't intended for your character's model. That, or you want to adapt your own pose for different models yourself. This problem is relatively simple to solve; adapting a pose for a different character race takes only a few minutes.
Identifying the problems
When you create a pose using one character model, it is possible that the pose will not translate properly to another character model. For most models, the differences will be insignificant, but for others, you may run into issues.
The best example of this is the difference between tall models and Lalafell. Simply said, a tall body's proportions do not translate well onto a short body's proportions.


The above pose looks perfectly fine on the Miqo'te. However, on the Lalafell, there are various issues that need to be addressed before it can be called useable. The face, ears, and limbs all have specific problems that need to be resolved.
Fixing the face

Fixing the face is the easiest part of adapting a pose and is done by importing a previously saved expression.
Importing an expression means that you import solely the face bones of an existing pose and apply it to the pose you are working on. This will not affect anything but your character's face.
To import an expression click on the arrow next to the import button. This will open a sub-menu in which you will be able to find the “Expression” option. Anamnesis has default expression pose files you can reach for however, you can also make custom ones yourself.
Making your own facial expression files
If you find that Anamnesis' default facial expressions do not meet your needs, you can create your own.
Open the Gpose menu while the character is in its default position and unfrozen. Navigate to the motion tab and select the Emotes menu, then the Expressions tab.
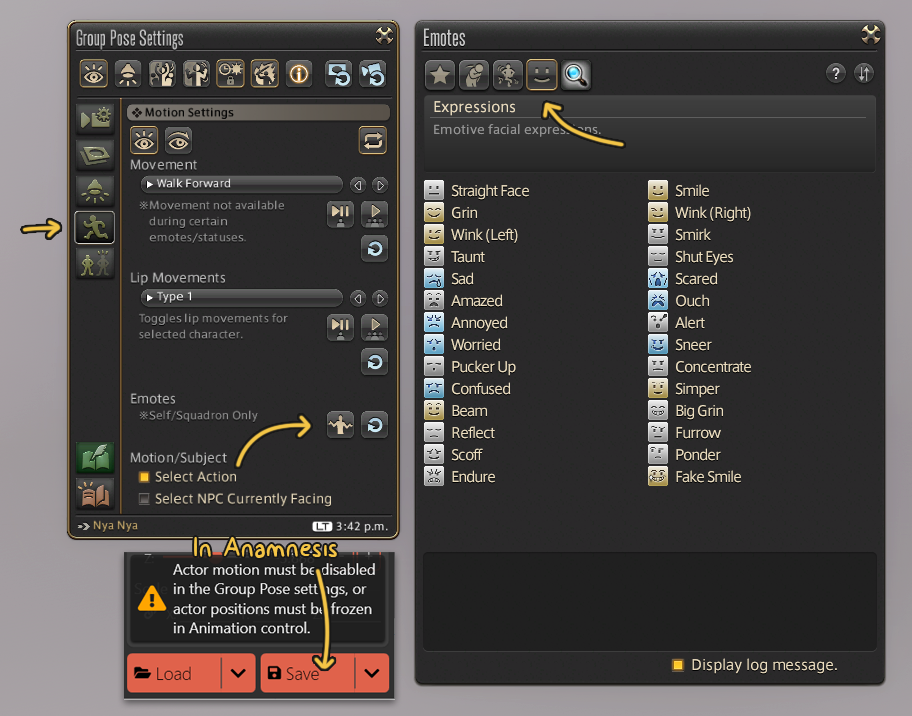
Select the expression you want to save and note whether or not it appears on your character. When you are satisfied with the expression (and it is still visible on the character), click the Save button in Anamnesis. You can disregard the error message that appears for leaving your character unfrozen. Freezing and unfreezing your character will be laborious and unnecessary, especially if you're trying to save many expressions in a row.
Fixing the clipping
The rest of the body will require the most effort to fix because it must be done manually. Pay attention to the neck, feet, hands, arms, legs, and any evident clipping. Don't feel obligated to imitate the original pose perfectly. There is no requirement for the poses to appear identical. What works on one body type might not work on another.
