# Step 2: Subdivision & Fixing Up The Mesh

Making it prettier after separating out the parts.

# Subdividing

<span style="font-size: 11pt; font-family: Arial,sans-serif; color: #000000; background-color: transparent; font-weight: 400; font-style: normal; font-variant: normal; text-decoration: none; vertical-align: baseline; white-space: pre-wrap;">Once you’ve prepared the coat by removing backfaces,I find this part pretty easy and self-explanatory. Subdivision is the process of adding more polys to the mesh in order to make it smoother and easier to upscale. The downside is that the more polys you add to something, the more graphical power it takes to render it and warping of the UV may occur. Plus, FF has a cap on polys that you can import per item. So for vanilla upscales, I will generally only subdivide 1-2x.</span>

<span style="font-size: 11pt; font-family: Arial,sans-serif; color: #000000; background-color: transparent; font-weight: 400; font-style: normal; font-variant: normal; text-decoration: none; vertical-align: baseline; white-space: pre-wrap;">For this part, you can go ahead and </span><span style="font-size: 11pt; font-family: Arial,sans-serif; color: #000000; background-color: transparent; font-weight: bold; font-style: normal; font-variant: normal; text-decoration: none; vertical-align: baseline; white-space: pre-wrap;">turn backface viewer off</span><span style="font-size: 11pt; font-family: Arial,sans-serif; color: #000000; background-color: transparent; font-weight: 400; font-style: normal; font-variant: normal; text-decoration: none; vertical-align: baseline; white-space: pre-wrap;">, we no longer need to see red and blue.</span>

<span style="font-size: 11pt; font-family: Arial,sans-serif; color: #000000; background-color: transparent; font-weight: 400; font-style: normal; font-variant: normal; text-decoration: none; vertical-align: baseline; white-space: pre-wrap;">Select all of the parts of your item that you believe need to be subdivided. Remember that subdivision on a single part of the mesh (as in, titties ONLY) will cause the mesh to distort and can sometimes ruin the textures. Additionally, if you subdivide the torso area, you should ALSO subdivide the elbows and wrists so that their vertices continue to align for seamless movement (the same for pant parts!) So if you want to subdivide the coat bit in the Red Mage AF, you will be subdividing ALL of the parts of the coat except the detailing. (I will likely also subdivide the detailing here too, because it goes across the chest. But you don’t HAVE to.)
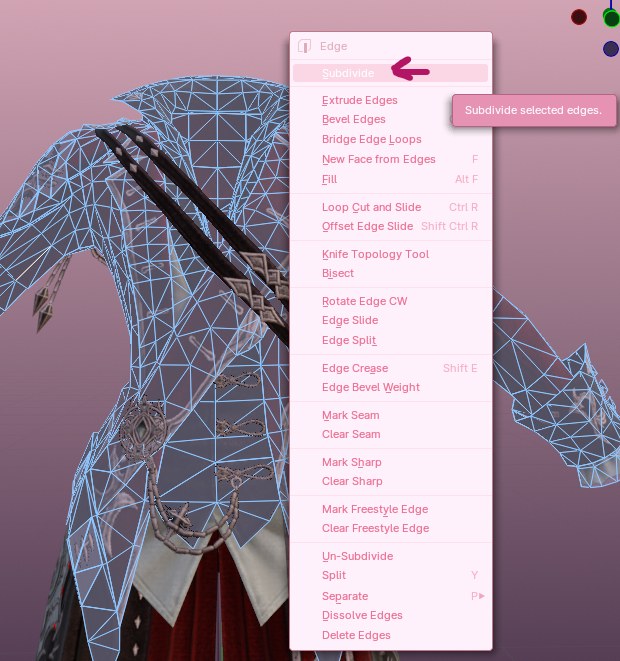
</span>

<span style="font-size: 11pt; font-family: Arial,sans-serif; color: #000000; background-color: transparent; font-weight: 400; font-style: normal; font-variant: normal; text-decoration: none; vertical-align: baseline; white-space: pre-wrap;">Open up edit mode and select all (</span><span style="font-size: 11pt; font-family: Arial,sans-serif; color: #000000; background-color: transparent; font-weight: bold; font-style: normal; font-variant: normal; text-decoration: none; vertical-align: baseline; white-space: pre-wrap;">A</span><span style="font-size: 11pt; font-family: Arial,sans-serif; color: #000000; background-color: transparent; font-weight: 400; font-style: normal; font-variant: normal; text-decoration: none; vertical-align: baseline; white-space: pre-wrap;">). Right click and select </span><span style="font-size: 11pt; font-family: Arial,sans-serif; color: #000000; background-color: transparent; font-weight: bold; font-style: normal; font-variant: normal; text-decoration: none; vertical-align: baseline; white-space: pre-wrap;">subdivide</span><span style="font-size: 11pt; font-family: Arial,sans-serif; color: #000000; background-color: transparent; font-weight: 400; font-style: normal; font-variant: normal; text-decoration: none; vertical-align: baseline; white-space: pre-wrap;">.</span>

<span style="font-size: 11pt; font-family: Arial,sans-serif; color: #000000; background-color: transparent; font-weight: 400; font-style: normal; font-variant: normal; text-decoration: none; vertical-align: baseline; white-space: pre-wrap;">(If this were anything but vanilla, I would tell you that this is bad practice, and that you should turn it into quads before subdividing. HOWEVER. On the newer coats I have noticed some distortion of the UV when I turn tris into quads, so I just go all in on the subdivision.)</span>

[![image37.png](https://xivmodding.com/uploads/images/gallery/2024-08/scaled-1680-/tGsl2P2kl4bEGsJ4-image37.png)](https://xivmodding.com/uploads/images/gallery/2024-08/tGsl2P2kl4bEGsJ4-image37.png)

<span style="font-size: 11pt; font-family: Arial,sans-serif; color: #000000; background-color: transparent; font-weight: 400; font-style: normal; font-variant: normal; text-decoration: none; vertical-align: baseline; white-space: pre-wrap;">On the </span><span style="font-size: 11pt; font-family: Arial,sans-serif; color: #000000; background-color: transparent; font-weight: bold; font-style: normal; font-variant: normal; text-decoration: none; vertical-align: baseline; white-space: pre-wrap;">Subdivision Submenu</span><span style="font-size: 11pt; font-family: Arial,sans-serif; color: #000000; background-color: transparent; font-weight: 400; font-style: normal; font-variant: normal; text-decoration: none; vertical-align: baseline; white-space: pre-wrap;"> (bottom right corner of your Layout window), you want to </span><span style="font-size: 11pt; font-family: Arial,sans-serif; color: #000000; background-color: transparent; font-weight: bold; font-style: normal; font-variant: normal; text-decoration: none; vertical-align: baseline; white-space: pre-wrap;">uncheck Create N-Gons</span><span style="font-size: 11pt; font-family: Arial,sans-serif; color: #000000; background-color: transparent; font-weight: 400; font-style: normal; font-variant: normal; text-decoration: none; vertical-align: baseline; white-space: pre-wrap;">.</span>

<span style="font-size: 11pt; font-family: Arial,sans-serif; color: #000000; background-color: transparent; font-weight: 400; font-style: normal; font-variant: normal; text-decoration: none; vertical-align: baseline; white-space: pre-wrap;">This was something Rox (the creator of Bimbo+) suggested, as N-Gons can create Normal issues later down the road on vanilla objects. Please don’t ask me to explain the science behind it, but I have noticed I get far better results leaving the N-Gons out!</span>

[![image10.png](https://xivmodding.com/uploads/images/gallery/2024-08/scaled-1680-/j3pS4cHIUuLfHFDX-image10.png)](https://xivmodding.com/uploads/images/gallery/2024-08/j3pS4cHIUuLfHFDX-image10.png)

<span style="font-size: 11pt; font-family: Arial,sans-serif; color: #000000; background-color: transparent; font-weight: 400; font-style: normal; font-variant: normal; text-decoration: none; vertical-align: baseline; white-space: pre-wrap;">
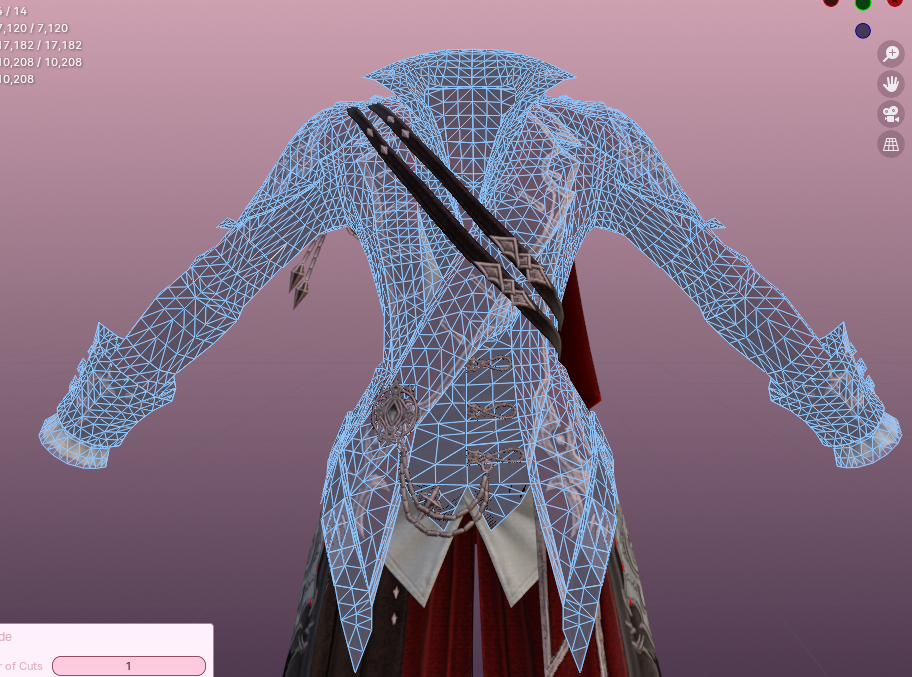
After you have done that, you should be left with a much higher poly coat than you had about two seconds previously. IF YOU ARE NOT SATISFIED with the number of polys, you can subdivide again. I generally do not go past 2x subdivision, as I’ve noticed it distorts the mesh to an absurd degree. But if you can get it to work, more power to you!</span>

<span style="font-size: 11pt; font-family: Arial,sans-serif; color: #000000; background-color: transparent; font-weight: 400; font-style: normal; font-variant: normal; text-decoration: none; vertical-align: baseline; white-space: pre-wrap;">BEHOLD the coat post-subdivision:</span>

[![image34.png](https://xivmodding.com/uploads/images/gallery/2024-08/scaled-1680-/Z7riOutCbYiJFRin-image34.png)](https://xivmodding.com/uploads/images/gallery/2024-08/Z7riOutCbYiJFRin-image34.png)

<span id="bkmrk-go-into-solid-viewpo-1" style="font-size: 11pt; font-family: Arial,sans-serif; color: #000000; background-color: transparent; font-weight: 400; font-style: normal; font-variant: normal; text-decoration: none; vertical-align: baseline; white-space: pre-wrap;">
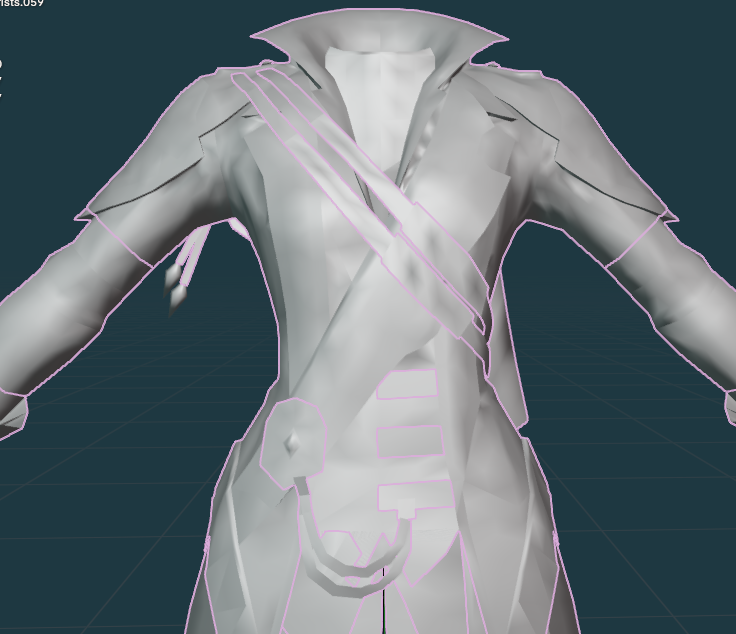
Go into Solid Viewport Shading (the completely filled in circle at the upper left) and take a look at your mesh. You’ll likely notice that it looks…bad. This is normal and to be expected, as you just told Blender to add in many more polys and haven’t yet told it how to shade those polys, or how to properly point them in good directions. You can see mine here:</span>

[![image8.png](https://xivmodding.com/uploads/images/gallery/2024-08/scaled-1680-/AXsxliAPpOvLgIef-image8.png)](https://xivmodding.com/uploads/images/gallery/2024-08/AXsxliAPpOvLgIef-image8.png)

<span style="font-size: 11pt; font-family: Arial,sans-serif; color: #000000; background-color: transparent; font-weight: 400; font-style: normal; font-variant: normal; text-decoration: none; vertical-align: baseline; white-space: pre-wrap;">At this point, we will be fixing the issues here, so don’t panic!</span>

<span style="font-size: 11pt; font-family: Arial,sans-serif; color: #000000; background-color: transparent; font-weight: bold; font-style: normal; font-variant: normal; text-decoration: none; vertical-align: baseline; white-space: pre-wrap;">Can you just leave this?</span>

<span style="font-size: 11pt; font-family: Arial,sans-serif; color: #000000; background-color: transparent; font-weight: 400; font-style: normal; font-variant: normal; text-decoration: none; vertical-align: baseline; white-space: pre-wrap;">I mean yes, I guess….but when you get it into game, you’ll see ALL the distortion, lumps, bumps, and strange shading you see in this view. So I highly recommend you do NOT leave this unless you want it to look bad.</span>

# Merging By Distance

<span style="font-size: 11pt; font-family: Arial,sans-serif; color: #000000; background-color: transparent; font-weight: 400; font-style: normal; font-variant: normal; text-decoration: none; vertical-align: baseline; white-space: pre-wrap;">Up until now, unlike in a normal upscale, we haven’t really done any sort of merging by distance. Before now, the coat wasn’t really in a place where we could safely merge without destroying parts of the coat by joining together Forbidden Backfaces. But now that we’ve sorted all of those out and we’re prepared to fix the lumps and bumps on the mesh, we can begin merging by distance.</span>

<span style="font-size: 11pt; font-family: Arial,sans-serif; color: #000000; background-color: transparent; font-weight: bold; font-style: normal; font-variant: normal; text-decoration: none; vertical-align: baseline; white-space: pre-wrap;">PLEASE NOTE</span><span style="font-size: 11pt; font-family: Arial,sans-serif; color: #000000; background-color: transparent; font-weight: 400; font-style: normal; font-variant: normal; text-decoration: none; vertical-align: baseline; white-space: pre-wrap;">: In the interest of keeping this below a billion pages, I’m assuming you understand the basics of upscaling and will not be explaining where to find merge by distance or averaging faces. If you don’t know where it is, I beg of ye, do a quick google for location before asking in any mod helps!</span>

<span style="font-size: 11pt; font-family: Arial,sans-serif; color: #000000; background-color: transparent; font-weight: 400; font-style: normal; font-variant: normal; text-decoration: none; vertical-align: baseline; white-space: pre-wrap;">For any parts that you will not have to merge into the whole in order to weight (like detailing or panties or something), you can go ahead and merge by distance as normal. I recommend averaging by corner angle. </span>

<span style="font-size: 11pt; font-family: Arial,sans-serif; color: #000000; background-color: transparent; font-weight: 400; font-style: normal; font-variant: normal; text-decoration: none; vertical-align: baseline; white-space: pre-wrap;">For those parts that will eventually join into the whole for weighting (elbows, wrists, knees, shins, etc), you’ll need to distinguish the parts so that you can separate them back out later. This has to be done BEFORE you merge. There are two ways to do this: Marking as Seam, and Changing Materials in the Viewport.</span>

<span style="font-size: 11pt; font-family: Arial,sans-serif; color: #000000; background-color: transparent; font-weight: 400; font-style: normal; font-variant: normal; text-decoration: none; vertical-align: baseline; white-space: pre-wrap;">( </span><span style="font-size: 11pt; font-family: Arial,sans-serif; color: #000000; background-color: transparent; font-weight: bold; font-style: normal; font-variant: normal; text-decoration: none; vertical-align: baseline; white-space: pre-wrap;">Why do I need to do this?</span><span style="font-size: 11pt; font-family: Arial,sans-serif; color: #000000; background-color: transparent; font-weight: 400; font-style: normal; font-variant: normal; text-decoration: none; vertical-align: baseline; white-space: pre-wrap;"> If you join elbows and wrists to the coat, or knees and shins to the butt, and do NOT separate them back out, </span><span style="font-size: 11pt; font-family: Arial,sans-serif; color: #000000; background-color: transparent; font-weight: 400; font-style: italic; font-variant: normal; text-decoration: none; vertical-align: baseline; white-space: pre-wrap;">you will ruin your ability to wear gloves, shoes, or other arm/leg accessories</span><span style="font-size: 11pt; font-family: Arial,sans-serif; color: #000000; background-color: transparent; font-weight: 400; font-style: normal; font-variant: normal; text-decoration: none; vertical-align: baseline; white-space: pre-wrap;">. It is vitally important that you keep those 3 separate parts you see in every ffxiv outfit for the ability to mix and match with other outfits! Take it from me: this will save you a bug report later!)</span>

<span style="font-size: 11pt; font-family: Arial,sans-serif; color: #000000; background-color: transparent; font-weight: 400; font-style: normal; font-variant: normal; text-decoration: none; vertical-align: baseline; white-space: pre-wrap;">NOW ONTO THE TWO METHODS…</span>

<span style="font-size: 11pt; font-family: Arial,sans-serif; color: #000000; background-color: transparent; font-weight: 400; font-style: normal; font-variant: normal; text-decoration: none; vertical-align: baseline; white-space: pre-wrap;">There are pros and cons to both methods of joining things together. Changing materials is simpler, but I’ve found on vanilla items that changing materials can leave unsightly normal problems at the seams for whatever reason. Marking as seam takes longer and requires more steps, but tends to leave a more ‘seamless’ finished product. I’ll cover both below, and generally use a mixture of both in my upscales.</span>

### <span style="font-size: 13.999999999999998pt; font-family: Arial,sans-serif; color: #434343; background-color: transparent; font-weight: 400; font-style: normal; font-variant: normal; text-decoration: none; vertical-align: baseline; white-space: pre-wrap;">Marking as Seam</span>

<span style="font-size: 11pt; font-family: Arial,sans-serif; color: #000000; background-color: transparent; font-weight: 400; font-style: normal; font-variant: normal; text-decoration: none; vertical-align: baseline; white-space: pre-wrap;">I created a video guide to this here: </span>[<span style="font-size: 11pt; font-family: Arial,sans-serif; color: #1155cc; background-color: transparent; font-weight: 400; font-style: normal; font-variant: normal; text-decoration: underline; -webkit-text-decoration-skip: none; text-decoration-skip-ink: none; vertical-align: baseline; white-space: pre-wrap;">Marking &amp; Ripping at Seam</span>](https://youtu.be/9dknmq6VzYI?si=nTYJhmAi4HYLLL7W)

<span style="font-size: 11pt; font-family: Arial,sans-serif; color: #000000; background-color: transparent; font-weight: 400; font-style: normal; font-variant: normal; text-decoration: none; vertical-align: baseline; white-space: pre-wrap;">Generally, I will mark edges as seams on places where they will be highly visible to the naked eye, due to the problem with changing materials mentioned earlier. On my red mage coat, that’ll be the elbow to torso seam, and elbow to wrist seam.</span>

[![image46.png](https://xivmodding.com/uploads/images/gallery/2024-08/scaled-1680-/scDGs1u1QTTc7Kl3-image46.png)](https://xivmodding.com/uploads/images/gallery/2024-08/scDGs1u1QTTc7Kl3-image46.png)

<span style="font-size: 11pt; font-family: Arial,sans-serif; color: #000000; background-color: transparent; font-weight: 400; font-style: normal; font-variant: normal; text-decoration: none; vertical-align: baseline; white-space: pre-wrap;">Go into Edit Mode on the </span><span style="font-size: 11pt; font-family: Arial,sans-serif; color: #000000; background-color: transparent; font-weight: bold; font-style: normal; font-variant: normal; text-decoration: none; vertical-align: baseline; white-space: pre-wrap;">Elbow</span><span style="font-size: 11pt; font-family: Arial,sans-serif; color: #000000; background-color: transparent; font-weight: 400; font-style: normal; font-variant: normal; text-decoration: none; vertical-align: baseline; white-space: pre-wrap;">. While in edge mode, carefully select all of the top and bottom edges of the part. You can see my selections here:</span>

[![image35.png](https://xivmodding.com/uploads/images/gallery/2024-08/scaled-1680-/YWniZLoKorDT4Ydw-image35.png)
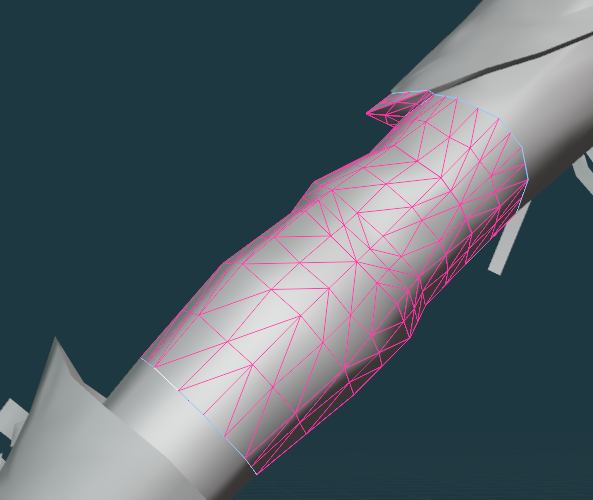
](https://xivmodding.com/uploads/images/gallery/2024-08/YWniZLoKorDT4Ydw-image35.png)

<span style="font-size: 11pt; font-family: Arial,sans-serif; color: #000000; background-color: transparent; font-weight: 400; font-style: normal; font-variant: normal; text-decoration: none; vertical-align: baseline; white-space: pre-wrap;">Right Click &gt; </span><span style="font-size: 11pt; font-family: Arial,sans-serif; color: #000000; background-color: transparent; font-weight: bold; font-style: normal; font-variant: normal; text-decoration: none; vertical-align: baseline; white-space: pre-wrap;">Mark Seam</span><span style="font-size: 11pt; font-family: Arial,sans-serif; color: #000000; background-color: transparent; font-weight: 400; font-style: normal; font-variant: normal; text-decoration: none; vertical-align: baseline; white-space: pre-wrap;">.</span>

<span style="font-size: 11pt; font-family: Arial,sans-serif; color: #000000; background-color: transparent; font-weight: 400; font-style: normal; font-variant: normal; text-decoration: none; vertical-align: baseline; white-space: pre-wrap;">Repeat this on the Torso, and the Wrists. Wherever things will join together.</span>

<span style="font-size: 11pt; font-family: Arial,sans-serif; color: #000000; background-color: transparent; font-weight: 400; font-style: normal; font-variant: normal; text-decoration: none; vertical-align: baseline; white-space: pre-wrap;">Sometimes you’ll get little stray edges that decide they want to be seams. They’re forbidden, so: left click those strays, Right Click &gt; </span><span style="font-size: 11pt; font-family: Arial,sans-serif; color: #000000; background-color: transparent; font-weight: bold; font-style: normal; font-variant: normal; text-decoration: none; vertical-align: baseline; white-space: pre-wrap;">Clear Seam</span><span style="font-size: 11pt; font-family: Arial,sans-serif; color: #000000; background-color: transparent; font-weight: 400; font-style: normal; font-variant: normal; text-decoration: none; vertical-align: baseline; white-space: pre-wrap;">.</span>

<span style="font-size: 11pt; font-family: Arial,sans-serif; color: #000000; background-color: transparent; font-weight: 400; font-style: normal; font-variant: normal; text-decoration: none; vertical-align: baseline; white-space: pre-wrap;">Now you can join these all together and continue onwards with the guide.</span>

<span style="font-size: 11pt; font-family: Arial,sans-serif; color: #000000; background-color: transparent; font-weight: 400; font-style: normal; font-variant: normal; text-decoration: none; vertical-align: baseline; white-space: pre-wrap;">WHEN YOU ARE COMPLETELY DONE WITH YOUR UPSCALE when everything is weighted, and ready for testing in game: select ONE edge that is marked as seam and then press </span><span style="font-size: 11pt; font-family: Arial,sans-serif; color: #000000; background-color: transparent; font-weight: bold; font-style: normal; font-variant: normal; text-decoration: none; vertical-align: baseline; white-space: pre-wrap;">Shift+G</span><span style="font-size: 11pt; font-family: Arial,sans-serif; color: #000000; background-color: transparent; font-weight: 400; font-style: normal; font-variant: normal; text-decoration: none; vertical-align: baseline; white-space: pre-wrap;">. On the menu that appears, select </span><span style="font-size: 11pt; font-family: Arial,sans-serif; color: #000000; background-color: transparent; font-weight: bold; font-style: normal; font-variant: normal; text-decoration: none; vertical-align: baseline; white-space: pre-wrap;">Seam</span><span style="font-size: 11pt; font-family: Arial,sans-serif; color: #000000; background-color: transparent; font-weight: 400; font-style: normal; font-variant: normal; text-decoration: none; vertical-align: baseline; white-space: pre-wrap;">. Then, press </span><span style="font-size: 11pt; font-family: Arial,sans-serif; color: #000000; background-color: transparent; font-weight: bold; font-style: normal; font-variant: normal; text-decoration: none; vertical-align: baseline; white-space: pre-wrap;">Ctrl+V</span><span style="font-size: 11pt; font-family: Arial,sans-serif; color: #000000; background-color: transparent; font-weight: 400; font-style: normal; font-variant: normal; text-decoration: none; vertical-align: baseline; white-space: pre-wrap;"> and select </span><span style="font-size: 11pt; font-family: Arial,sans-serif; color: #000000; background-color: transparent; font-weight: bold; font-style: normal; font-variant: normal; text-decoration: none; vertical-align: baseline; white-space: pre-wrap;">Rip Vertices</span><span style="font-size: 11pt; font-family: Arial,sans-serif; color: #000000; background-color: transparent; font-weight: 400; font-style: normal; font-variant: normal; text-decoration: none; vertical-align: baseline; white-space: pre-wrap;">.</span>

<span style="font-size: 11pt; font-family: Arial,sans-serif; color: #000000; background-color: transparent; font-weight: 400; font-style: normal; font-variant: normal; text-decoration: none; vertical-align: baseline; white-space: pre-wrap;">From there, you will be able to press L to select linked on the various parts of your upscale. You’ll notice that now (if you did it correctly) your mesh will separate at those seams, as they are no longer connected together. You can separate them into separate parts by selecting all of one type (for example, both elbows) &gt; pressing P &gt; “by selection”. Voila! You have retained your elbows, wrists, knees, and shins!</span>

### <span style="font-size: 13.999999999999998pt; font-family: Arial,sans-serif; color: #434343; background-color: transparent; font-weight: 400; font-style: normal; font-variant: normal; text-decoration: none; vertical-align: baseline; white-space: pre-wrap;">Changing Materials</span>

<span style="font-size: 11pt; font-family: Arial,sans-serif; color: #000000; background-color: transparent; font-weight: 400; font-style: normal; font-variant: normal; text-decoration: none; vertical-align: baseline; white-space: pre-wrap;">I feel like this is fairly self-explanatory, but as in modded upscaling, if you want to join two pieces together you can change their material in the viewport and then AT THE END OF YOUR UPSCALE you can select the entire piece and go P &gt; “By material” to separate them back out. As long as you have made the items two separate materials, they will separate themselves in this method.</span>

[![image44.png](https://xivmodding.com/uploads/images/gallery/2024-08/scaled-1680-/pFuFaDw46BXQrlMu-image44.png)
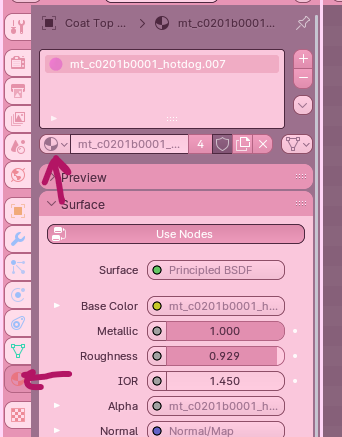
](https://xivmodding.com/uploads/images/gallery/2024-08/pFuFaDw46BXQrlMu-image44.png)

<span style="font-size: 11pt; font-family: Arial,sans-serif; color: #000000; background-color: transparent; font-weight: 400; font-style: normal; font-variant: normal; text-decoration: none; vertical-align: baseline; white-space: pre-wrap;">Select any material you want, as long as it’s not the same material as another part you want to keep separate later on. Personally on the Bimbo rig, I use the hotdog materials…because there’s 5 of them. And when you have dick textures on everything you can’t help but smile at how silly it is (and know you are DEFINITELY not keeping those that texture in Textools).</span>

<span style="font-size: 11pt; font-family: Arial,sans-serif; color: #000000; background-color: transparent; font-weight: 400; font-style: normal; font-variant: normal; text-decoration: none; vertical-align: baseline; white-space: pre-wrap;">Whatever method you have chosen, you are now ready to continue onwards.</span>

# Marking as Sharp

<span style="font-size: 11pt; font-family: Arial,sans-serif; color: #000000; background-color: transparent; font-weight: 400; font-style: normal; font-variant: normal; text-decoration: none; vertical-align: baseline; white-space: pre-wrap;">After you’ve merged by distance, you’ll notice that a lot of edges will look distorted or particularly muddy in the shading viewport. There’s a few things we can do to try to fix this, but the one that will work the best is marking things as sharp at places where two parts combine at an acute angle. We do this to instruct blender on how the mesh should be shaded. Many outfits from SE are made with very sharp angles that would otherwise cause awkward shading if not marked as sharp.</span>

<span style="font-size: 11pt; font-family: Arial,sans-serif; color: #000000; background-color: transparent; font-weight: 400; font-style: normal; font-variant: normal; text-decoration: none; vertical-align: baseline; white-space: pre-wrap;">When you merge by distance, you can select </span><span style="font-size: 11pt; font-family: Arial,sans-serif; color: #000000; background-color: transparent; font-weight: bold; font-style: normal; font-variant: normal; text-decoration: none; vertical-align: baseline; white-space: pre-wrap;">Sharp Edges</span><span style="font-size: 11pt; font-family: Arial,sans-serif; color: #000000; background-color: transparent; font-weight: 400; font-style: normal; font-variant: normal; text-decoration: none; vertical-align: baseline; white-space: pre-wrap;"> in the Merge by Distance menu (by default, it appears in the lower left corner of the viewport) if you want Blender to try and guess what parts should be sharp for you. I find that it does okay at it - it’s not the best, and you will probably have to manually adjust some things, but it’s a good starting point. However, I find that it frequently thinks seams are meant to be marked as sharp, leaving big ol pointy parts on your mesh.</span>

<span style="font-size: 11pt; font-family: Arial,sans-serif; color: #000000; background-color: transparent; font-weight: 400; font-style: normal; font-variant: normal; text-decoration: none; vertical-align: baseline; white-space: pre-wrap;">To fix these pointy problem areas, enter </span><span style="font-size: 11pt; font-family: Arial,sans-serif; color: #000000; background-color: transparent; font-weight: bold; font-style: normal; font-variant: normal; text-decoration: none; vertical-align: baseline; white-space: pre-wrap;">edit mode</span><span style="font-size: 11pt; font-family: Arial,sans-serif; color: #000000; background-color: transparent; font-weight: 400; font-style: normal; font-variant: normal; text-decoration: none; vertical-align: baseline; white-space: pre-wrap;"> and make sure your selections are set to </span><span style="font-size: 11pt; font-family: Arial,sans-serif; color: #000000; background-color: transparent; font-weight: bold; font-style: normal; font-variant: normal; text-decoration: none; vertical-align: baseline; white-space: pre-wrap;">Edges</span><span style="font-size: 11pt; font-family: Arial,sans-serif; color: #000000; background-color: transparent; font-weight: 400; font-style: normal; font-variant: normal; text-decoration: none; vertical-align: baseline; white-space: pre-wrap;">. Then, click those edges that are giving you problems and right click &gt; </span><span style="font-size: 11pt; font-family: Arial,sans-serif; color: #000000; background-color: transparent; font-weight: bold; font-style: normal; font-variant: normal; text-decoration: none; vertical-align: baseline; white-space: pre-wrap;">Clear Sharp</span><span style="font-size: 11pt; font-family: Arial,sans-serif; color: #000000; background-color: transparent; font-weight: 400; font-style: normal; font-variant: normal; text-decoration: none; vertical-align: baseline; white-space: pre-wrap;">. Then you can try averaging to fix the issue (if it doesn’t fix itself automatically after you clear sharp).</span>

<span style="font-size: 11pt; font-family: Arial,sans-serif; color: #000000; background-color: transparent; font-weight: 400; font-style: normal; font-variant: normal; text-decoration: none; vertical-align: baseline; white-space: pre-wrap;">Before fixing it by clearing Sharp:</span>

[![image50.png](https://xivmodding.com/uploads/images/gallery/2024-08/scaled-1680-/uMXz5WzlEFFmS4K4-image50.png)](https://xivmodding.com/uploads/images/gallery/2024-08/uMXz5WzlEFFmS4K4-image50.png)

<span style="font-size: 11pt; font-family: Arial,sans-serif; color: #000000; background-color: transparent; font-weight: 400; font-style: normal; font-variant: normal; text-decoration: none; vertical-align: baseline; white-space: pre-wrap;">And after clearing Sharp:</span>

[![image22.png](https://xivmodding.com/uploads/images/gallery/2024-08/scaled-1680-/iNIV8FO9xfOZUdxR-image22.png)](https://xivmodding.com/uploads/images/gallery/2024-08/iNIV8FO9xfOZUdxR-image22.png)

<span style="font-size: 11pt; font-family: Arial,sans-serif; color: #000000; background-color: transparent; font-weight: 400; font-style: normal; font-variant: normal; text-decoration: none; vertical-align: baseline; white-space: pre-wrap;">You may find that there are situations, such as a sharp collar, where Blender or the mesh did NOT mark it as sharp but you think it would look better as a sharp edge. In these situations, you would follow the above instructions, but instead of selecting clear sharp you will instead select </span><span style="font-size: 11pt; font-family: Arial,sans-serif; color: #000000; background-color: transparent; font-weight: bold; font-style: normal; font-variant: normal; text-decoration: none; vertical-align: baseline; white-space: pre-wrap;">Mark Sharp</span><span style="font-size: 11pt; font-family: Arial,sans-serif; color: #000000; background-color: transparent; font-weight: 400; font-style: normal; font-variant: normal; text-decoration: none; vertical-align: baseline; white-space: pre-wrap;"> which is right beside its clearing cousin in the dropdown menu.</span>

<span style="font-size: 11pt; font-family: Arial,sans-serif; color: #000000; background-color: transparent; font-weight: 400; font-style: normal; font-variant: normal; text-decoration: none; vertical-align: baseline; white-space: pre-wrap;">After you’ve sharped to your satisfaction (or unsharped!) go ahead and set from faces &gt; average by either corner angle (usually my go-to) or face area.</span>

<span style="font-size: 11pt; font-family: Arial,sans-serif; color: #000000; background-color: transparent; font-weight: 400; font-style: normal; font-variant: normal; text-decoration: none; vertical-align: baseline; white-space: pre-wrap;">This is sort of a back and forth situation. I’ll set from faces/average, see if I’m happy with it. If I’m not happy with it, I’ll go back and add more sharp faces/remove sharp faces. There are not really pictures to show because it’s going to be deeply individual to the upscale you’re working on. I’ll show some more pictures of areas I may ADD or REMOVE sharp parts from however, to guide you on your way.</span>

<span style="font-size: 11pt; font-family: Arial,sans-serif; color: #000000; background-color: transparent; font-weight: 400; font-style: normal; font-variant: normal; text-decoration: none; vertical-align: baseline; white-space: pre-wrap;">Remember that Vanilla meshes are more prone to showing discoloration on the mesh than modded outfits and fix appropriately.</span>

<span style="font-size: 11pt; font-family: Arial,sans-serif; color: #000000; background-color: transparent; font-weight: 400; font-style: normal; font-variant: normal; text-decoration: none; vertical-align: baseline; white-space: pre-wrap;">
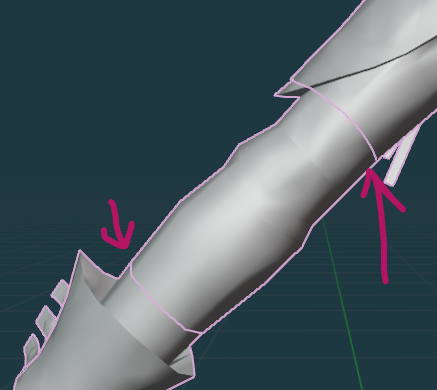
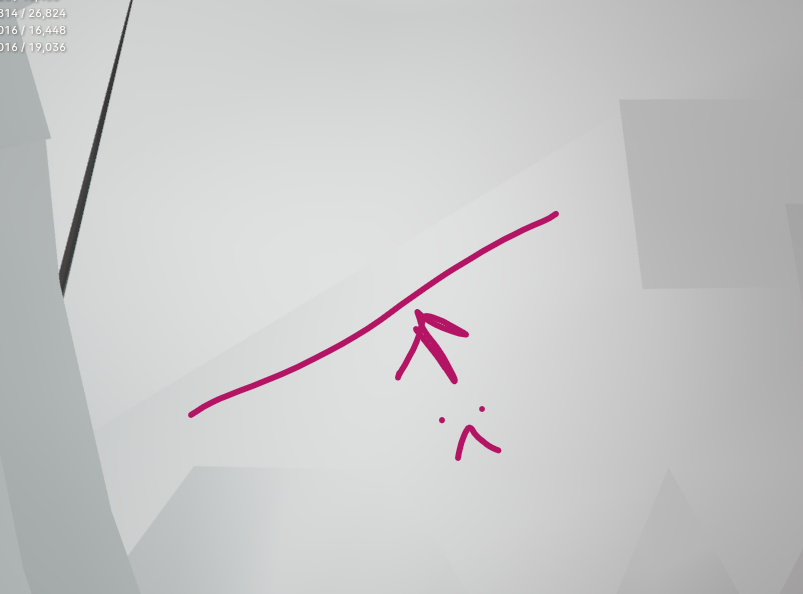
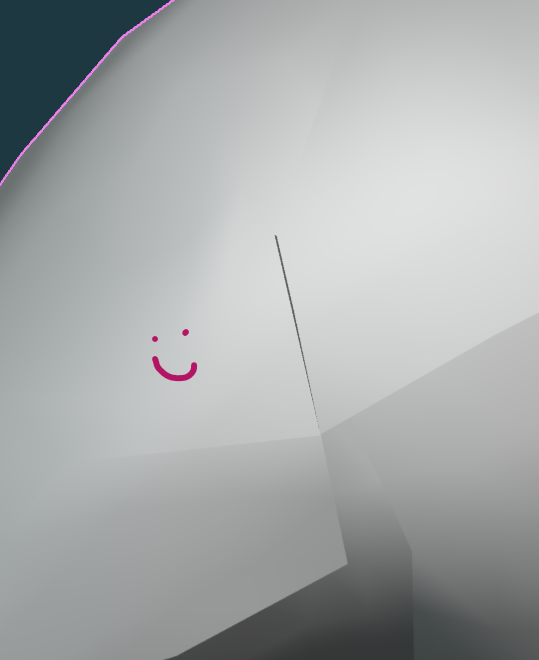
This part doesn’t have any sharp marking, which has caused some distortion:</span>

[![image15.png](https://xivmodding.com/uploads/images/gallery/2024-08/scaled-1680-/7wL9oSf7b1VjAZwy-image15.png)](https://xivmodding.com/uploads/images/gallery/2024-08/7wL9oSf7b1VjAZwy-image15.png)

<span style="font-size: 11pt; font-family: Arial,sans-serif; color: #000000; background-color: transparent; font-weight: 400; font-style: normal; font-variant: normal; text-decoration: none; vertical-align: baseline; white-space: pre-wrap;">
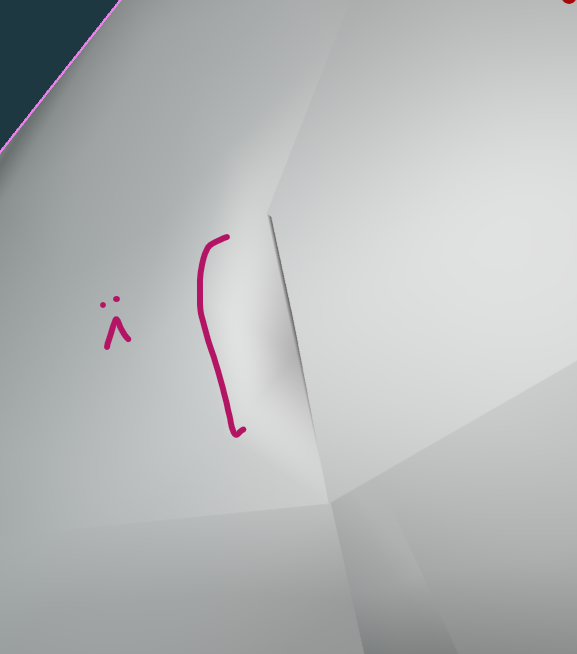
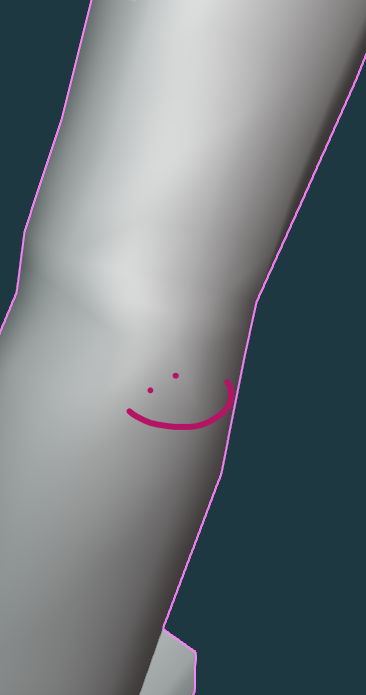
Marking the angle as sharp gets you this:</span>

[![image38.png](https://xivmodding.com/uploads/images/gallery/2024-08/scaled-1680-/MJcA3rkxby5n85TR-image38.png)](https://xivmodding.com/uploads/images/gallery/2024-08/MJcA3rkxby5n85TR-image38.png)

<span id="bkmrk-the-autosharp-tool-o-1" style="font-size: 11pt; font-family: Arial,sans-serif; color: #000000; background-color: transparent; font-weight: 400; font-style: normal; font-variant: normal; text-decoration: none; vertical-align: baseline; white-space: pre-wrap;">The autosharp tool off of merging by distance marked ALL these seams as sharp and that’s BAD looking:</span>

[![image19.png](https://xivmodding.com/uploads/images/gallery/2024-08/scaled-1680-/iUZX5i3g9SEImLZu-image19.png)
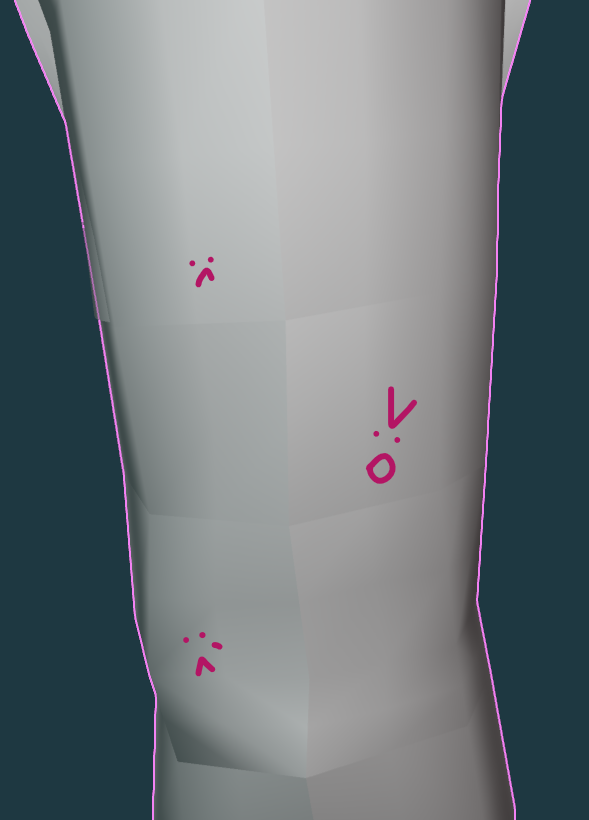
](https://xivmodding.com/uploads/images/gallery/2024-08/iUZX5i3g9SEImLZu-image19.png)

<span style="font-size: 11pt; font-family: Arial,sans-serif; color: #000000; background-color: transparent; font-weight: 400; font-style: normal; font-variant: normal; text-decoration: none; vertical-align: baseline; white-space: pre-wrap;">So I Clear Sharp and am left with this:</span>

[![image27.png](https://xivmodding.com/uploads/images/gallery/2024-08/scaled-1680-/EPA6zhMXWuS6q9KN-image27.png)](https://xivmodding.com/uploads/images/gallery/2024-08/EPA6zhMXWuS6q9KN-image27.png)

<span id="bkmrk-and-finally%2C-sharps--1" style="font-size: 11pt; font-family: Arial,sans-serif; color: #000000; background-color: transparent; font-weight: 400; font-style: normal; font-variant: normal; text-decoration: none; vertical-align: baseline; white-space: pre-wrap;">
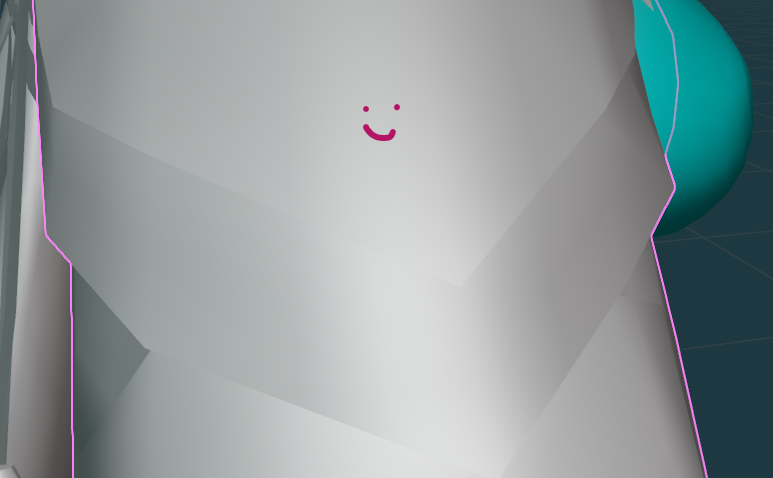
And finally, sharps may be hidden by your seam markings. DON’T BE FOOLED</span>.

[![image29.png](https://xivmodding.com/uploads/images/gallery/2024-08/scaled-1680-/jquOa5eWSViCIEeG-image29.png)
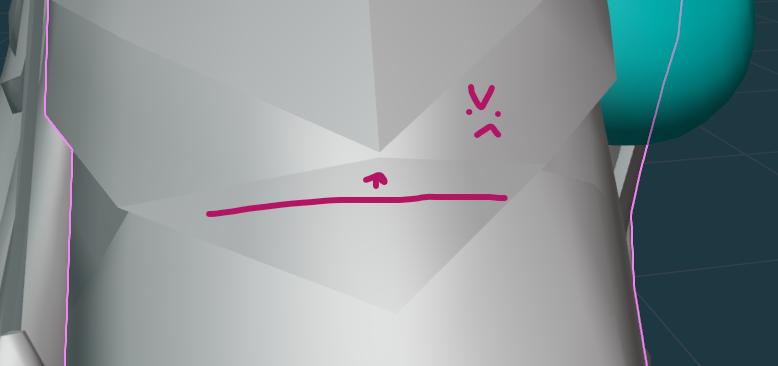
](https://xivmodding.com/uploads/images/gallery/2024-08/jquOa5eWSViCIEeG-image29.png)

<span id="bkmrk-clear-your-sharps-an-1" style="font-size: 11pt; font-family: Arial,sans-serif; color: #000000; background-color: transparent; font-weight: 400; font-style: normal; font-variant: normal; text-decoration: none; vertical-align: baseline; white-space: pre-wrap;">Clear your SHARPS and NOT your seams:</span>

[![image6.png](https://xivmodding.com/uploads/images/gallery/2024-08/scaled-1680-/tGIf5WES1sBJLzgw-image6.png)](https://xivmodding.com/uploads/images/gallery/2024-08/tGIf5WES1sBJLzgw-image6.png)

<span style="font-size: 11pt; font-family: Arial,sans-serif; color: #000000; background-color: transparent; font-weight: 400; font-style: normal; font-variant: normal; text-decoration: none; vertical-align: baseline; white-space: pre-wrap;">LOOK THE ENTIRE MESH OVER THOROUGHLY! You don’t want to miss one and be sad when it leaves a weird part on your upscale. When you’re done, it looks nice and pretty, something like this!</span>

[![image24.png](https://xivmodding.com/uploads/images/gallery/2024-08/scaled-1680-/YKcb8rWKoLZukdll-image24.png)
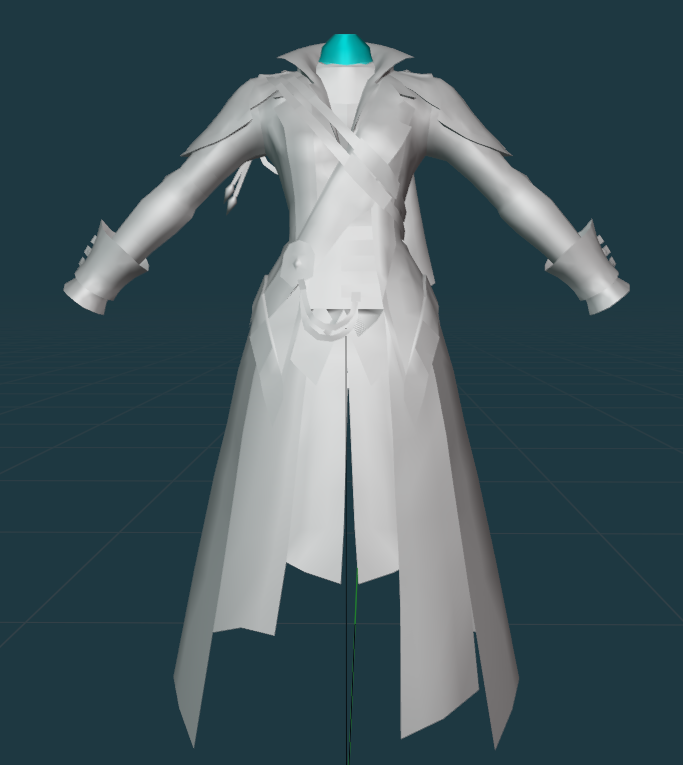
](https://xivmodding.com/uploads/images/gallery/2024-08/YKcb8rWKoLZukdll-image24.png)

<span id="bkmrk--12" style="font-size: 11pt; font-family: Arial,sans-serif; color: #000000; background-color: transparent; font-weight: 400; font-style: normal; font-variant: normal; text-decoration: none; vertical-align: baseline; white-space: pre-wrap;"></span>