Misc Short and sweet guides
What it says on the tin. This is a compilation book of a bunch of guides/tutorials that are super short and wouldn't normally fill an entire page. They're being made into guides though for easy distribution and reference.
Most of the things in here are either incredibly simple, incredibly specific (hence they are short) or take less than 10 clicks on average.
As far as I am aware, none of these things are covered by a proper "guide" or the initial guide these are based from is outdated (pre-Dawntrail) and also (in my opinion) bloated. If you made a post dawntrial guide on any of these topics, that's super awesome, I just never saw it/was linked it because Gdocs are impossible to find without direct links, and social media threads are volatile, sorry.
The formatting of these guides may be inconsistent between pages, so please bear with me.
- Updating a mod to DT shaders (instead of legacy)
- How to assign materials in Textools
- How to (easily) work with textures that use Alpha as non-transparency
Updating a mod to DT shaders (instead of legacy)
This is a short and sweet guide on the above, that covers MOST cases but not all. As some ground rules, this is NOT talking about pre-dawntrail mods. those MUST be either remade from scratch, or thrown through textools' DT updater. This is referring to mods using the characterlegacy shader that you want to move to the new Character shader. if you have a pre-DT mod that has not yet been updated YOU MUST RUN IT THROUGH THE TEXTOOLS UPGRADER FIRST.
This assumes you have basic familiarity with either textools 3.0 (post dawntrail) or penumbra. if you don't, then you will need to find another guide for them.
This guide is also only referring to CharacterLegacy shader to Character shader conversions. For any other shaders such as transparency, skin, furniture, scroll, etc; there is more involved than this and the mods may need to be remade. That said most need for manual conversion post using the updater falls in this category, as this is often asked about for Gear.
Remember to hit save after every big step. you don't want to lose your work. In penumbra it's the "save to file" button. In textools, it's "save to TX/transaction" at the bottom right.
Step 0- Select your mod and tool of choice
Pick whatever mod you want to update, and your tool of choice. you can use either textools or penumbra. I will show both UIs. You will need to install the mod into whatever tool. for penumbra, this just means installing the mod normally. For textools, prepare or begin a transaction in SAFE mode, then install the mod IN SAFE MODE WITH THE TRANSACTION RUNNING.
Step 1- Changing the shader
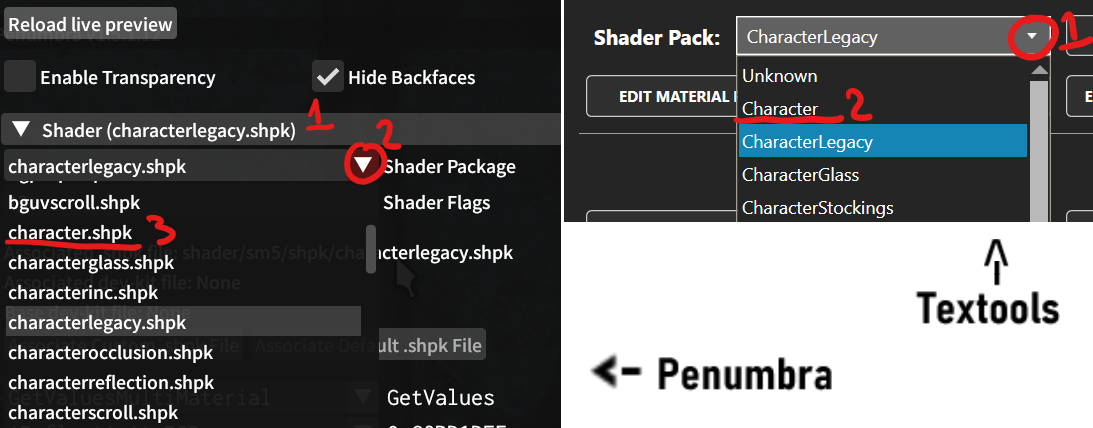
Go to your mod of choice and edit the relevant material. In penumbra this is in the materials tab of advanced editing under the "shader" dropdown. in textools this is in the general "materials" tab.Find the shaderpack selector (image below) and swap it from "characterlegacy" to "character".
Step 2- Fixing the material
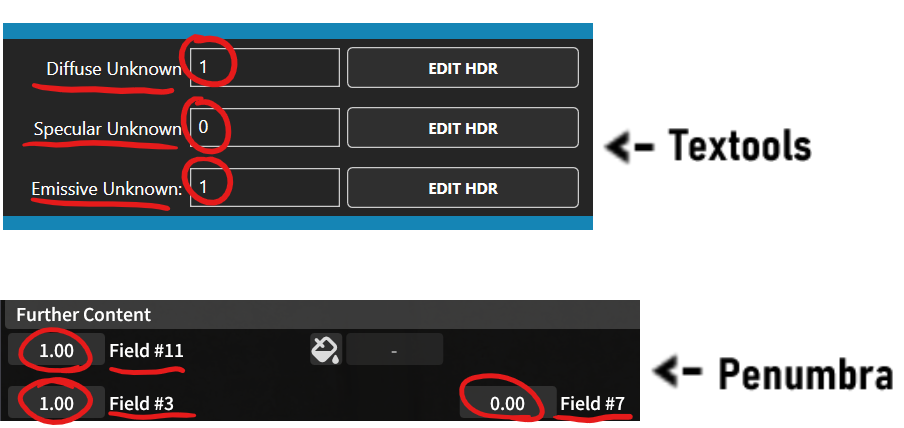
Once you've done this, you now need to change some material parameters. This needs to be done on every colorset row you plan on using. as of right now, there is no way to automate this in either tool. In penumbra, scroll to the bottom under "further content" and change Fields 3 and 11 to 1 and Field 7 to 0. In textools, go to "view/edit colorset" and change the fields Diffuse and Emissive unknown to 1, and Specular unknown to 0. Hit save.
Step 3 (OPTIONAL)- Fix dye templates and metals
if you have normal gear that you don't care about dyeing, and that does not contain any parts that are meant to be metal, this is entirely optional and unneeded. but if you do have those things, they're also pretty easy to fix (though you may want to tweak past this yourself.)
For dyes-
Legacy uses dyes with 3 digit numbers. the new shader uses the same templates but with 4 digit numbers. to get the same dye results, just pick the dye template that matches the last 3 numbers of the old template (it will still show the old template when you manually convert until you fix it). this needs to be done on every dyeable row. For visuals on what the templates look like, please check out the Dye templates Document also posted on this wiki.
For metals-
The big difference between legacy and non legacy as far as metals are concerned is the addition of the metalness value, and the fact that the new Character shader doesn't use spec color for the color of the metal. to adjust for this, copy the hexcode of the specular color on the metallic row, and paste into the diffuse color's spot, then make the specular color white. You will likely want to mess with the metalness and roughness values to get the shine you want.

(you do not need the roughness and metalness values to match this, this is just what i liked for this mod)
TL:DR;
Change shader from Characterlegacy to Character
Adjust Shader/Colorset/Color table Extra values
Save
Optional: Fix dye template and/or metals by swapping the dye template to the same one with a 1 in front, and the metals by moving the spec color to diffuse and making spec white. Add roughness and metalness percentages.
Done.
How to assign materials in Textools
Short and simple guide on assigning materials in textools, since every guide I've found expects you to know all this. I won't be teaching penumbra as I'm sure there is a guide out there for that, and I'm not comfortable with using penumbra's UI for it. Sorry.
Step 0- Prep and figuring out your mesh groups.
In order to assign materials, you need to know what mesh group is what so you can assign them correctly. I will be showing on vanilla clothing, as it already has a mesh separated into groups, but this works for anything. You should always be working in SAFE mode and in a transaction when working in textools.
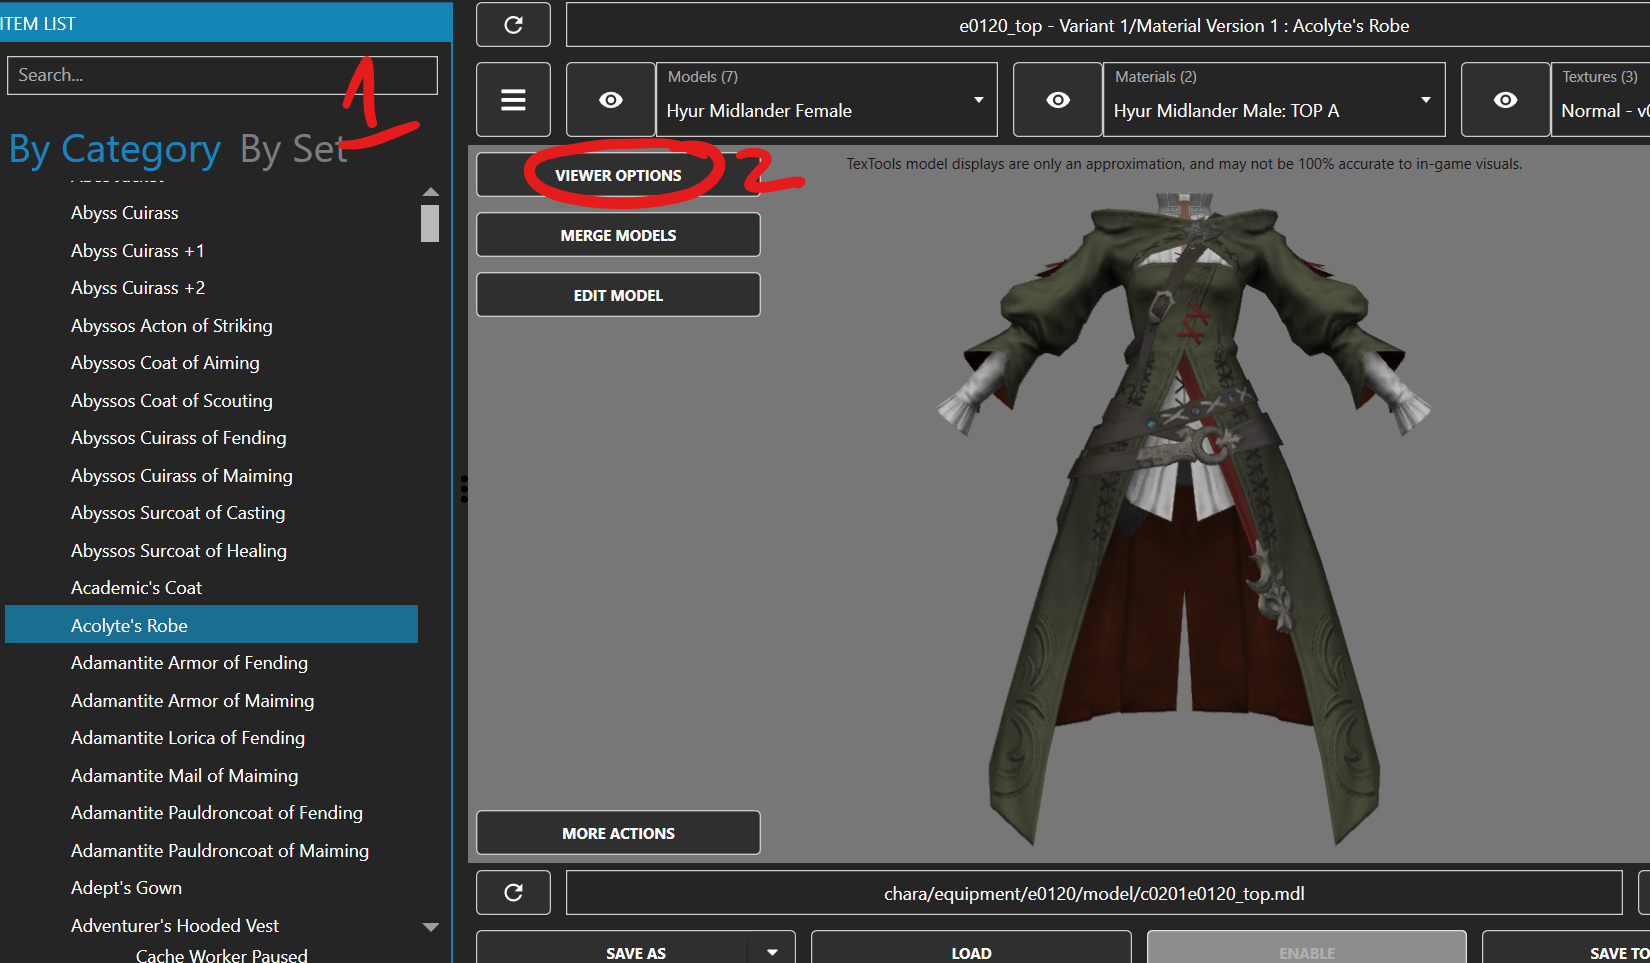
1- Find your item or the item a mod is affecting. this will generally be by name in the by category tab
2- click "viewer options"
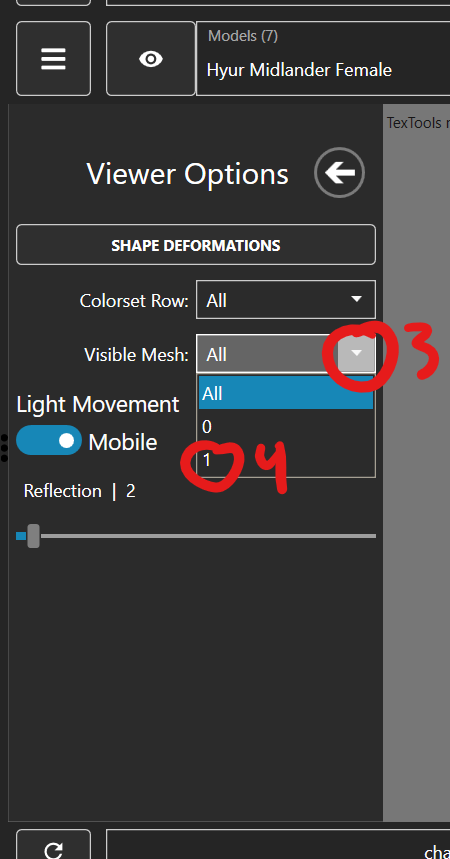
3- Click the arrow next to visible mesh
4- click a number
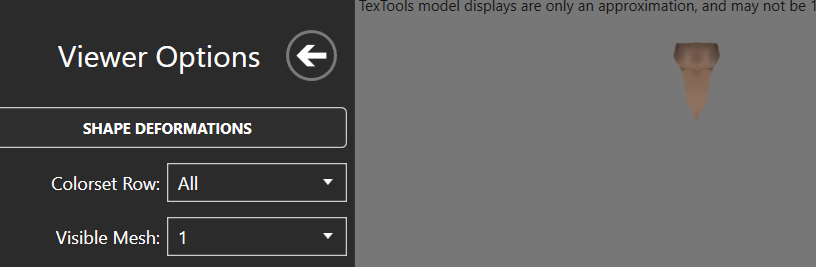
Whatever is included in that mesh will show and everything else will be hidden.
5- repeat for all other parts if there is more than 2, and write down what is what.
Step 1- Assigning the material
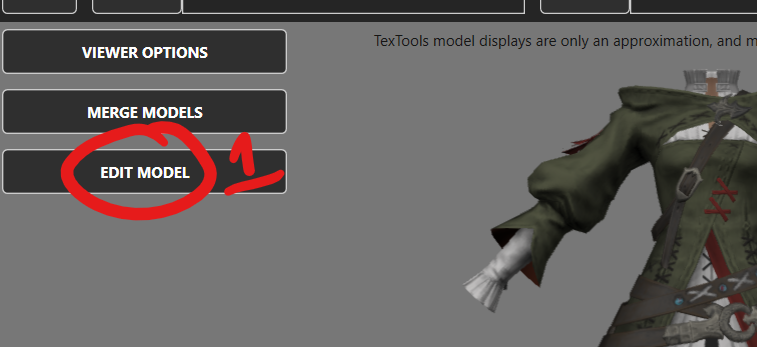
1- click "edit model"
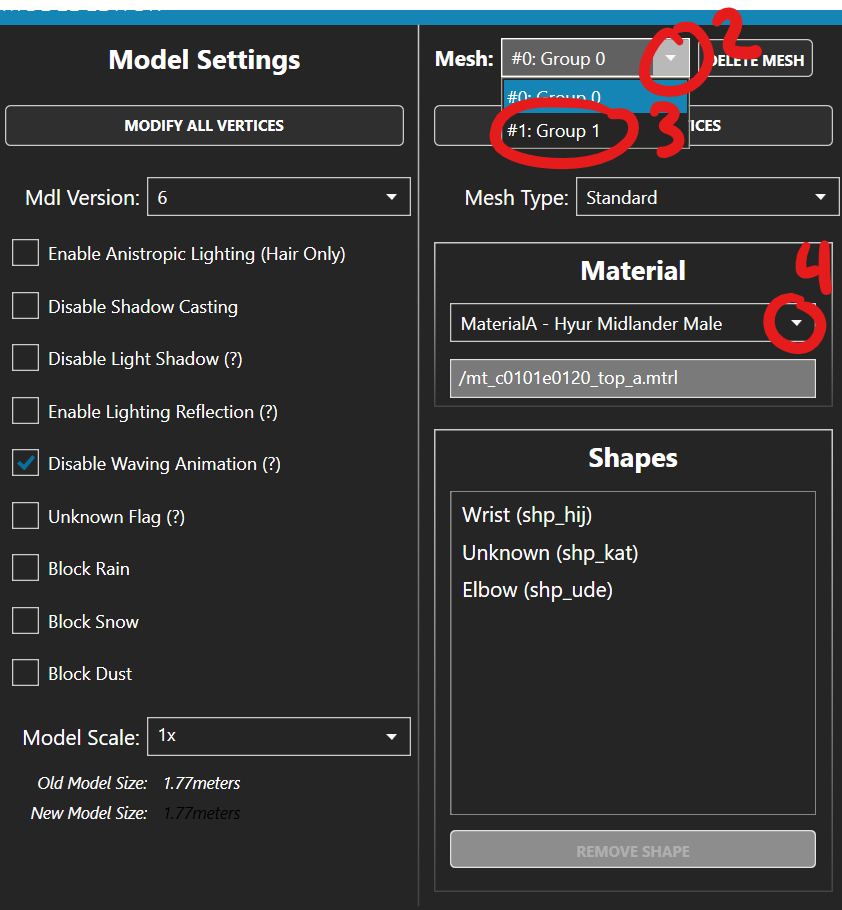
2- Click the arrow next to mesh: group 0 (if you are not editing group 0)
3- Click the group you want to change (if you are not editing group 0)
4- Click the arrow next to the existing material
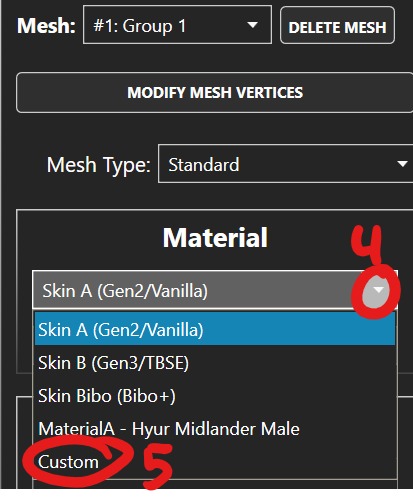
5- Click the material you want to add. if the material is already in the dropdown, click that. If the material is not, click "custom"
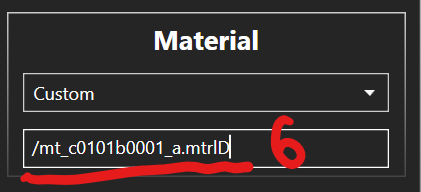
6- copypaste or type the material path you want. If it's not an existing material that you made beforehand or are borrowing from another item, you will have to make one on the materials tab. This guide will not cover that.
7- Hit "confirm" at the bottom right.
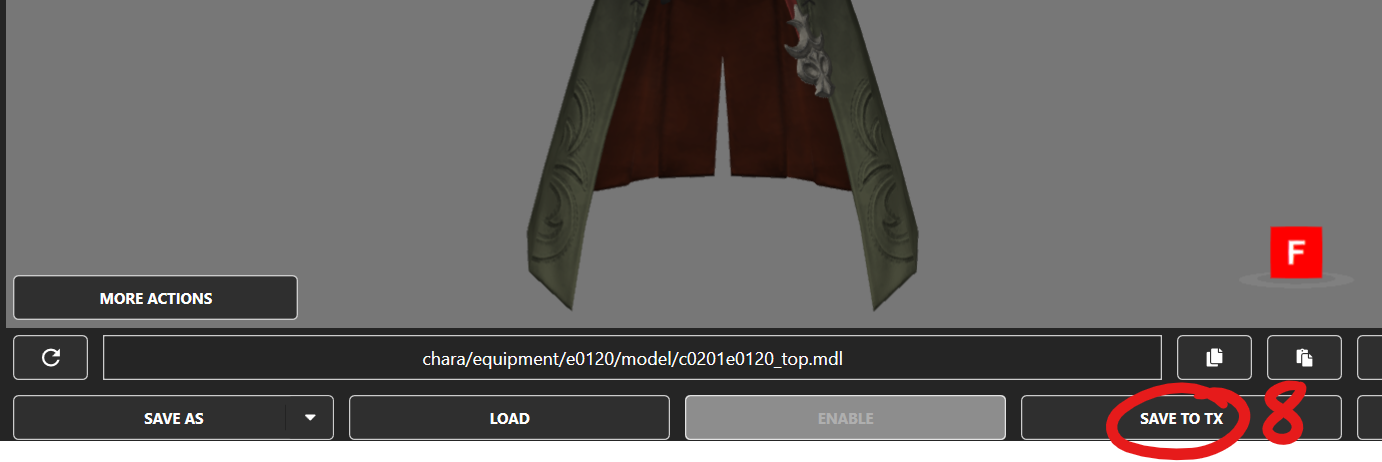
8- Hit "save to TX" at the bottom.
9- Pack as normal using your preferred modpacking method. I will not be explaining this here.
That is how you assign materials in textools. I feel like creating a new material and assigning textures is fairly self-explanitory if you're willing to click around, but if a simple non-video guide doesn't exist for that, then I can make one in the future, if people need it.
How to (easily) work with textures that use Alpha as non-transparency
When working with and editing some textures in FF14, some files use the alpha channel as greyscale data instead of transparency to save on space. This causes a lot of issues for people who do not know how to work with this properly, and can cause people to unintentionally break these textures which causes problems.
This guide will show you a way to work with these, and the ways I find easiest. This guide will be utilizing Textools and Photoshop. From what I understand, Penumbra and Gimp work in place of these two, but I am not as comfortable with them, so I will not be showing them. Anyone more comfortable with those is free to make another guide or add to this one showing the same process but using those instead.
When working with textures that use alpha as non-transparency, it is best to export these files from the game/your mod tool of choice as TGA or DDS. While PNG has capabilities of storing the alpha channel as non-transparency, the default handling by 99.9% of softwares is to use alpha as transparency, and once this is done, it cannot be undone. even for softwares that are capable of reading PNG alpha as non-transparency, there are often special ways you have to load the file in those softwares for it to read correctly, so for the sake of ease and less confusion in the real world; you should only be exporting these textures as TGA or DDS. I personally reccommend TGA, as DDS is a proprietary format that most software cannot read.
The most common textures in 14 that use alpha as data and not transparency are skin/body Normal map, hair Normal map, and hair Mask. however this may change at any time. for a full list of what textures use what, please refer to https://xivmodding.com/books/ff14-asset-reference-document/page/dawntrail-shader-reference-table
Step 1- Exporting the textures
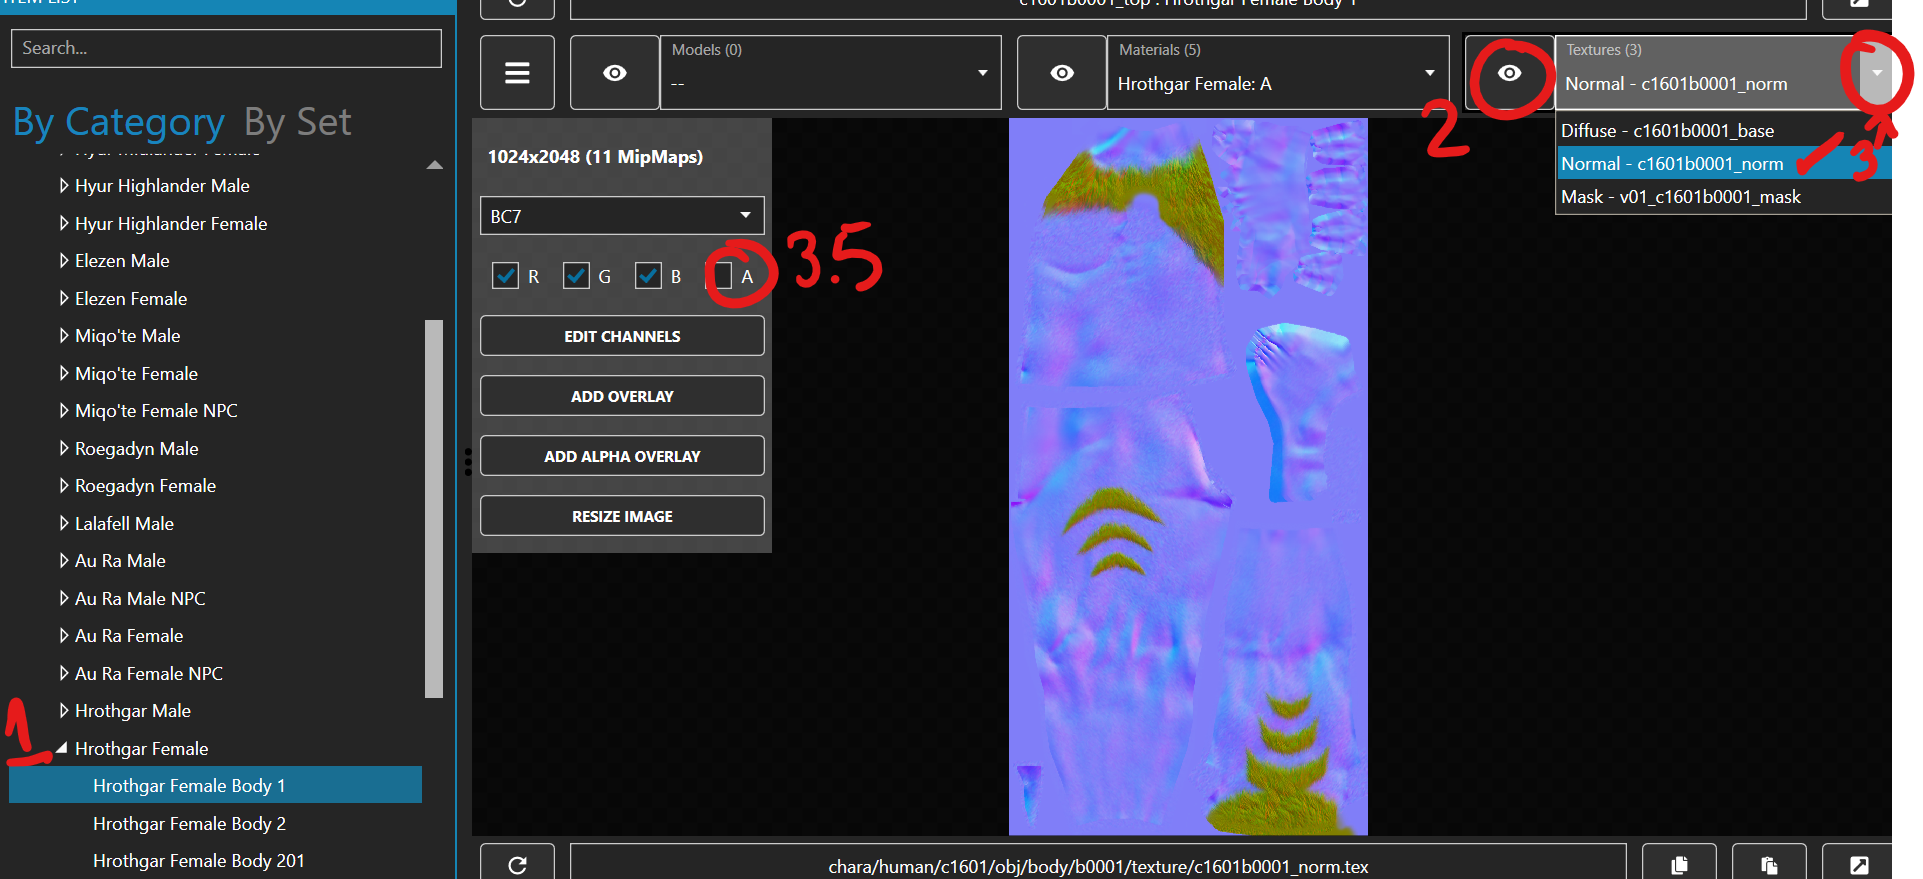
- In textools, navigate to the item you want to edit. If you want to edit a modded texture, make sure to load the mod in a transaction in SAFE mode.
- Click the eyeball next to "texture"
- Click the dropdown arrow and select the texture you want to edit (generally normal or mask) Optional step, confirm the alpha channel is being used by clicking the A box. if the texture changes, it is using alpha

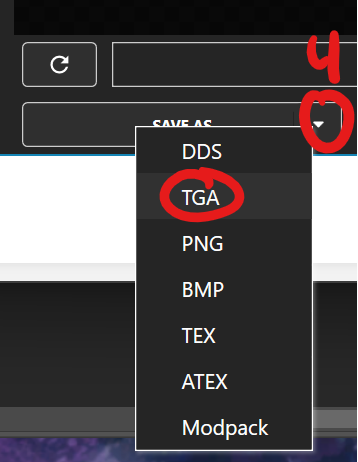
- At the bottom left click the arrow next to "save as" and click TGA

- Click the folder icon at the far right to open the folder the file was saved to. Repeat for all textures you want to edit.
Step 2- Prepping the textures for Editing
While photoshop and gimp allow for per-channel editing and editing of the alpha separately, it can still be a little annoying to do so, and you have to be mindful of your save options when you finish. It also causes problems for those who may want to edit the textures later but do not have photoshop or want to use gimp. So I prefer to split the TGA into two PNGs that will not cause alpha issues. one image that is a full color RGB image, and another that is a greyscale Alpha Only image. I will be showing the steps in Photoshop, but I believe this process in gimp is called "decompose". At this time, photopea does not have this capability, or if it does, it does not follow the photoshop way and I have not found it.
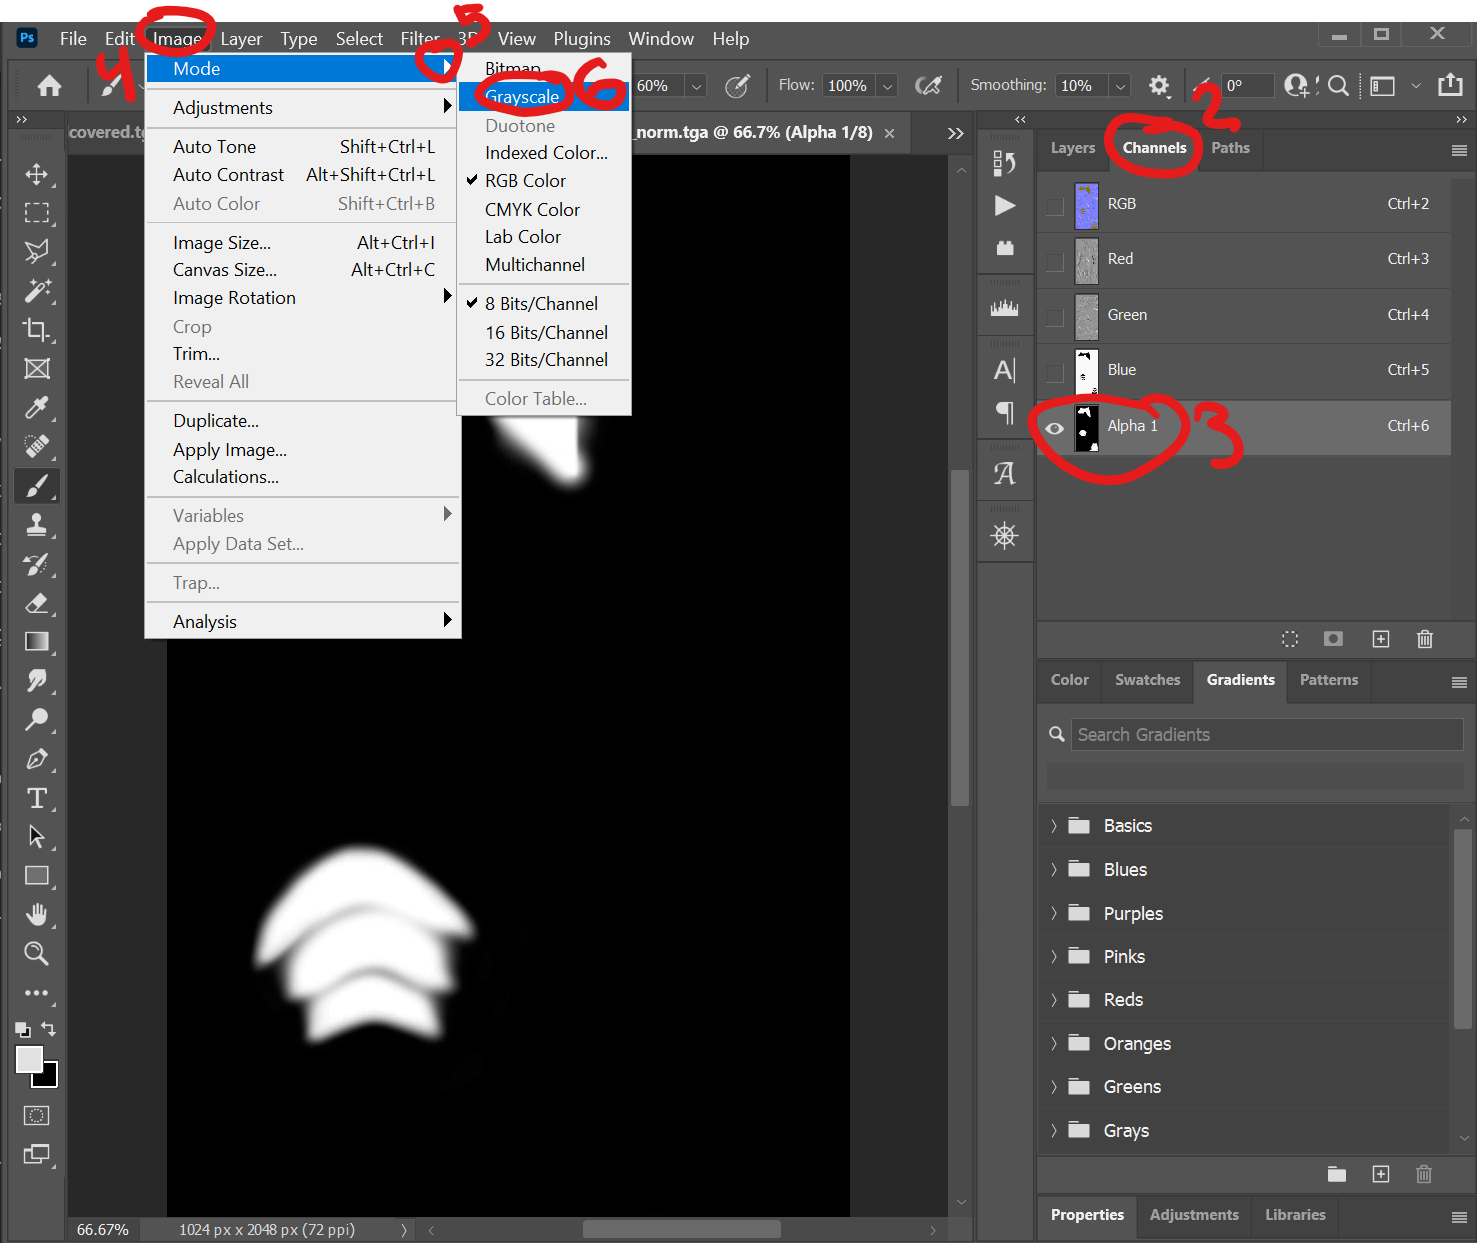
- Open the image in photoshop. I personally drag and drop the image either into the main menu when I don't have other projects open, or into the channel/layer box to open a new file if i have other projects open.
- To separate the alpha, we will click the "channels" tab instead of "Layers"
- Then click the channel labeled "alpha" or the one that is at the very bottom. you should have 5 channels there. if you only have 4, you exported wrong and have lost your alpha channel.
- in the top bar to the left, click "image"
- Then click "mode"
- Click "greyscale"

- When a message asking if it's ok pops up say "yes". once you have saved as a PNG, you can undo to get the others back.
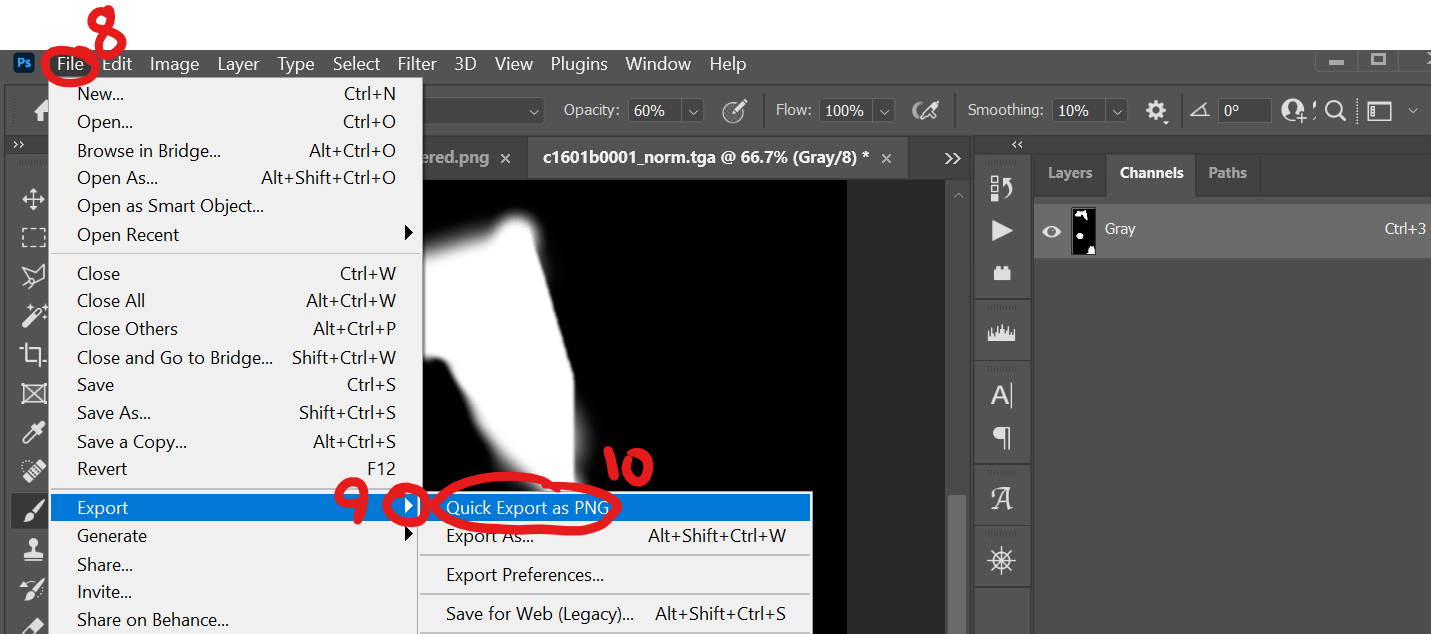
- Save as a PNG by going to "file"
- click or hover over the arrow for "export"
- click "quick export as PNG"

- Save the file. I recommend naming it whatever the thing is and "alpha"
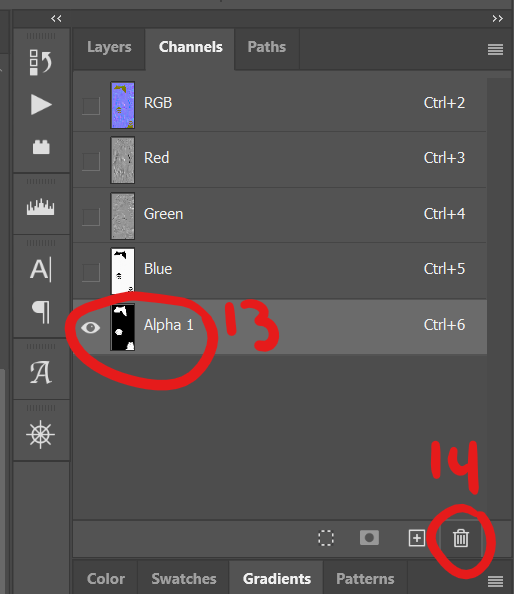
- Undo until you have the 5 channels and full color again. (control Z if you use shortcuts)
- click the alpha channel if it is not selected already
- click "delete channel"

- Hit "ok" on the popup box
- save the image as PNG like in steps 8-13, but name this one with "RGB" at the end.
- re-open the PNGs in whatever software you prefer to edit in.
- Edit the images how you like. repeat for however many files.
Step 3- Re-importing and merging the alpha back in
When you finish your edits, you need to re-import them back into your mod. While it is possible to re-combine the RGB and Alpha in either photoshop or gimp, I find re-importing it into textools easier. I believe you can also do this in penumbra, but I'm not quite sure how. When doing any kind of editing or modmaking in textools, be sure to be in SAFE mod and in a transaction. if you have a transaction open and running, you will see "save to TX" at the bottom right.
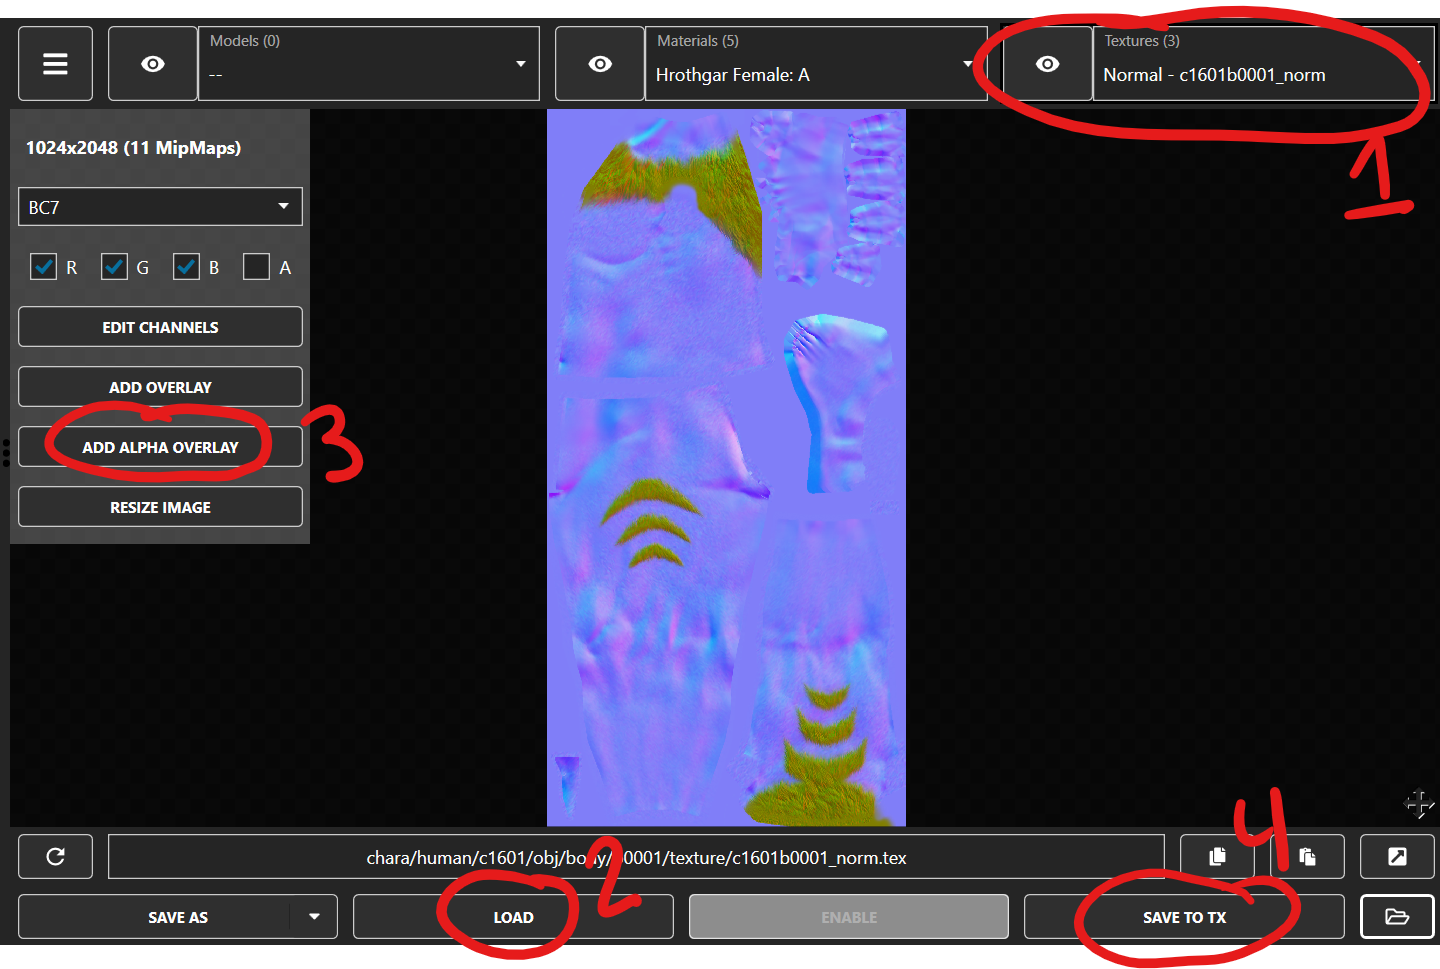
- Re-Navigate back to the matching texture you exported, or wherever you want the texture to go. Make sure to match Normal with Normal and Mask with Mask
- Click "load" and select the image labeled "RGB"
- Click "Add alpha overlay" and select the image labeled "Alpha"
- click "Save to TX"

- repeat for any other textures you have edited.
- Export your modpack however you prefer.
All done!
Examples of Incorrect texture exporting
Below are example images of what a texture looks like when it is incorrectly exported as PNG or incorrectly exported with alpha as transparency. If you export a texture and it looks like this outside of textools, then you exported it wrong and need to follow this guide.
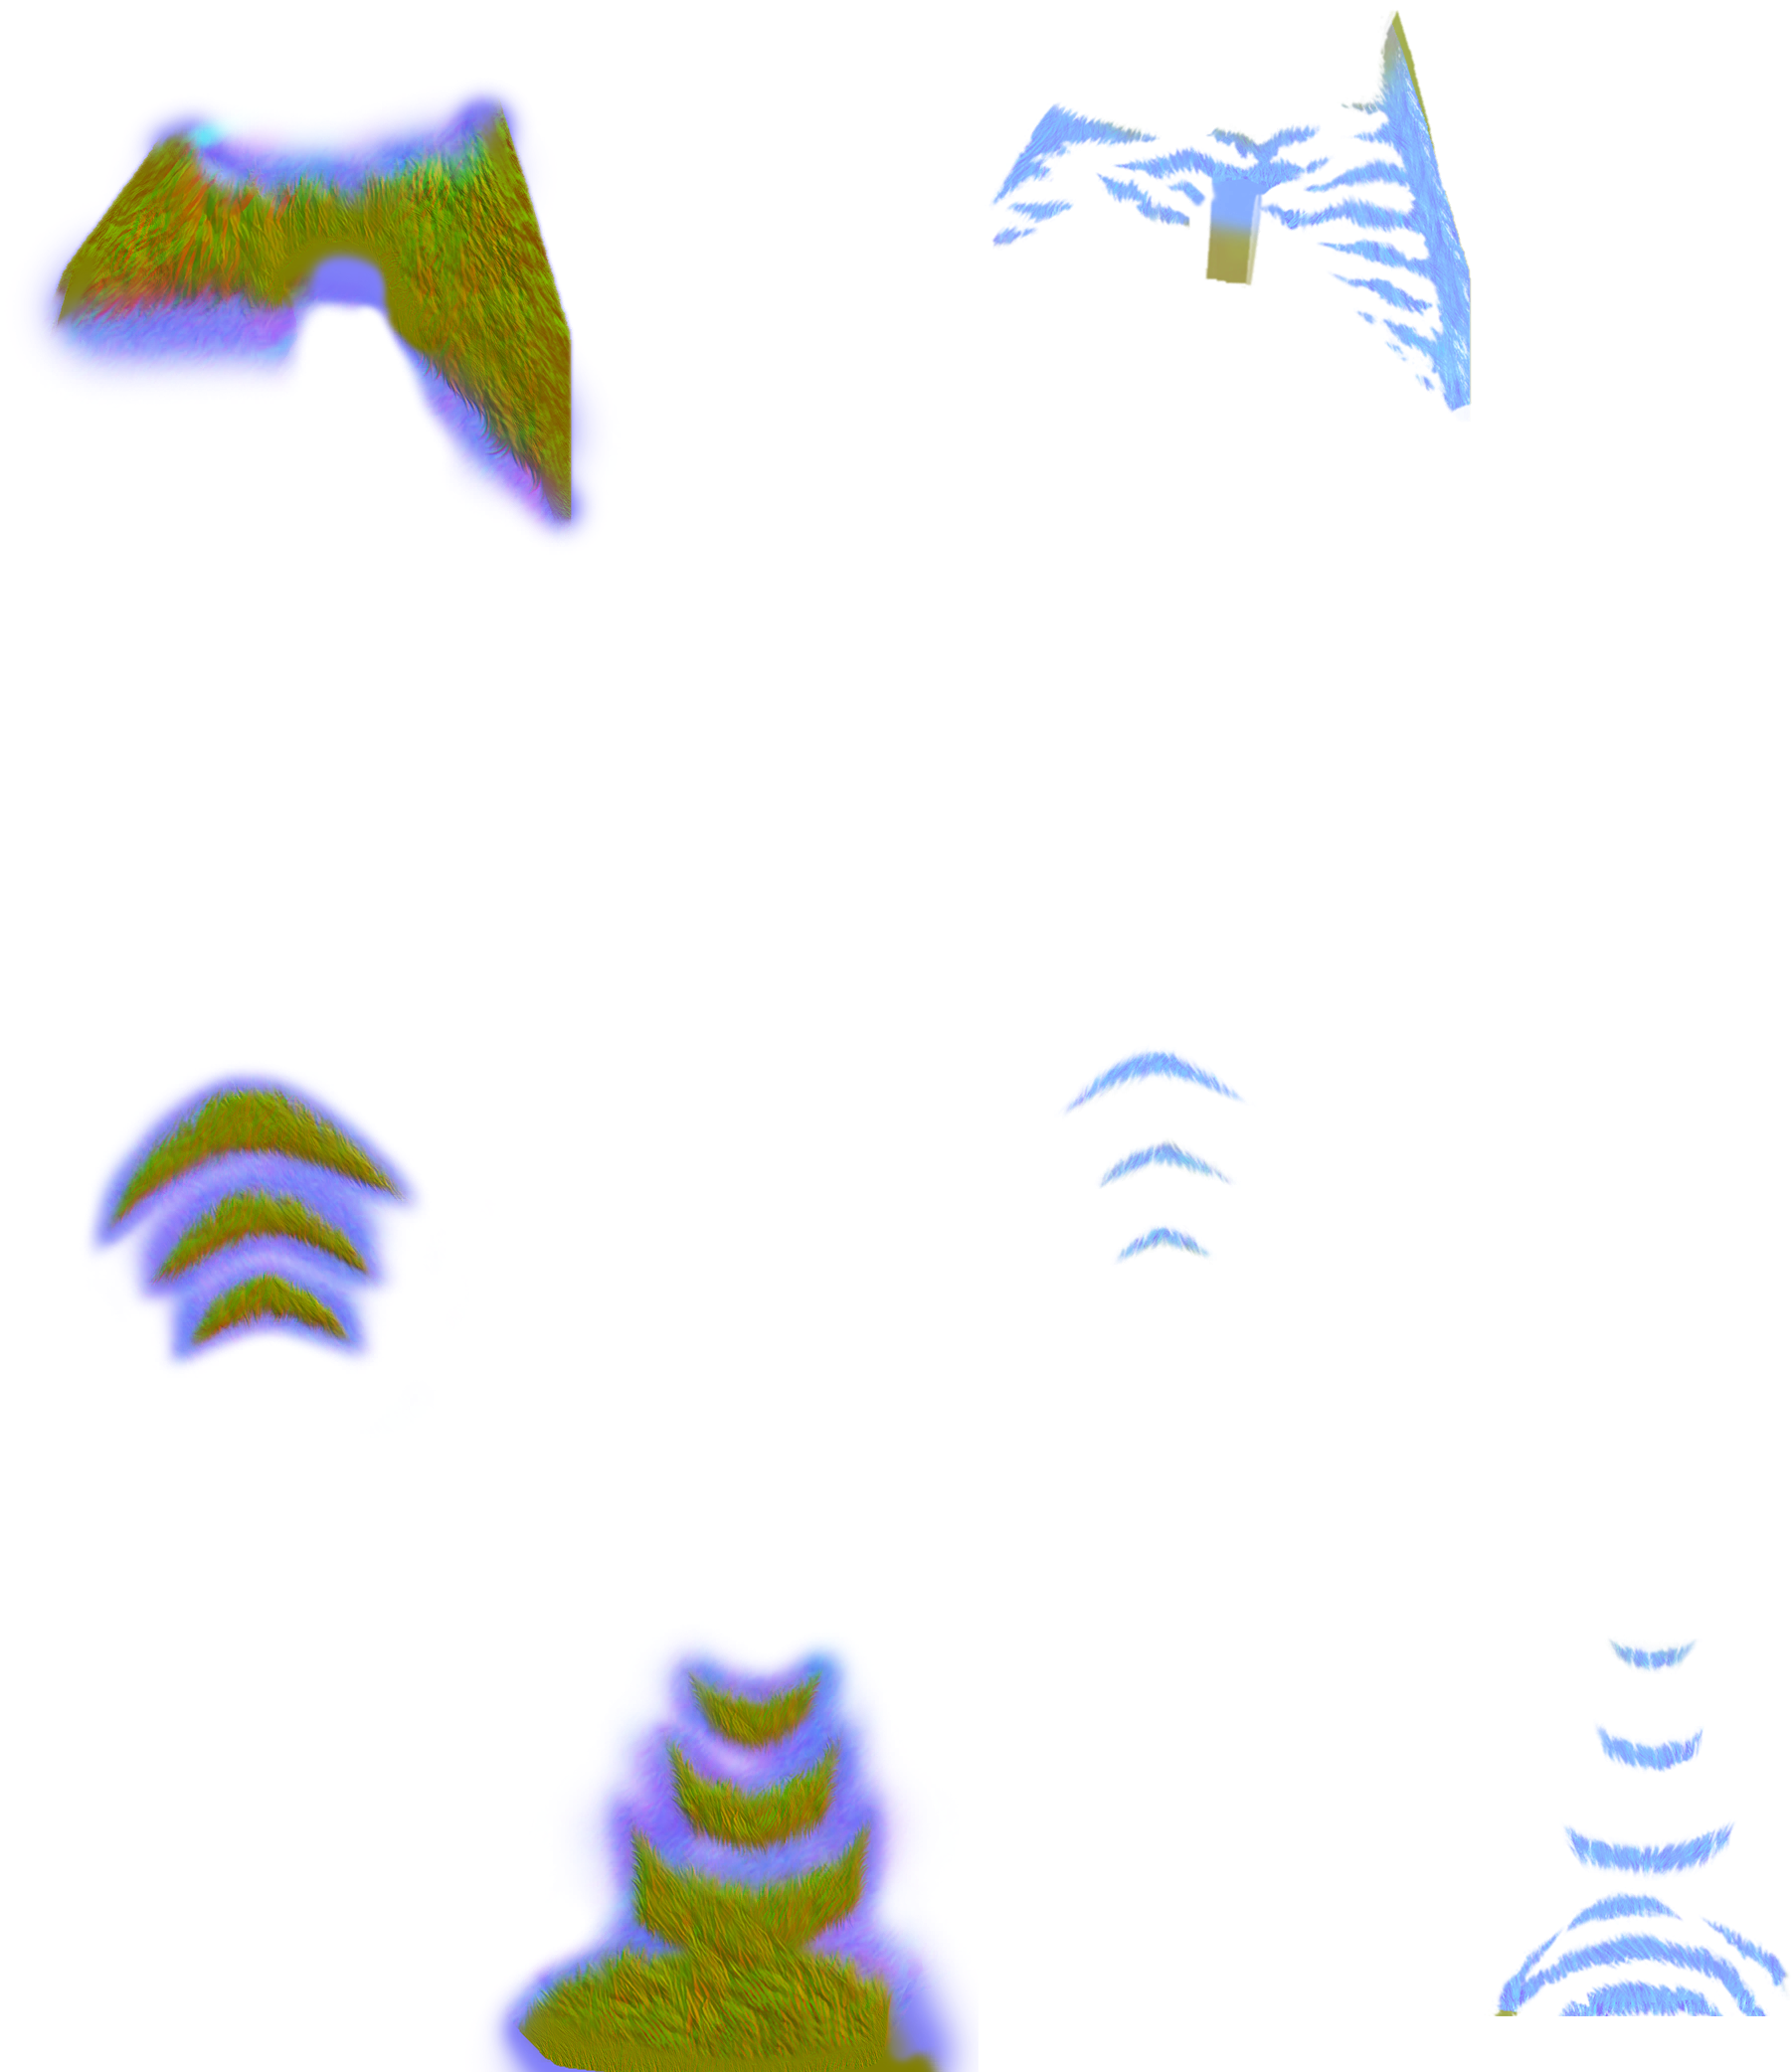
Example of Hrothgar body textures. Normal map on left and Mask on Right. Depending on your settings this will be either black (dark mode), White (Light mode) or have a white and grey checkerboard pattern (PNG transparency)
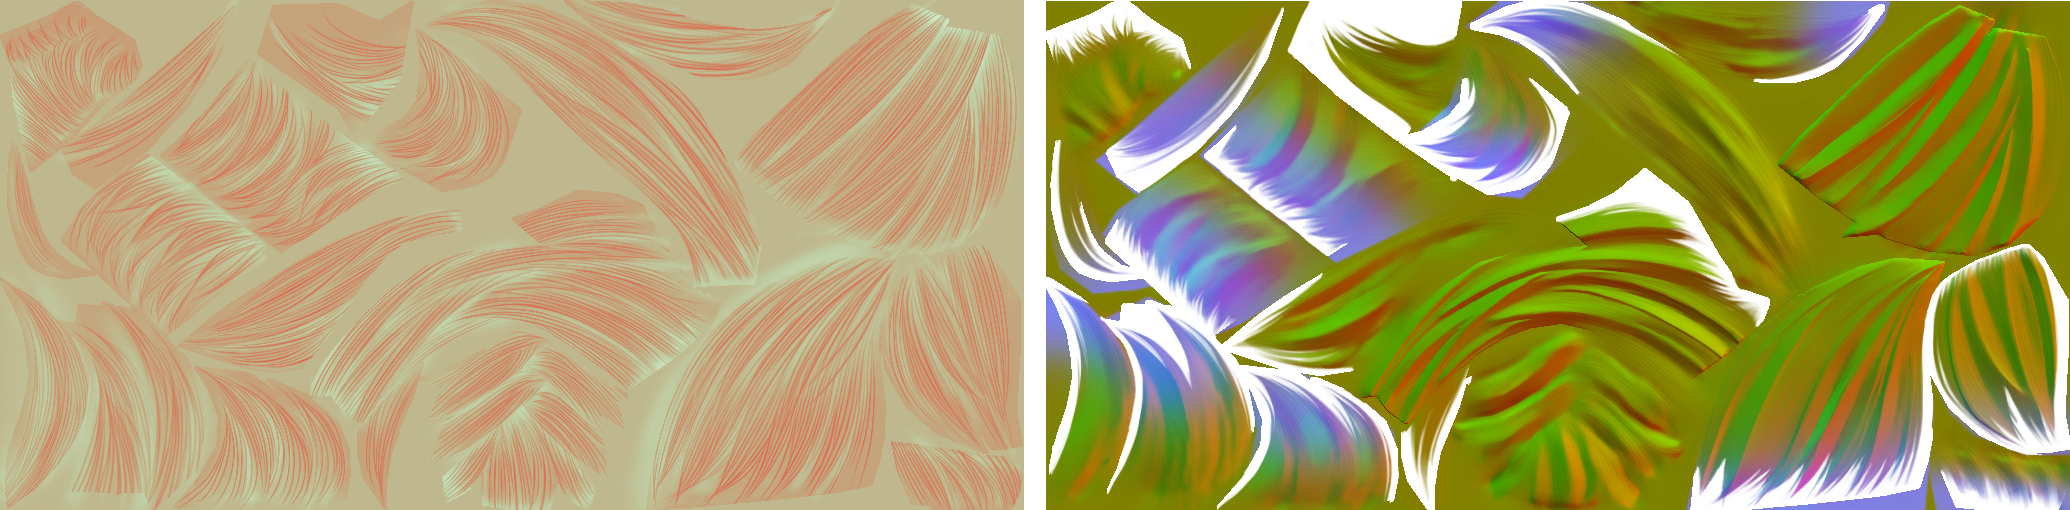
Example of hair textures. Mask on left and Normal on right. Depending on your settings this will be either black (dark mode), White (Light mode) or have a white and grey checkerboard pattern (PNG transparency)
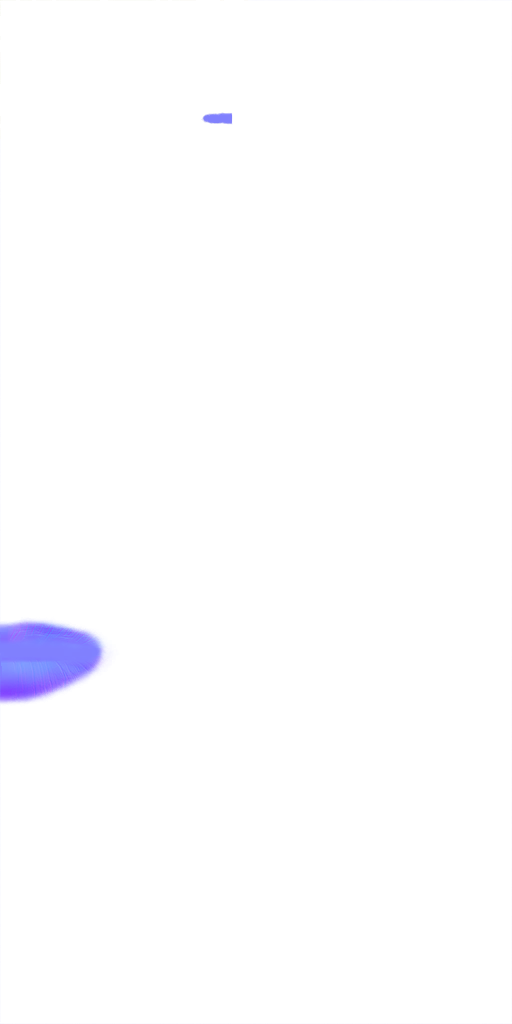
Example of incorrect face Normal Map texture for all Players except Hrothgar and Aura. Depending on your settings this will be either black (dark mode), White (Light mode) or have a white and grey checkerboard pattern (PNG transparency)
Finally, if you exported your textures and it shows the entire image but you still have issues in game, it's possible that you exported your textures incorrectly and lost the alpha channel entirely by having it set to pure white. This is incorrect for textures that use transparency as data. if this happens to you, please redo your edits following this guide.