General GPosing
Stuff about Gposing that's not really here nor there. So it goes in this!
Posing your characters
Creating interesting poses is not exclusive to those who have access to posing tools. But there's only so many animations available in the game, which can easily lead to shots becoming repetitive.
Head & Face
Conveying attitude
The choices you make for your picture are influences by its subject matter and tone. Is a scene soft, with the character looking at some flowers? Or is it a high stakes action scene, where everything feels like it is in motion? The way you pose your character changes based on what you're trying to convey.
 |
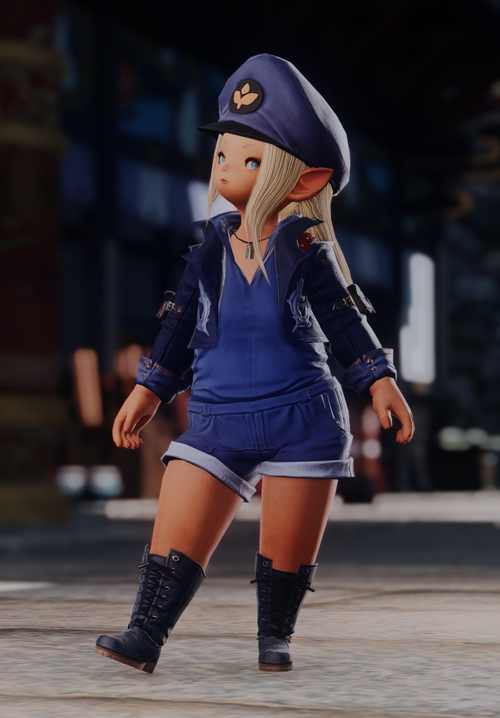 |
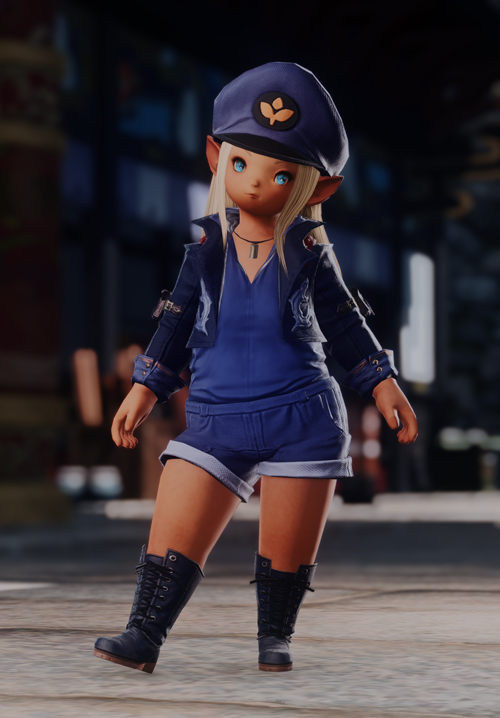
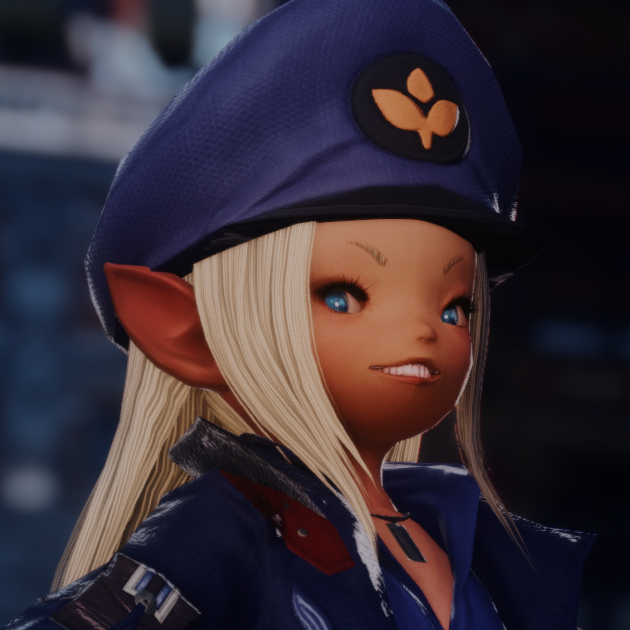
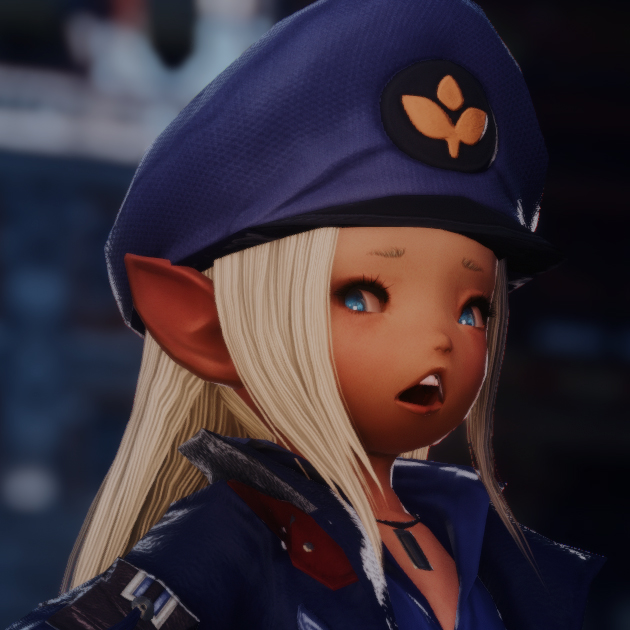
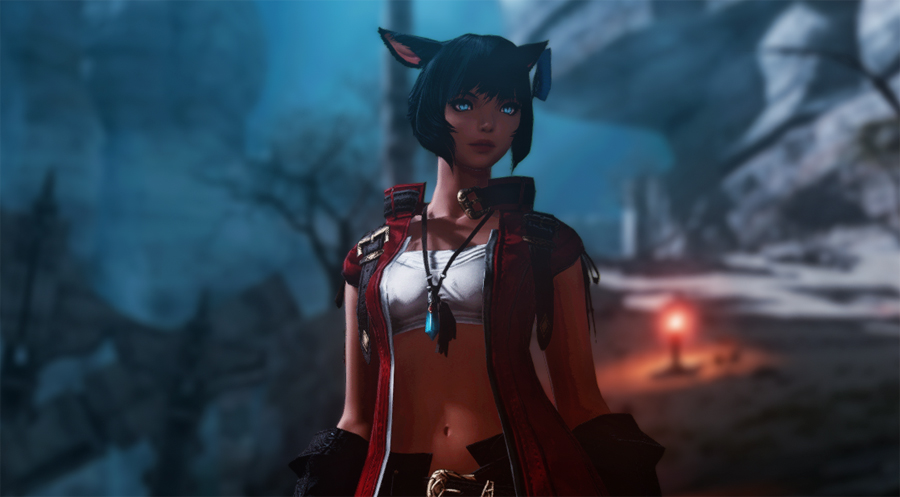
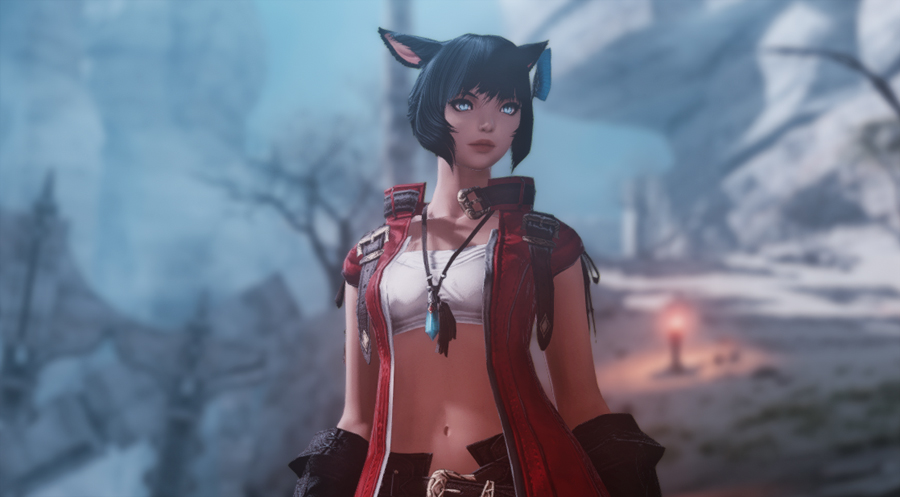
Attitude can and should be conveyed throughout the entire body. Above you can see how a simple head tilt can make the difference between a simple front-facing pose, and one with a lot of attitude; a change fairly small can influence the look and feel of your entire pose. All this is achieved by only moving her head and eyes.
Head angles & eye tracking
To replicate the aforementioned example two options are used. Within the motion settings menu, you can find “Face Camera” and “Eye Tracking.”
By selecting the “Face Camera” button, the character will face wherever the camera is positioned at that moment. By selecting the “Eye Tracking” button, the character's eyes will follow the camera as it moves.
By angling the camera up in the air, it is possible to get the character to look up when paired with the “Face Camera” button. Then, with the character's head locked in place and “Eye Tracking” enabled, the camera can be moved again to create the side-eye effect.
Lip movements
With what we’ve done so far we’re on track to make an interesting facial expression. To get more out of the face’s potential in a pose we’re going to have a look at “Lip Movements”.
In the drop down menu you’ll find three lip movement types. The difference between these three is the speed at which the lips move and the level of animation that is added to the character’s head.
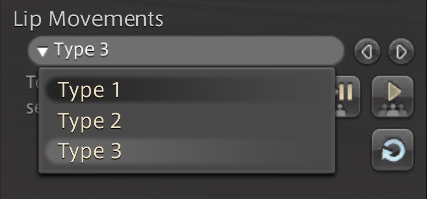
Type 1
Type 2
Type 3
Adding facial expressions
I feel like it goes without saying that adding facial expressions will make the biggest difference to well… the facial expression.
|
|
|
Even with your character’s mouth moving, you’re still able to add facial expressions. They might not translate 1:1 like they would with a static face, but there’s lots of neat little combinations you can achieve with them.
That said, you won’t be able to combine lip movements with every facial emote. There are a few expressions that will override lip movements.
Obstruction of the face
A pose might appear fine at first glance, but ask yourself, does it do a good job at showcasing what you want people to see? To make an image easier to read our needs need a point of interest. This will be covered more in depth in an actual composition guide, but I’ll quickly address the posing aspect of it here.
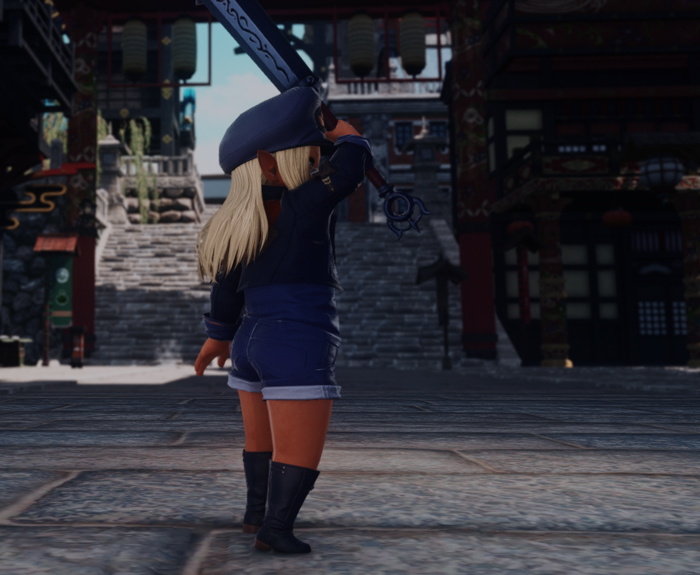
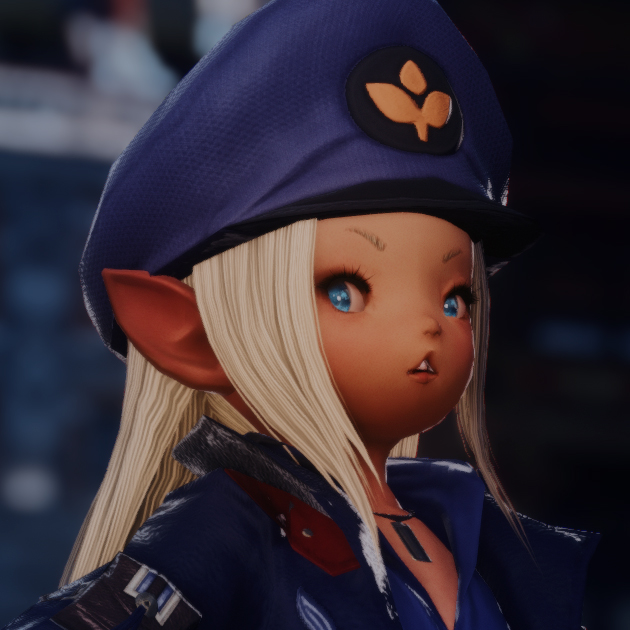
The image on the left is hard to read. You don’t really have anything to latch onto with your eyes as the character’s face is mostly hidden by the character’s arm. It could have been an interesting pose with a glance over the shoulders, but do to the Lalafell’s physique that quickly turned into an obstructed view.
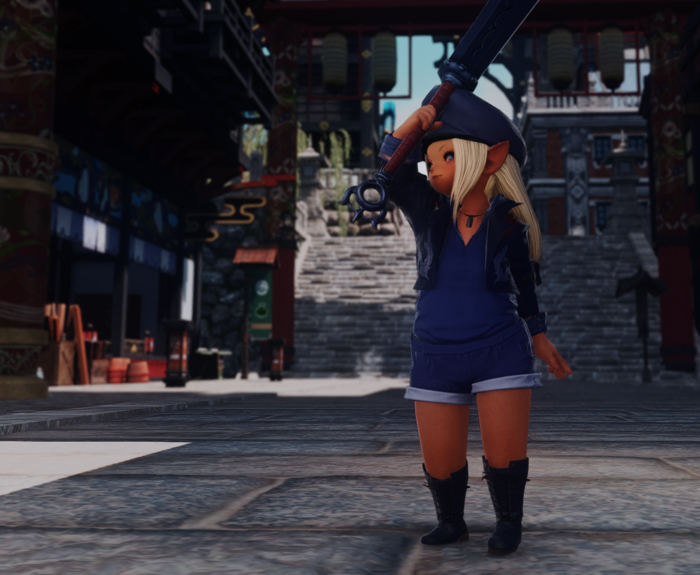
The image on the right is much easier to read. By revealing the face I’ve given the viewer something to look at. Additionally it adds a natural break point between the clothes which are all a similar shade of blue. This contrast also makes the image easier to read.
This all said, you’re allowed to hide the face in certain situations. My general rule of thumb is that if I break a “rule” I have to do it in an intentional way. Again, the face doesn’t have to be visible, but it has to be clear that this was my intent. We can create drama by hiding parts of the character, would can result in enticing scenes.
Examples of hiding the face correctly
Move your body!
We’ve already made some pretty big steps in changing our character’s demeanor by only changing the head and facial expression. It’s time to move on to the rest of the body which is just as, if not most important.
Movement submenu
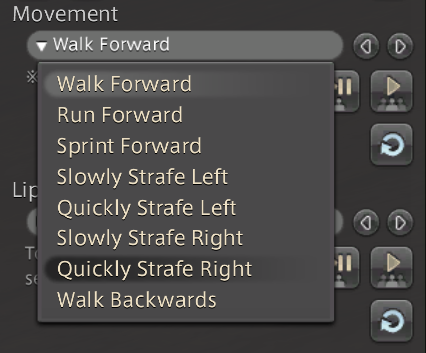
Backing up a little in the Gpose menu we’re going to have a look at the “Movements” drop down. This drop down contains all types of walking animations.
It’s an easily overlooked option as, it’s just walking animations right? Well, think again!
I’ve always found my biggest issue in posing my character than there’s such a huge limit when posing a specific class. Using the battle stance and victory pose emotes gets you a long way, but when you’re on your 50th screenshot of said class it starts to get a bit repetitive.
Luckily every class also comes with unique walking and running animations if you hold their weapon out. Thanks to this we’re able to add a whole repertoire of unique animations to our collection.
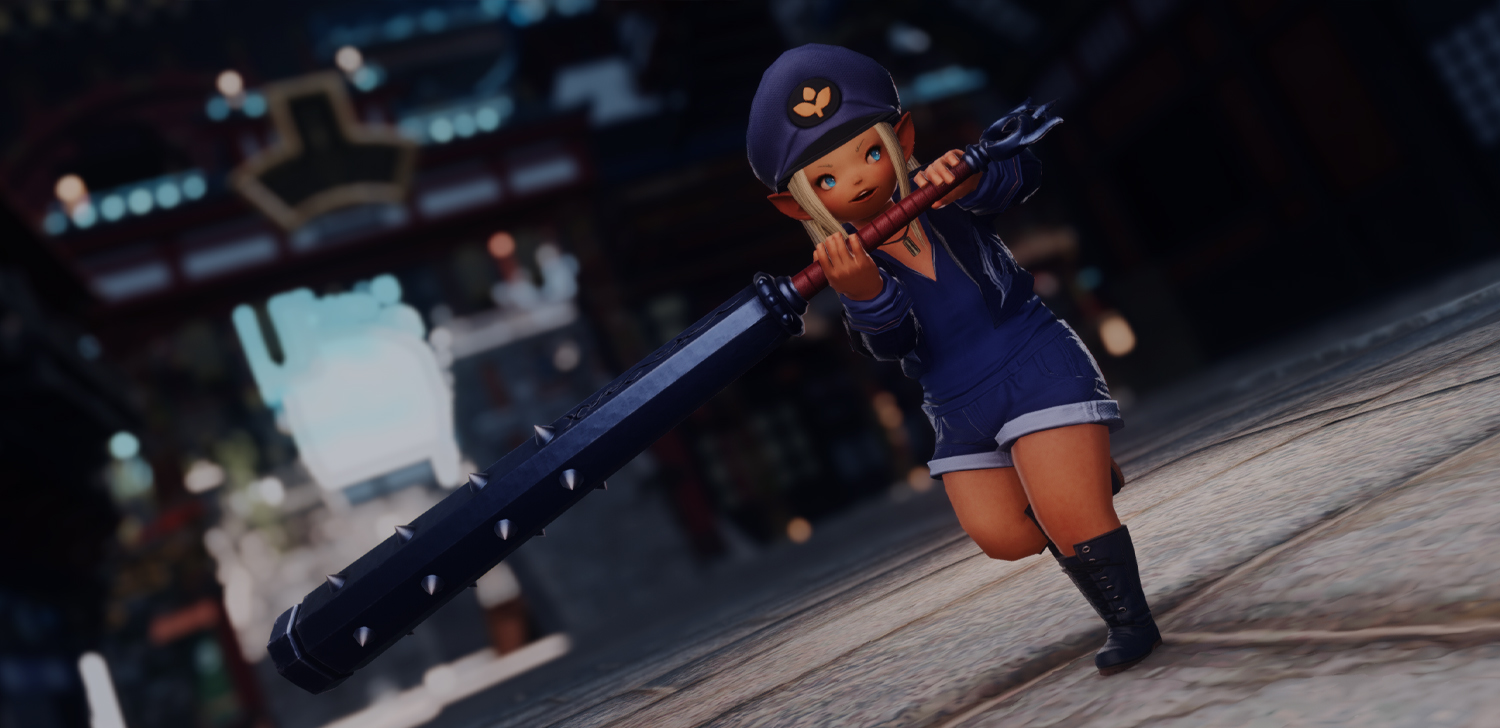
A pose created with the walking animations
Emotes
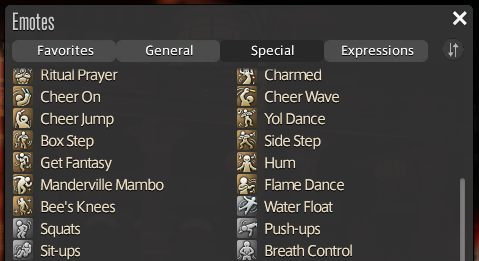
Without a doubt emotes will make the biggest difference to your character’s pose. Before I get into how to get the most out of emotes I would like to recommend you get into the habit of collecting.
By collecting emotes, even the ones you don’t quite like as much, you open yourself up to a lot more variety. Though you might not like the animation as a whole, there’s always the potential that one still frame from it makes for a beautiful and unique pose. Here you will be able to find a resource will all available emotes and where to get them.
Now that we’ve got that out of the way, let’s start navigating using emotes more efficiently.
Slowing down animations
3rd party tool users like myself might already be familiar with the ability to slow down animations. It’s an amazing advantage to have when trying to choose more precisely what frame you’d like to pause on.
Luckily this isn’t entirely exclusive to PC players and there’s a way for us to do this using just the in game tools. So, how do we do this?
First we’re going to open up the second tab in Gpose, “Effect/Frame Settings”. Here you will find the status drop down menu. In this menu we’ll select sleep and apply it with either of the play buttons below.
You’ll immediately see everything is slowed down. However you run into the issue of those pesky sleep bubbles. You can remove these by click the “Toggle Battle Effects ON/OFF” button in the top menu.
Secondly, you might have issues with the expression. You can combat this by using a facial expression emote before or after applying the sleep status.
I’ll be honest and say that this trick is rather finicky. It will help you in some cases and work against you in others. It’s sadly not fool proof in that it also doesn’t work for every type of animation, as you may find that battle animations aren’t affected.
Regardless, it might be useful to you even to just get a closer look at the animation’s potential.
Moving frame to frame
Another option for getting a more precise result out of your chose animation is to skip between frames quickly. I’d say this option comes with less downsides too.
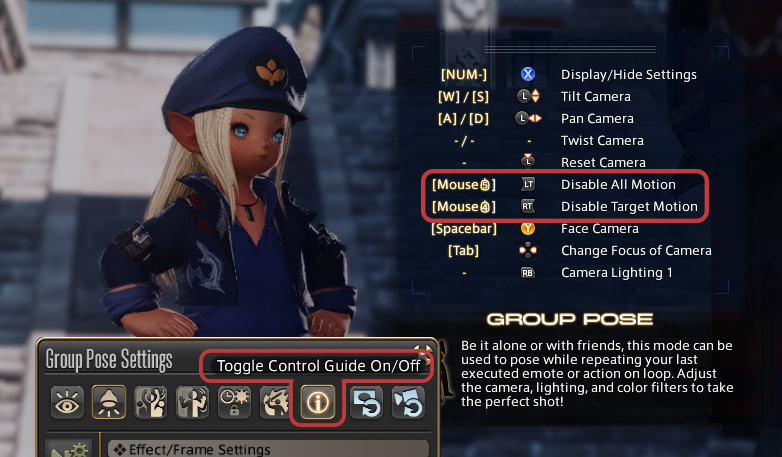
What I’m doing here is I’m quickly enabling and disabling motion using the shortkeys I have set for the disable all motion/target motion buttons. You’ll find these buttons in the top menu in Gpose, however we’re going to avoid actually clicking these buttons physically.
You can find which keys these buttons are bound to in the control guide Gpose provides. Hovering the buttons themselves will always show them bound to 1 or 2 which isn’t always the case.
Using cutscenes
This section isn’t something you’ll need an elaborate explanation for as it’s really just more of a reminder. Posing your character within Gpose is the default, but you’ll find many good poses can be found in the game’s cutscenes. All you have to do to access these is enter an inn, open up the unending journey and pick a cutscene.
Finding the right cutscene can take a while, so you might want to consider noting down cutscenes you liked as you progress through the story!
Basics of Lighting
There’s a lot to be explored when talking about lighting in Gpose. As many other parts of the screenshot end game, a lot of the techniques and principles you’d encounter in real life photography can be applied to your in game photography.
This guide will be covering the in game tools we have at our disposal, as well as how to apply them effectively. Let’s dive right into it!
Full Screen Mode Gamma Correction
Before we get into /gpose and its lighting options, there’s one setting worth discussing that won’t be found in the Gpose menu. If you navigate yourself to the first tab in System Configuration and scroll down a little, you’ll find “Full Screen Mode Gamma Correction”
Now, before I cause any confusion, this isn’t a setting you’ll be adjusting every time you plan to take a screenshot. Rather, there’s a good chance you’ll never adjust this setting ever again if you even did in the first place.
Gamma Correction is something most if not all games nowadays provide as a setting for you to mess with. It’s meant to give you the ability to adjust the brightness of your game to be in line with your monitor’s display, as not everyone’s monitor is as bright or as dark as the other. It’s meant for your general game play experience, not for you to take screenshots with. That said, it still affects the appearance of your screenshots.
This means that there’s no optimal setting for me to recommend you, which is also not the intent of me bringing this setting up. Rather, I’d simply like to inform you that if your screenshots are coming out too dark or too bright on other people’s screens, you might want to consider giving it a look.
Manual brightness adjustments
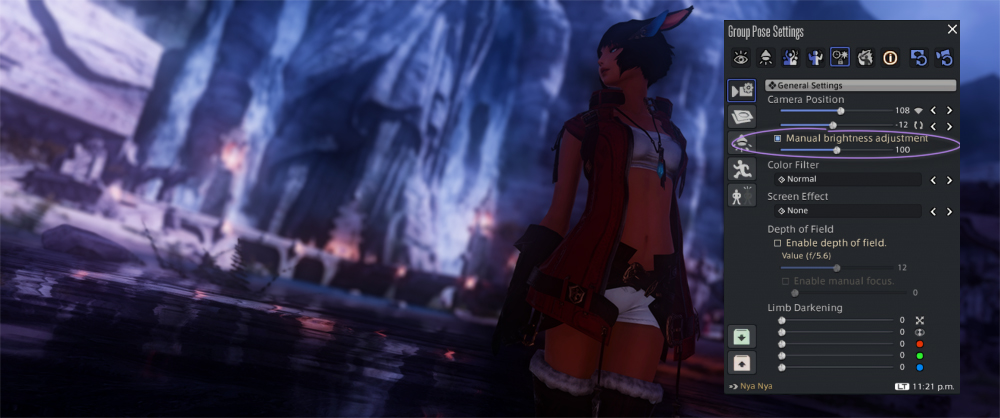
With that out of the way, we can actually get into /gpose and look at what it offers us. First, we’re going to have a look at the “Manual brightness adjustment” slider. If there’s any way to describe this slider, I’d say it’s similar to exposure settings you’ll find in most editing software. The slider is used to darken or brighten your overall image.
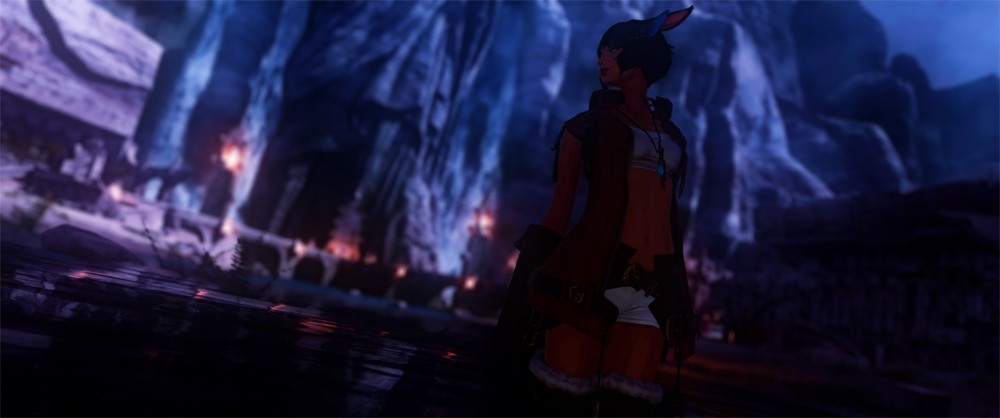
The slider works from a 0 to 200 value range. The effect of these values is relative to the environment you’re in, meaning that time of day, weather and setting itself will influence the how much a certain value changes the overall scene. To give an example, my character is in Ralgr’s Reach at 1PM Eorzean Time, with the weather set to “Fog”. The slider value that changes “nothing” to the lighting right now is 70. If I were to change the time of day and the weather now, that slider value can be anything else.
It’s useful to find the value that closest resembles the actual lighting situation outside of Gpose, as you can work from there to add or remove lighting without going overboard. If I add or subtract no more than 10-50 to the value, I know I’ll generally be safe from under/overexposing the image.
No adjustments made: Bit on the dark side, but not inherently bad
Slider at 100: It looks good, but it no longer looks like a night time scene
As this slider adjusts the overall brightness of the image and not just parts of it, if you add or subtract too much you will quickly run into the issue that parts of your image become unclear and leaving you with a very unbalanced picture in terms of lighting. The tool shines most when you need that little bit of boost to a dark scene, or need to reduce the brightness in an overexposed scene.While it can be extremely useful in dark scenes,
you also have to keep in mind that adding too much overall light can also change the time of day it looks like you’re taking pictures at. This, of course, isn’t really a problem unless you specifically want that night time aesthetic. If anything, you could use the slider to intentionally make it look like a different time of day.
A sentiment I’ll be repeating throughout this guide is how nearly all tools work best when combined with the others. This slider is great, but it’s even better when you use it with the other options alongside it!
Limb darkening
Limb darkening is not a lighting setting per se. All it really does is add a vignette to the edges of your screen, which you can alter the intensity of as you see fit. I cover it in the lighting section since a light vignette can be utilized as a means to brighten or darken the scene. It’s not ideal since at the end of the day, a vignette is a vignette and you don’t have that much control over it. I’d like to see it as an option that if it works, it works. If it doesn’t, it doesn’t.
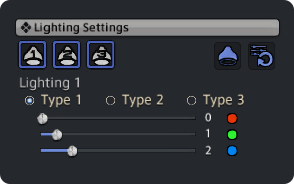
The sliders are fairly straight forward. The first one determines the intensity and size. When it comes using it as a means to lighten or darken you’ll never go over 2, if not 1. The second slider determines the roundness. Set it to 0 for a vertical oval shape, 10 for a horizontal oval shape and 5 for a circle shape.
The next three sliders determine what colour the vignette has. Further along this guide we’ll talk about colour combinations we can make, so for now I’ll leave you with the knowledge that three 0’s will make black, while three 10’s will make white.
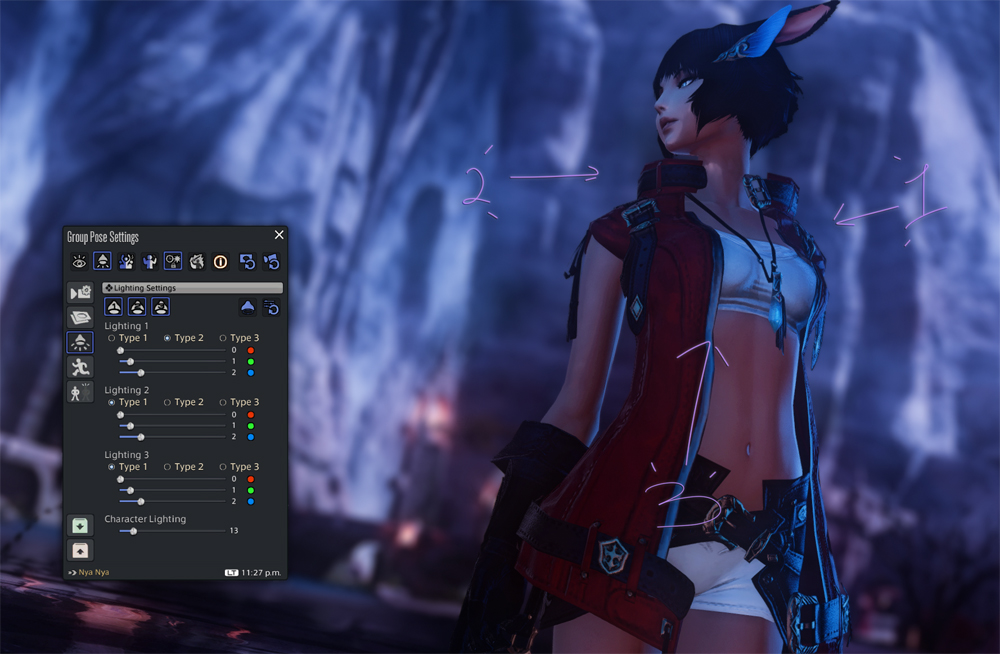
Lighting Settings
Now here we are, at the part of the guide where we talk about the hands down best lighting options this game has to offer. While the other options Gpose gives us will generally require you to to mess around with some other setting on the side, these lights can and probably will be enough for most your shots.
In the Lighting Settings tab, you’ll find a menu with three different lights. The other settings we’ve been looking at so far (and will be looking at) are restrictive in comparison, as we are able to place these three separate lights almost freely around our character. Our only restriction being how far our “camera” can reach.
Lighting settings continued: placement
It’s simple and straight forward enough, wherever you are positioned with your camera (so wherever you are looking from), if you press the light button, this is where it will place itself until you choose to remove it.
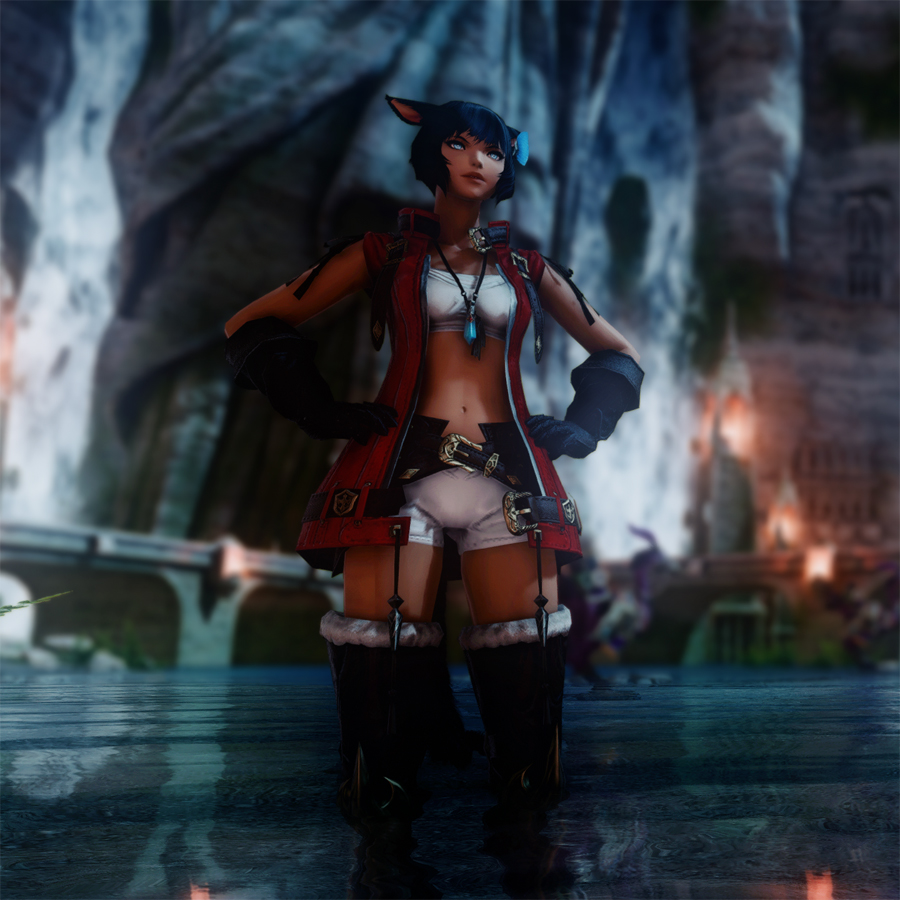
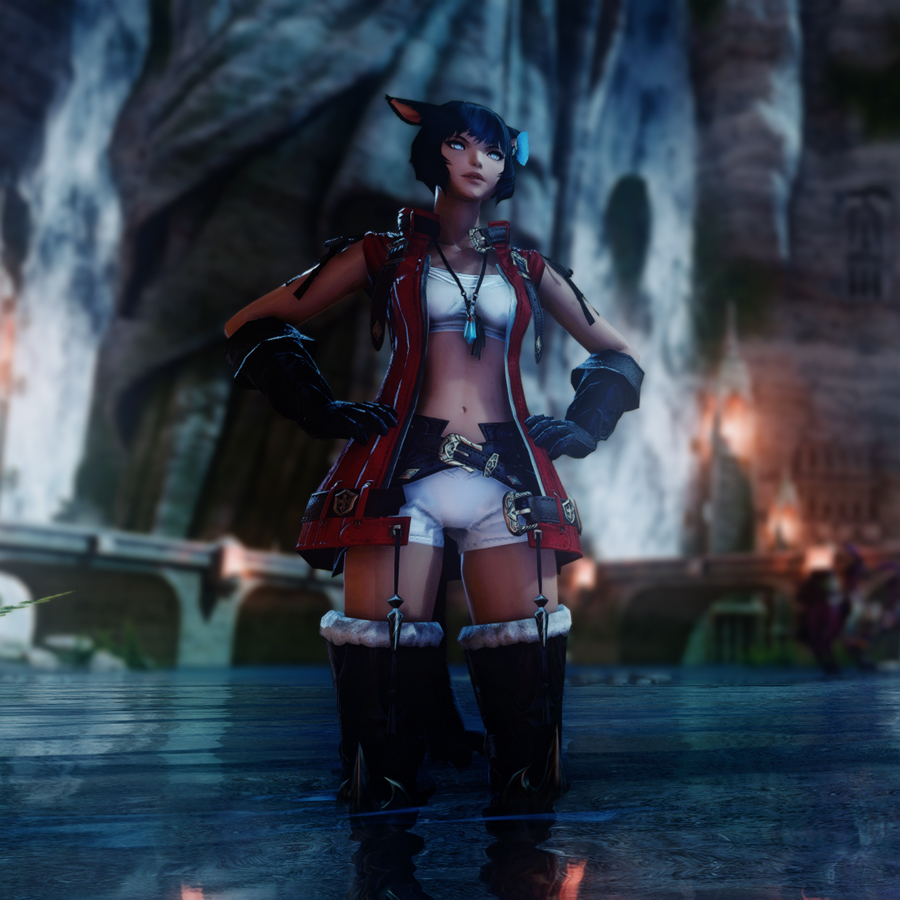
Due to being able to place these lights so freely, they’re extremely versatile. Not only can you be selective about the parts of the scene you light up, you’re able to create the illusion of lights that could have already been part of the scene. For example, I added a blue-toned light behind the character and a cool toned light in front of her. This emulates the light from the moon as well as the reflection of the water around her.
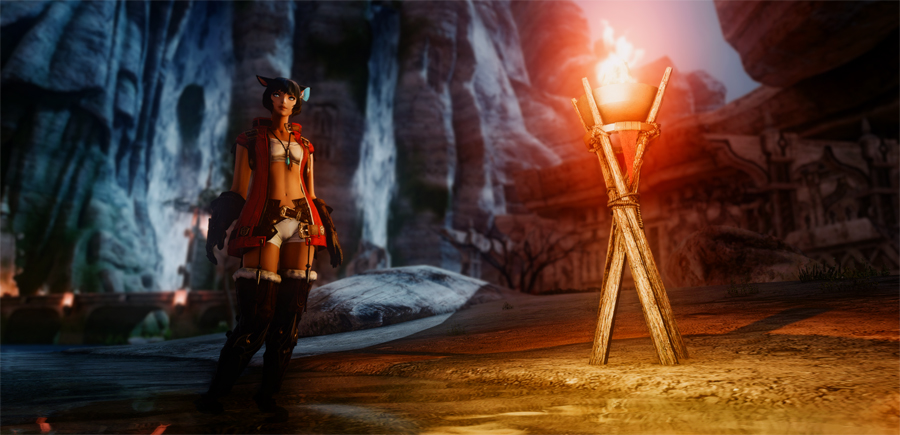
You’re also able to enhance already existing lighting. For example, I took the existing light source, the fire, and enhanced the effects on the character by adding a light to her side.
These are just some basic ideas and concepts in using these lights. This is something I will thoroughly expand upon in the guide about how to work with natural lighting however.
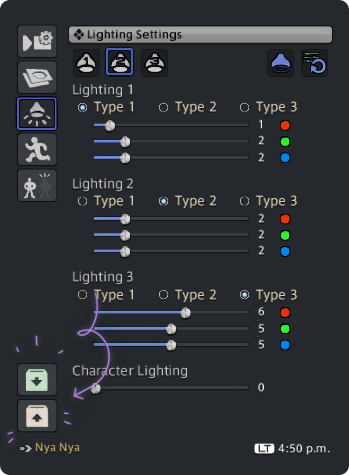
Lighting settings continued: Types

Once you’ve selected a light, you will be able to choose from three “types”. These types represent the size and intensity of the lights.
Type 1 is the softest light and can create the subtlest differences. It’s best use is lightly illuminating the character from a few steps away.
Type 2 is a middle ground type of light. It can be used the same way both Types 1 and 3 are used, however it’s not as dim or bright as either two. Personally I like to use it for overhead lights and accent lights.
Type 3 is the harshest and biggest light and can alter the lighting of an entire scene. It’s best used illuminating the entire scene from far away. It can also be used effectively close by for intense and dramatic statement lights.
Lighting settings continued: brightness sliders
Underneath the types, you’ll find three colour sliders. Red, green and blue. With these you can achieve different colour combinations as well as different intensities. The lower the number, the subtler a light. The higher the number, the more intense the light. The intensity of the light also influences how clearly a colour comes through.
The following images serve as a general visual guide. The values I’ve listed aren’t something you will apply on in a 1:1 way. The intensity you use will depend on the setting of your screenshot and might not be the exact numbers I’ve shown here. Rather, it’ll be a similar combination with different (albeit it close) values.
Lighting settings continued: colour values
Starting off with the most important ones, we have the natural types of light. These types of lights you will generally add in order to subtly enhance your image and work with the natural lighting of the scene. These are great for adding lighting to your character when you don’t want it to be clear that lights were added in the first place.
Then we have the colours that make for more abnormal lighting. These can make for dramatic effects and statement pieces. These can still be used in natural settings depending on the intensity you set them to and what other light sources you have in your scene.
Character Lighting
Underneath all the individual lights we have the “Character Lighting” slider. As the name basically already tells us, Character Lighting is a lighting option that only affects your character and what they’re holding. Like every other slider, being conservative with the values is key in using it effectively.
The reason we want to use this slider conservatively is due to two issues it comes with when we set it too high.
First and foremost, cranking up this setting removes depth from your character. With a large amount “overall” light added, you also remove clear shadows. While the image on the left is a bit on the dark side, the character’s face is much more dynamic to look at and feels far more natural with the scene.
Which brings us to the second issue which is how unnatural a single bright element looks in a scene that doesn’t match in brightness.
I tend to steer clear from setting this slider any higher than 25-30, if I even go that high. I usually sit anywhere between the 10-20 range. This way the character blends in with the rest of the scene and the natural shadows are retained. If I’m not happy with how bright the character looks at this point, I can always mess around with the individual lights or the manual brightness slider.
Saving/loading your settings
Finally, we have the option to save and load both our lighting and camera settings. This is all fairly simple, at the bottom of your Gpose menu you see two bottoms with arrows on them. The first one is the save window.
From here you can save your current lighting and camera settings so that if you were to exit Gpose or even the game, you can load these settings up for your next Gpose session.
Though despite it being fairly straightforward, you might find yourself a little confused by the “Save Preferences” section.
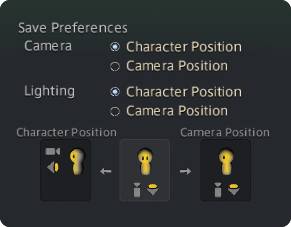
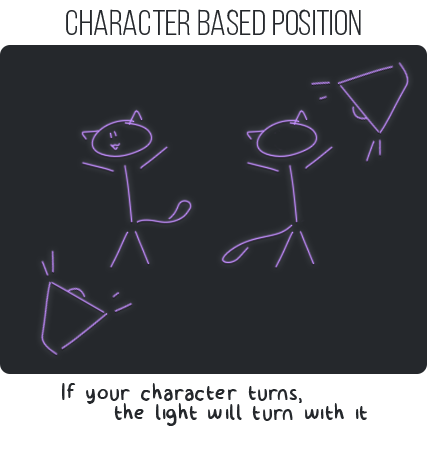
Save Preferences gives you two options for how you wish it to apply your settings next time you load them. You can choose from “Character Position” and “Camera Position”.
The way the tooltip in the Gpose menu explains what this exactly means is a little confusing, therefore I’ve drawn up these excellent graphics to explain exactly what the difference is.If I were to place a light in front of my character and save this setting with “character position checked”, Gpose will load in this light relative to where my character is facing.
This means that if I were to rotate my character outside of Gpose, re-entered Gpose and loaded in the lights I saved, it will place the lights based on where my character is facing now rather than where she was facing before.
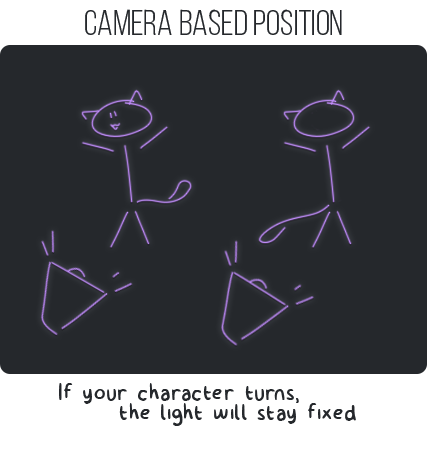
Camera position saves lighting based on your camera as you saved it. It’s essentially a “fixed” setting and it will remain the same regardless of where your character is facing. However, the lights will still use your character as a reference.
Meaning that if you were to move your character a few steps over, the lights you saved will still load in surrounding the character. It would simply ignore how the character has changed their angle but focusing solely on its position on the map and how the camera was originally placed when saving.
Combining settings
Let’s put everything we’ve learned to the test and brighten up the above scene, which, without a shadow of a doubt is too dark.
I’ll begin by setting the scene to “100” on the manual brightness adjustments slider. I can always come back to decrease or increase it. For now however, I just want a bit more visibility while I put the individual lights down.
From here, I’m going to start thinking about the temperature/colour of the lights I’m about to place as well as their location. I want to brighten the character overall as well as make it clear that some light sources exist around her. A more in depth guide on this particular step will be provided at some point, for now, let’s not over complicate it.
I place three lights. One to her right, one to her left and one in front of her.
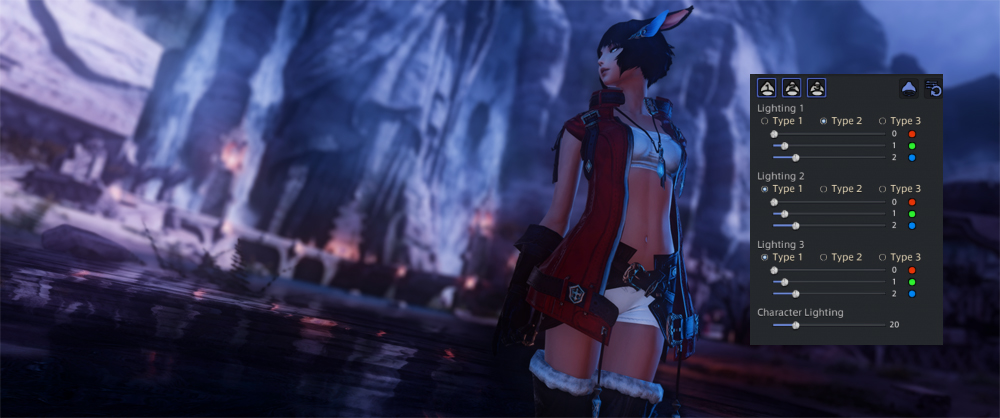
With all the individual lights placed and done, I add just a tiny boost on the “Character Lighting” slider.
Basics of composition
Composition is how we arrange individual elements in our photographs to either tell a story or simply look enticing to the viewer. There’s many techniques that can aid you in how you construct your picture. I will be covering majority of them in separate guides but let’s start with the basics. The purpose of this guide is to get you started on thinking with composition in mind. We’re going to deconstruct an image into elements and see how adjusting their placement might drastically alter what impression your image will leave with the viewer.
What’s in a picture?
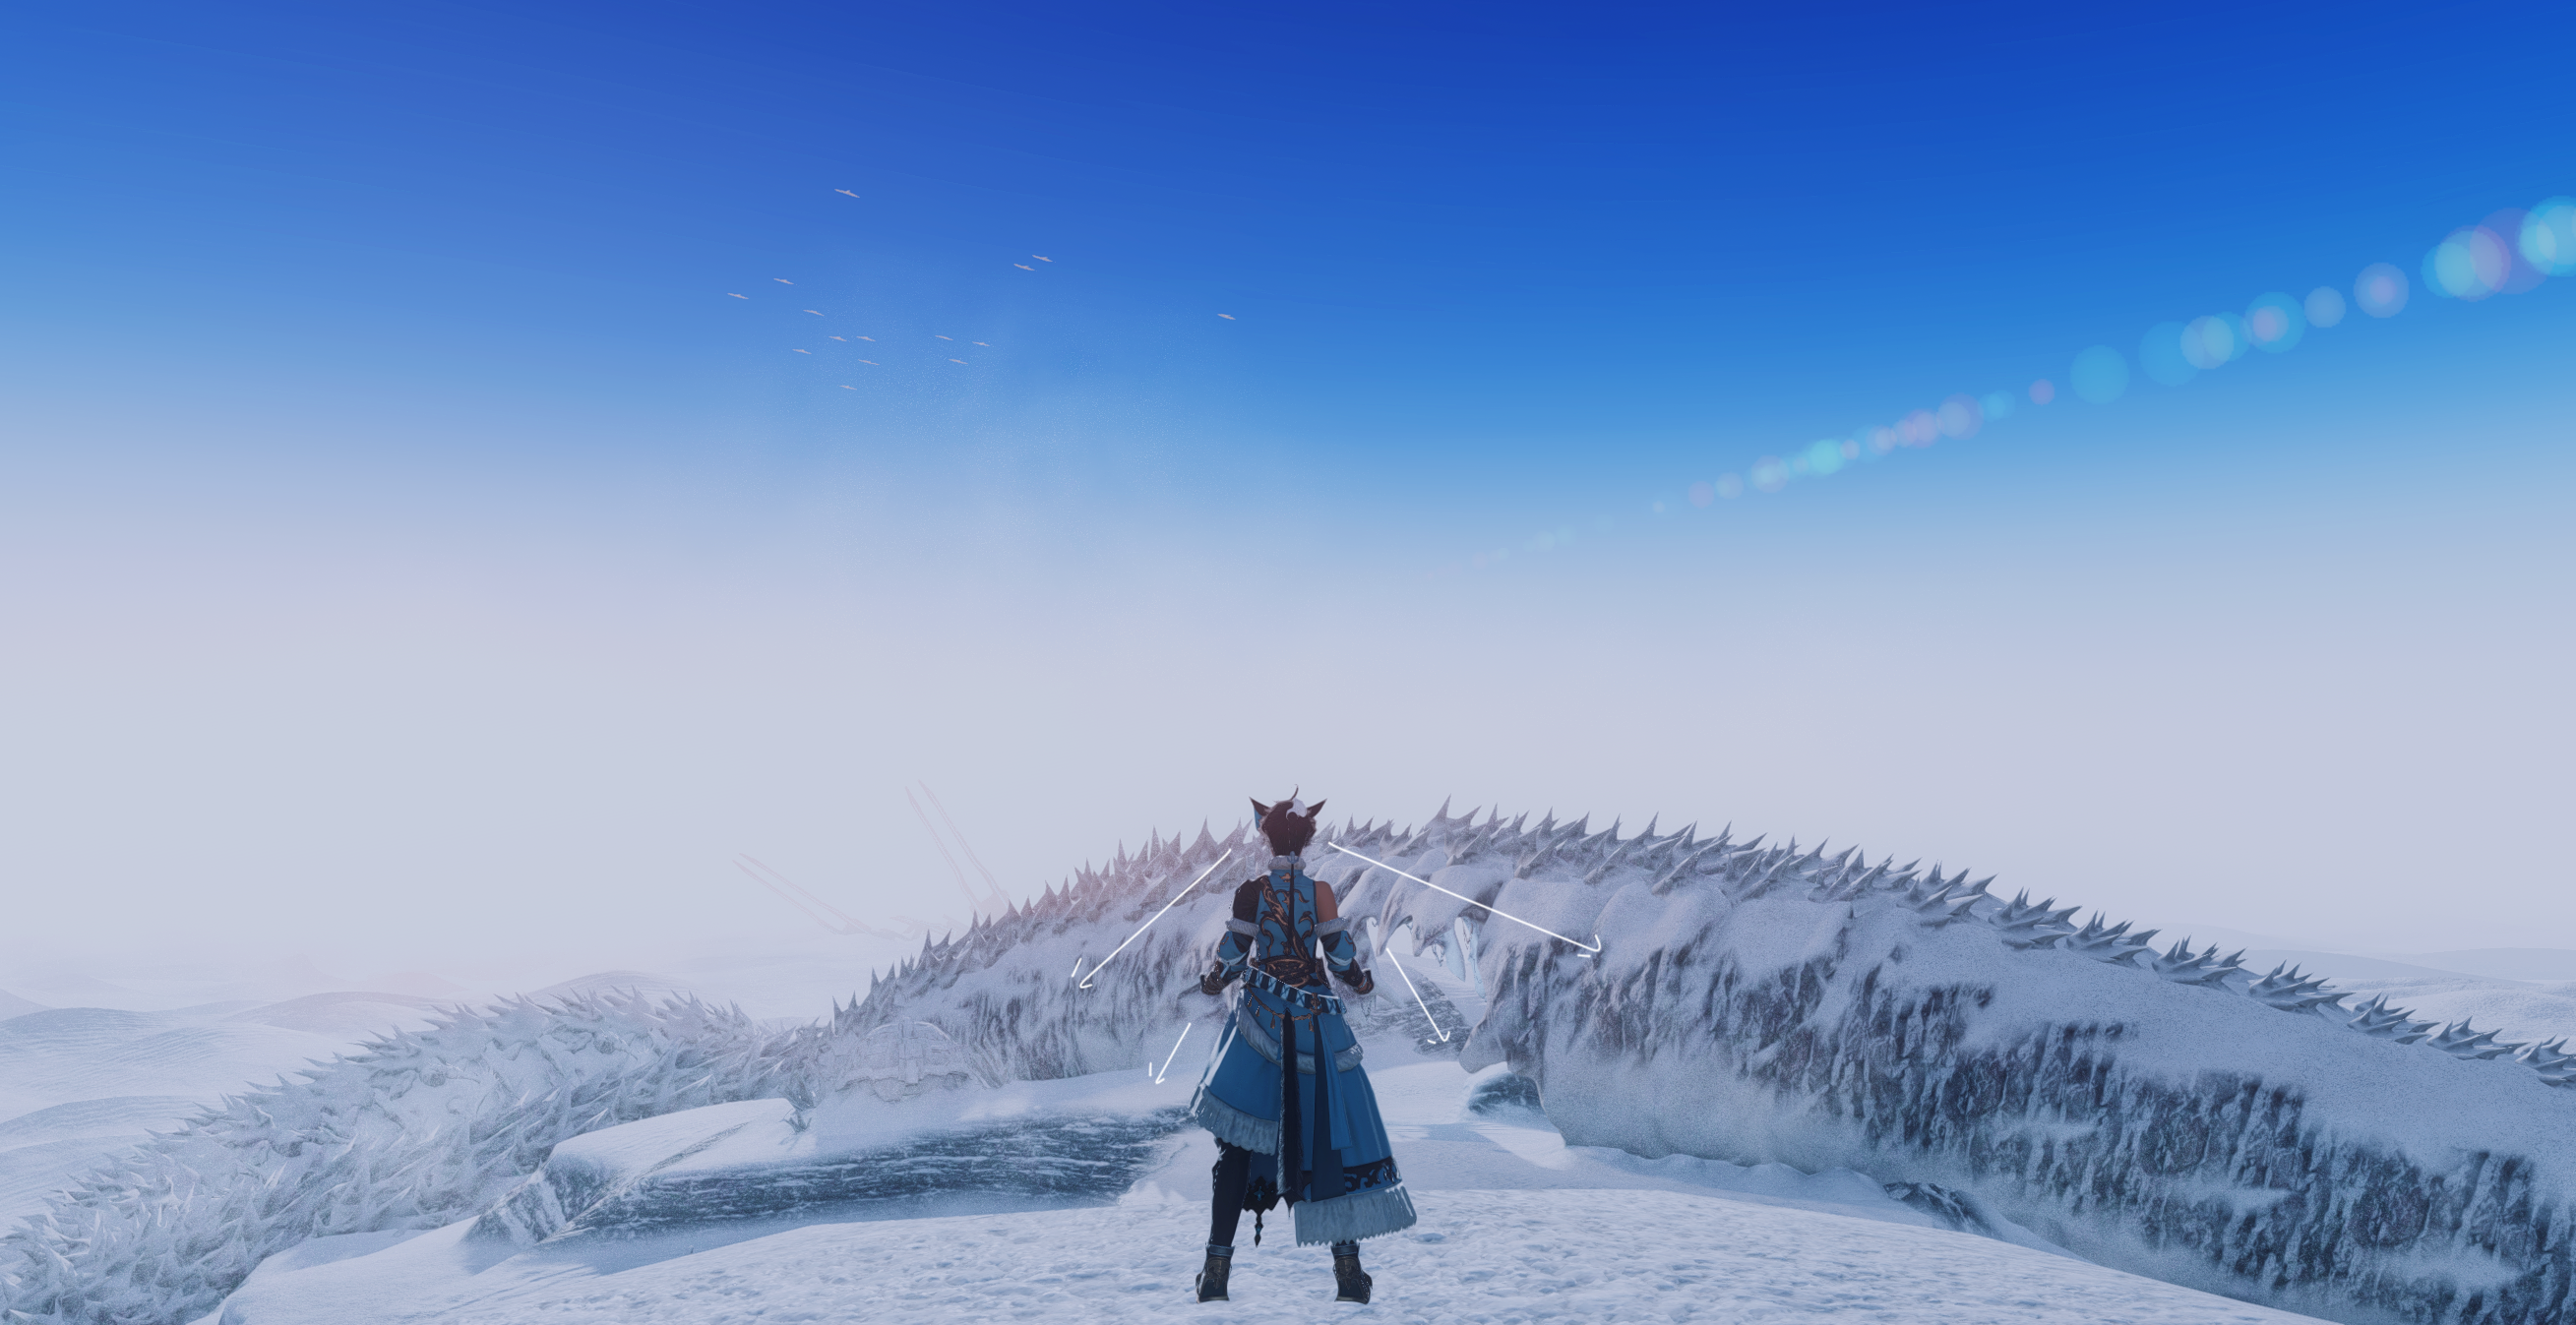
Dissecting elements

We’re going to start by dissecting our scene. I’ve taken the above image to give us a clear look at exactly what is at our disposal in our surroundings. We’re starting simple so there’s three different elements we’ll focus on. These being the character, the backdrop and the birds in the sky.
The general idea we want to explore is how placing these elements differently can greatly influence what kind of story they tell.
Let’s put this into practice.
Placement of elements

My intent with this image is portraying perhaps an early morning training scene. The character climbed all the way up here and is now catching her breath, taking in the fresh air. For the most part, this composition aids in telling that story. From the way her head is angled to the position of the birds in the sky. Even her clothes and pose the rest of the body holds aid this narrative.

So let’s move one of these elements, the birds. The story told has now changed. Rather than the character catching her breath after what might be very intense physical exercise, she’s now looking at the birds in the sky. Nothing wrong with that, but it’s not my intent. It’s also a little less dramatic, don’t you agree?
Adjusting angles
Another issue with the narrative I was trying to convey is that she climbed up there and is therefore catching her breath. This is where the environment comes into play. We don’t really know what’s going on behind her or in front of her in the previous pictures. We can generally guess she is high up due to the appearance of the sky, but that might not be too obvious.
For these reasons, I add a new element, which is the scenery before her. Now there’s no questioning that she’s atop of a summit looking down. Again the story has changed slightly because rather than taking in that breath of fresh air, with the way I angled her head she’s now taking in the scene before her. It’s these small changes that can change the intent of an image entirely.

That all said and done, a change in the composition doesn’t have to be influenced by the want or need to tell a different story in the image. Sometimes, something just looks more aesthetically pleasing if you place it differently.
For example, the above image is nearly identical as the previous one. The only difference is that I really did not like how the birds were in focus and cut off. By taking the shot as they’re further in the distance, the image becomes more harmonious.
Essentially, there’s no harm in saying “Well, this just looks better”.
Tips for DT Face Bone Posing
These infographics were created by and provided to this wiki by @StrayCatte_xiv on twitter.
Here are some tips and tricks for posing the new facial bones/skeletons as of the Dawntrail expansion. Please feel free to incorporate this knowledge into your own posing, and we hope it will help.
The images in this page are using the Ktisis plugin, however, the general concept should be possible via any posing plugin. If you have further questions about this resource, please contact straycatte. We will continue to update this page as they create more helpful information!
General
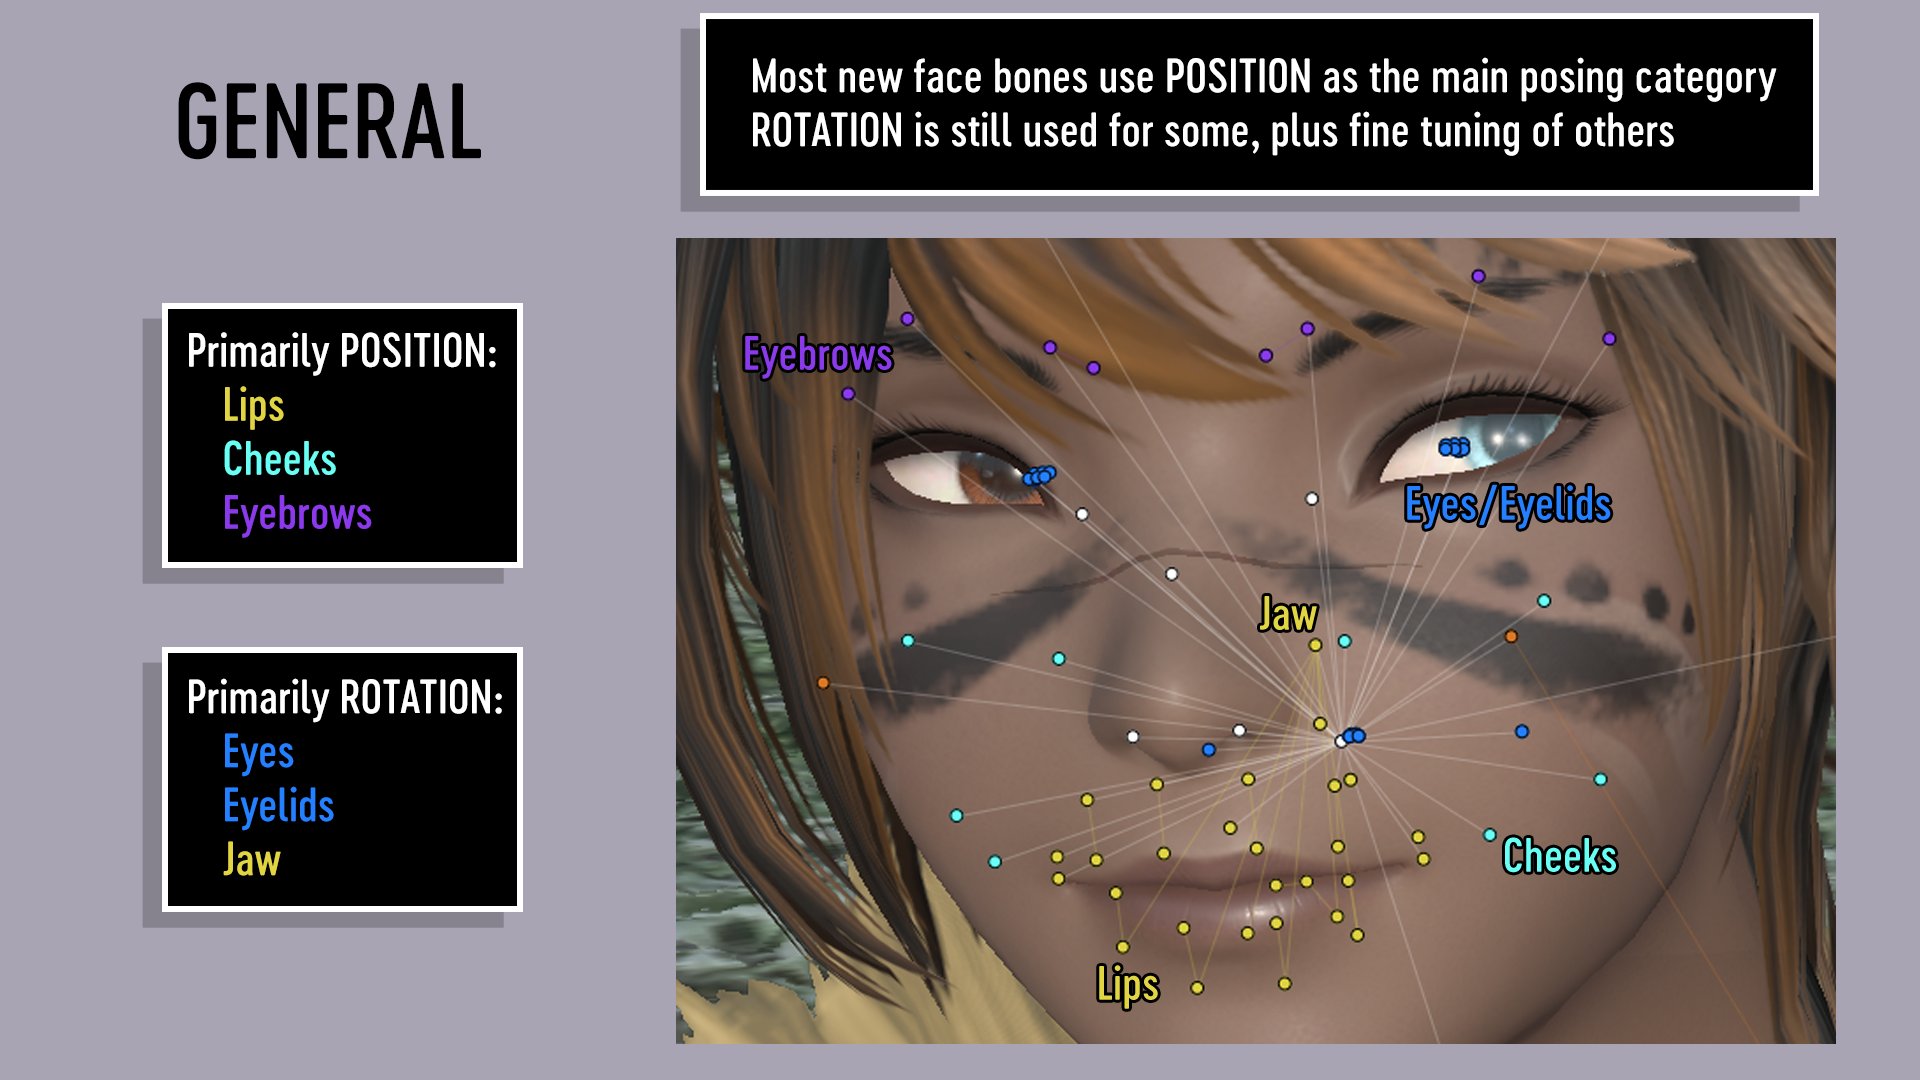
Most new face bones use POSITION as the main posing category. ROTATION is still used for some, plus fine tuning of others.
Primarily POSITION:
- Lips
- Cheeks
- Eyebrows
Primarily ROTATION:
- Eyes
- Eyelids
- Jaw
Eyes/Brows
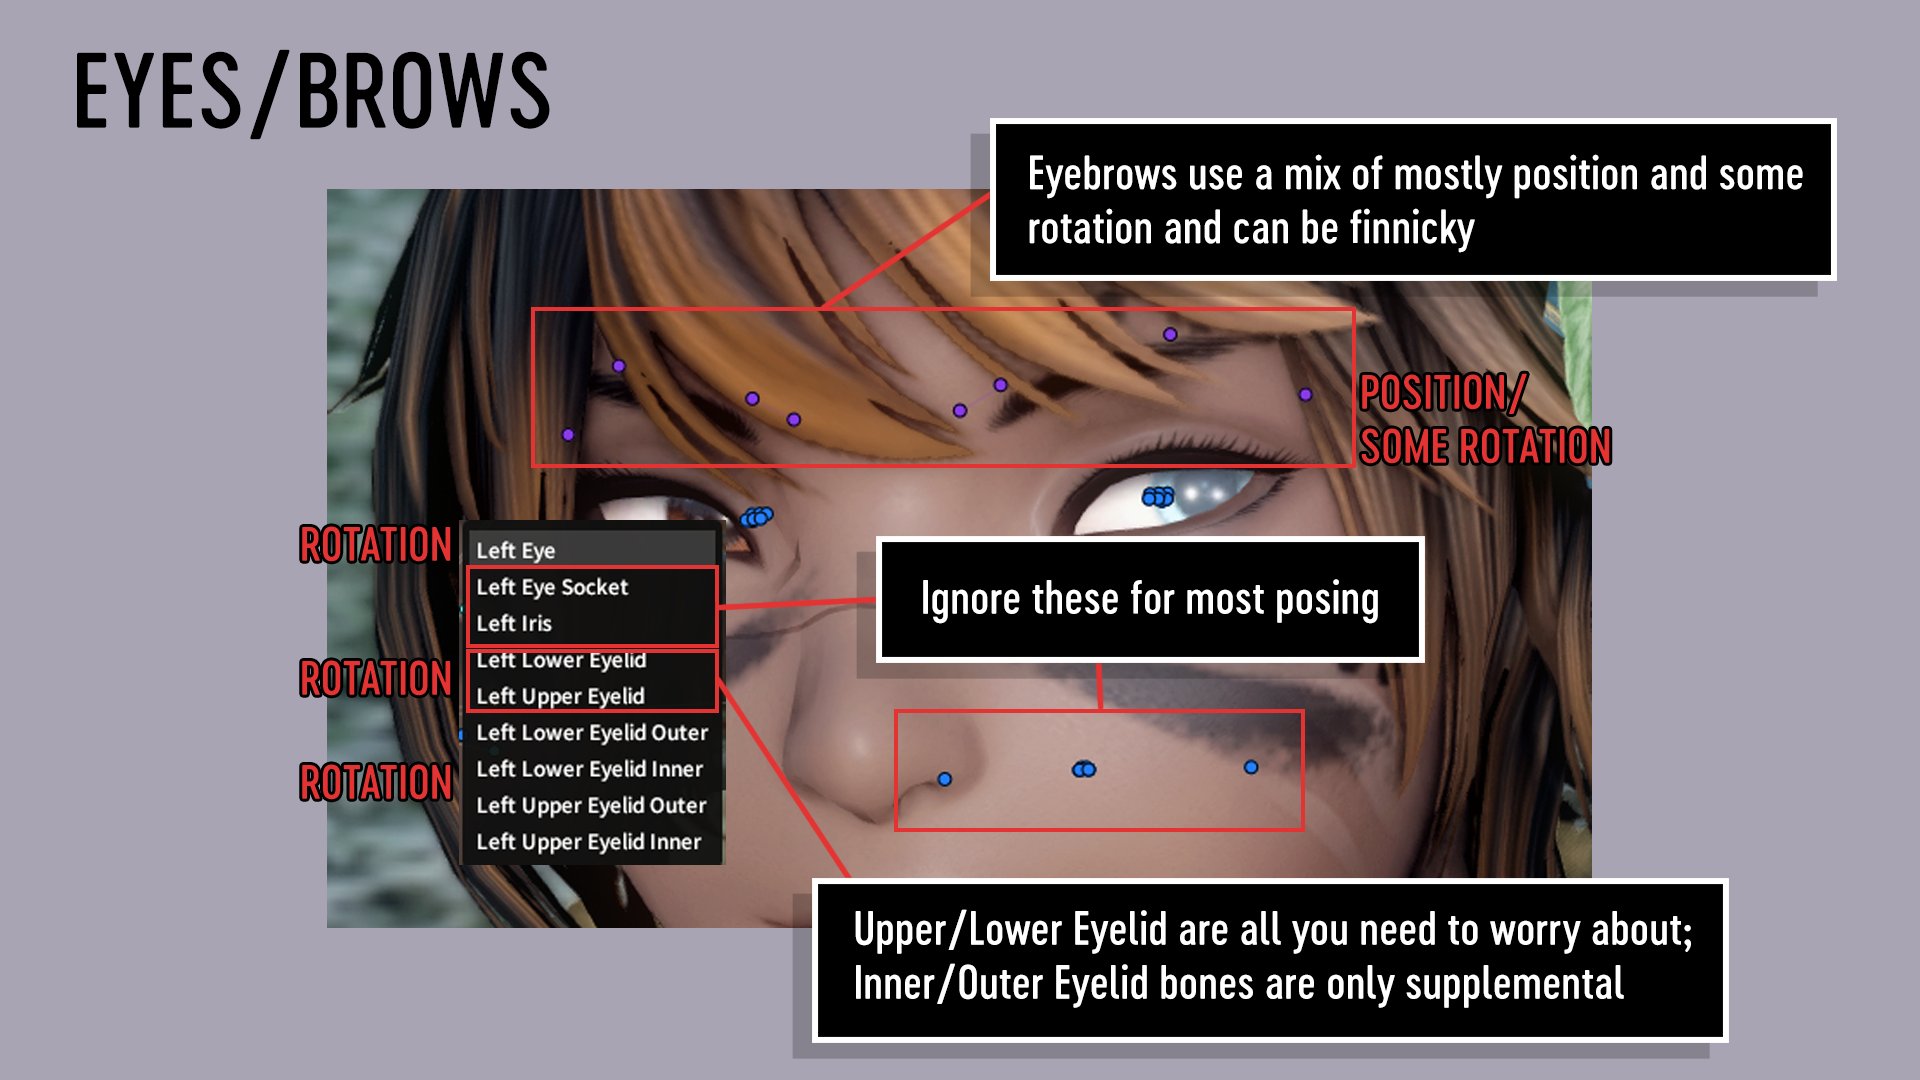
Eyebrows use a mix of mostly position and some rotation, and can be finicky.
Upper/Lower Eyelid are all you need to worry about; Inner/Outer Eyelid bones are only supplemental.
Mouth
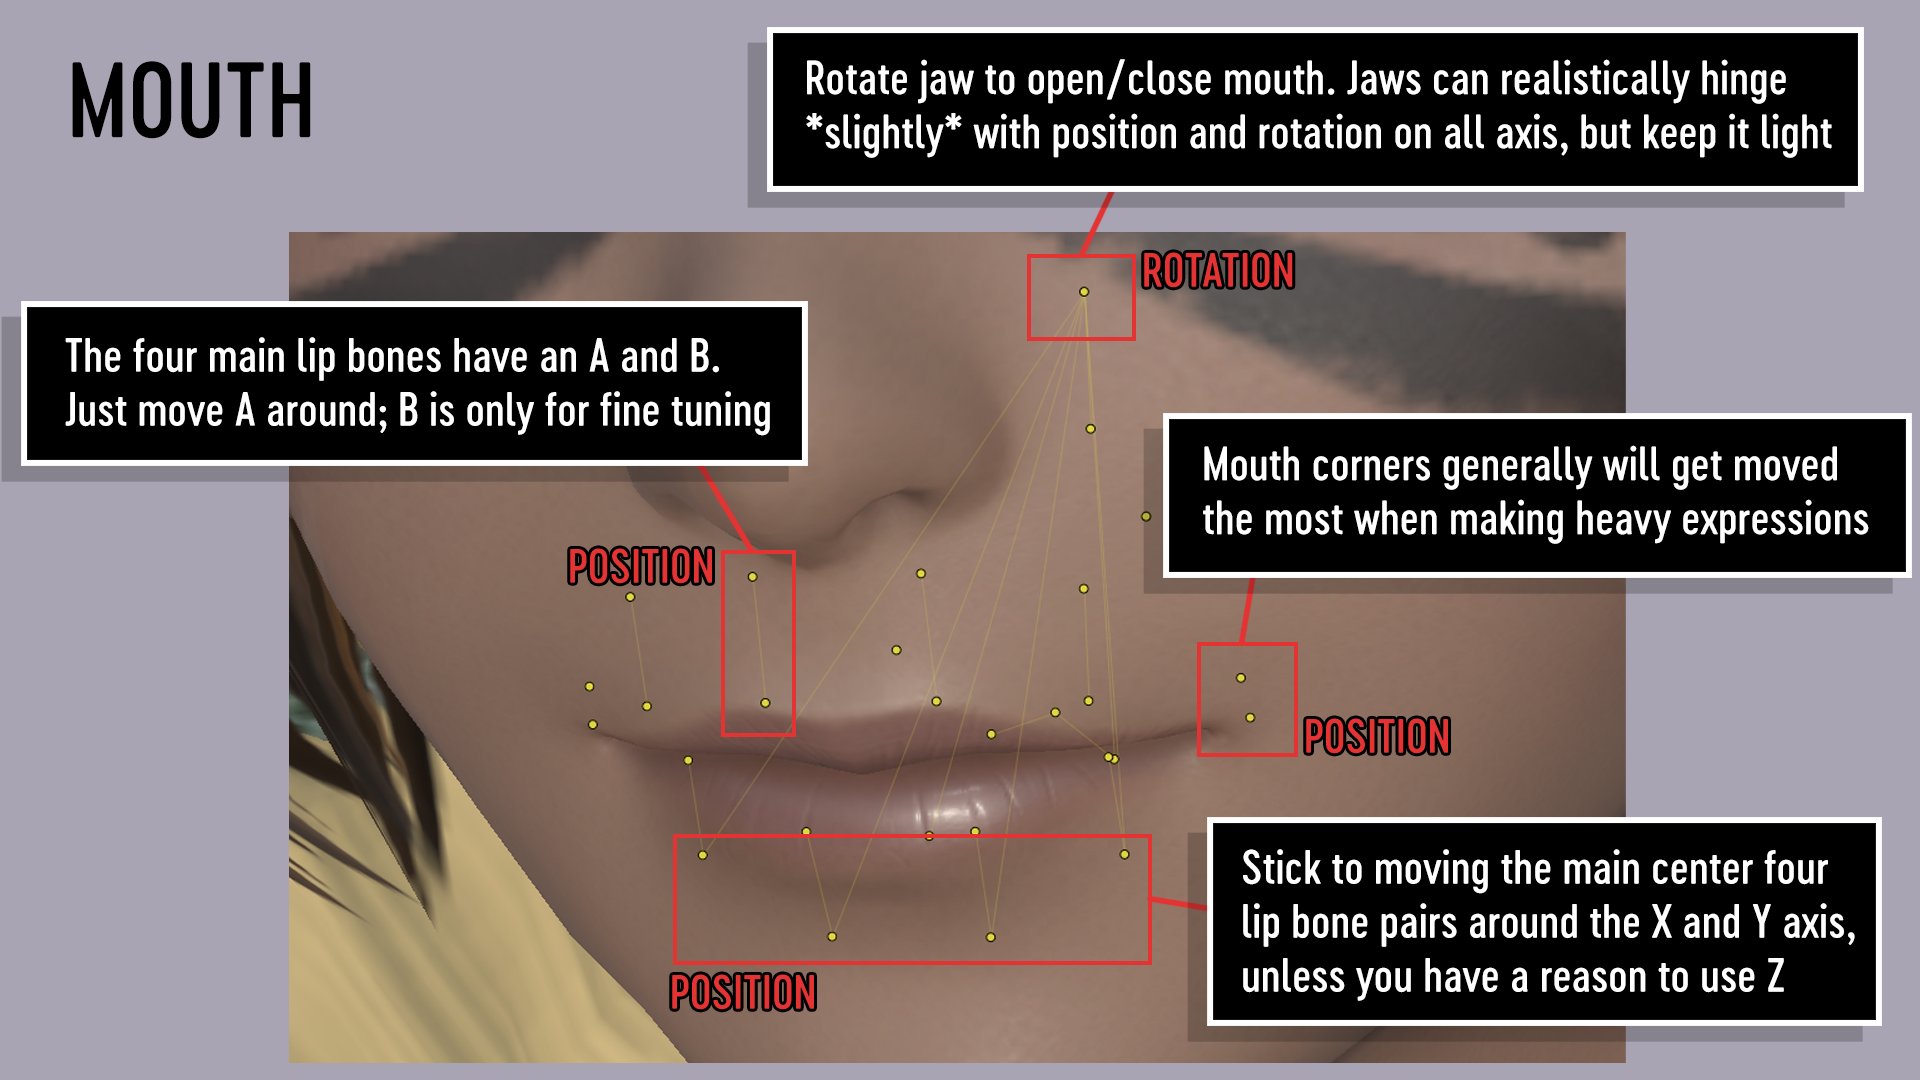
Rotate jaw to open/close mouth. Jaws can realistically hinge slightly with position and rotation on all axes, but keep it light.
The four main lip bones have an A and B. Just move A around; B is only for fine tuning.
Mouth corners will generally get moved the most when making heavy expressions.
Stick to moving the main center four lip bone pairs around the X and Y axis, unless you have a reason to use Z.
Cheeks
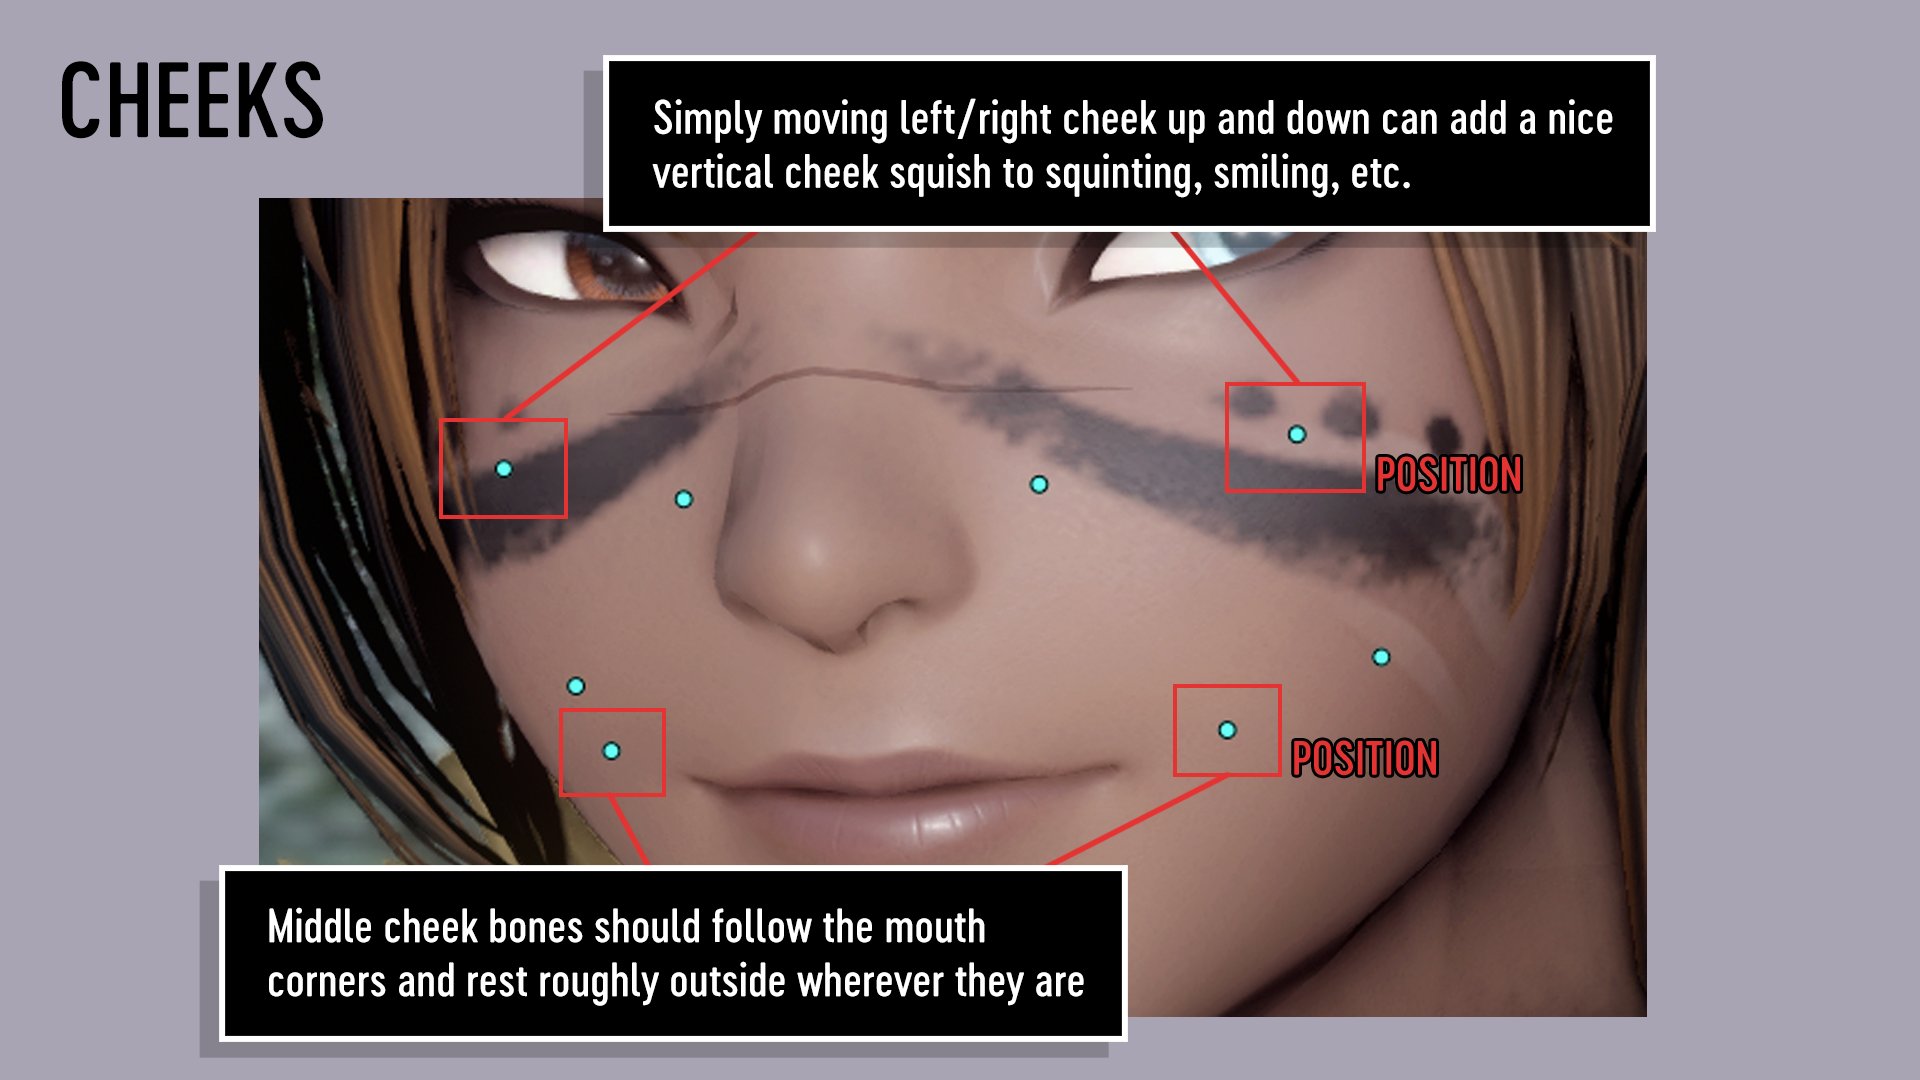
Simply moving left/right cheek up and down can add a nice vertical cheek squish to squinting, smiling, etc.
Middle cheek bones should follow the mouth corners and rest roughly outside wherever they are.
Video Example: https://x.com/i/status/1817007484730486972
An example to follow along with. Regardless of your tool of choice, here's using all the bones from the reference guide to create a simple smile from scratch. I tried to select and move single bones to keep things clear and easy to follow but stay within the video time limit. pic.twitter.com/Nos1XSlA9h
— Catte Next Door (@StrayCatte_xiv) July 27, 2024