FF14 Asset Reference Document
This Document contains information sourced from and annotated from the FF14 Textooles Reference Document by Sel. It has been updated in some places and had some annotations added by me, however most of the information credit must go to it's original creator.
This Doc will only contain Dawntrail-specific information, until the last page which will have anything from Endwalker that changed as a reference, but the information in that page should not be used outside of comparison's sake. I will try to keep this as up to date with the GSheets if/when it updates, but for an Excel spreadsheet format, please check the original document.
- (Dawntrail) Shader Reference Table
- Attribute Reference Tables
- Shapes Reference Table
- Visibility Reference Tables
- (Dawntrail) Colorset Values reference table
- Dye templates and Tile References
- Racial Scaling tree (wip, outdated)
- Bone list and Bone Scaling notes.
- Outdated tables (cross-reference only)
(Dawntrail) Shader Reference Table
This page is a list of tables with explinations/annotations of how the New shaders in dawntrail work. Most of this page has been adapted from the Textools Reference Document by Sel. Extra information is added based on research and conversations in modding creation discords, mainly the Textools, Penumbra, and Bibo+ Discords.
This page is partially incomplete as we still do not fully understand every shader. Shaders with entirely blank boxes are those that we know exist, but do not understand how they work. Any important notes or observations about these shaders will be notated below their shader tables in Red.
The following explains how each color/data channel is used in each shader. Channels are listed by their Default Behavior whenever variable.
Channels listed in Purple are variable and affected by shader keys.
These will be listed Below each main table for the shader, before any notes or annotations.
SubSurface Scattering (SSS) and Fur Settings are controlled by the same channels/fields when applicable
Please note that all textures making use of an alpha channel for non-transparency should be saved as either .DDS or .TGA when bringing it in/out of an art program. PNG frequently gets mishandled by programs and ends up "eating" the alpha channel or forcing it as transparency, which destroys the data used.
FFXIV uses the OpenGL format for Normal map direction (Y+ up if you are using a software with diffuse to normal generation capabilities)
For easier editing using this document as a reference in penumbra, Please grab and use Nylfae's Penumbra material development kit. this only works for penumbra, but the data in this document is tool-agnostic and will work regardless of tool used. this kit renames constants and data in penumbra to make them more Human readable, though for clarity, all data names will use both the textools and penumbra kit variants. https://heliosphere.app/mod/bktfny69y57gf4y42bp4tn5z38
Linked as attachments on this page are some substance painter export and material settings for easier authoring of textures via substance painter, using the shader settings from this page.
Currently, we have Bacara and SB!(Skateboards)'s templates. Information from the mod's modpage descriptions has been added into the .rar files as readme Text documents. (.rar is a type of zipped folder with better compression. it can be extracted with either WinRar or 7Zip)
As of dawntrail, FF14's shader usage is similar to Unreal Engine 4, but slightly modified and different. It is closest to UE4's ORM and ORS formats, for those familiar with UE4 (Thank you to Bacara)
Please note that Mask textures are incredibly complex and variable. Pay close attention to their parts in the tables. Masks can have their channel usage changed by shader keys, other texture channels, and shader IDs. There is a lot we still don't know about these textures, and any information on them is as of now a WIP. The most variable channel in the mask is the usage of the Blue channel. **
Character Shader:
This is the standard shader used for most things you would mod (gear, minions, mounts, weapons) that are not options tied to the Character creator. This shader will probably be the one you look at most often. There are a few other things that this shader can do based on keys, and I will explain them below.
This shader can make use of a field named "Effect ID". There appear to be 5 total shader effects, and number 3 Is what's used for a holographic/iridescent effect seen on some new gear. In order to utilize these effects, you must also set a value for "Effect Opacity". 0 means there will be no effect, 1 is full effect, and over 1 appears to be multiplicative. This effect is only possible on gear with the new Character shader, and not Character Legacy (the endwalker compatibility version of this shader).
Number 1 seems to apply a "clear vinyl overlayer" effect
* It is believed from further investigation that the mask map Red channel is actually closer to metallic usage than specular power, however due to the fact that metallicity is also controlled via the colorset values, This chart will continue to mark it as specular power, as it is also what the community has found to work fairly ok. (thank you to Bacara for this information)
Character Legacy Shader:
This is the Character Legacy shader. It is a port of the old endwalker shader for compatibility with old assets that have not been updated by Square Enix. It is Not recommended to continue creating anything for this shader, as it is not able to do all the things that the new Character shader can. Most Assets will still be using this shader unless updated by Square Enix or a modder. This shader is to our knowledge, not capable of handling some of the extra shader effects that the new Character shader can.
Skin Shader:
This is the Shader used for Body skin, Faces, and Hrothgar Skin with Fur.
- As a note, When both Skin influence and Hair influence are set, Skin influence wins out.
When working with this shader for body mods, Keep in mind that as of writing this, Body mods on the Female base (bibo, tf gen 3, etc) use skin type Body/standard skin. However, Male body mods (TBSE) Use the Hrothgar shader key for skin to allow for body hair that changes with head hair color. As such, authoring of maps for these two may differ slightly.
You can create a faux metallic effect on skin by confusing the Subsurface shader (though be careful). To do this, set the blue channel of the mask to a value close to 255. This creates an effect that is both metallic and subsurface at the same time. This method should only be done by Power users who know what they are doing. All other users should instead use the shader ID 10 method listed below for metal on skin.
It has been found that skin can have semitransparency. To utilize this, use the alpha channel on the Diffuse as transparency as normal, and change the g_alphathreshold in material constants (in penumbra) to another value. So far, Setting this value to 0.5 creates a good effect without culling any backfaces. Keep the value under 1.0 to prevent face culling. DO NOT USE THE ENABLE TRANSPARENCY CHECKBOX IN THE MATERIAL. THIS WILL CAUSE CRASHES. Also ensure that "hide backfaces" is UNCHECKED so you aren't completely seethrough. (Thank you to eggpies on discord for this information)
As emissive is a shader key on the same level as hrothgar (body hair on skin) you cannot use both emissive and dyeable body hair on skin at the same time using vanilla shaders. this is non-negotiable.
- When Shader ID is set to 10 (default value is 1) this activates "proper" metal on skin, and changes the Mask blue from Subsurface/Fur parallax to Metalness. When authoring with this shader ID for metalness, all skin/non metal must be PURE BLACK in the blue channel (causing it to look yellow in RGB mode). The closer the value is to white, the more metalness it has. The Green roughness channel must also be given special consideration. values closer to black cause the metal to be more shiny/polished looking, but due to how 14 has implemented this, it will also pick up more color from the skybox/environment lighting, to the point where it will change the color of the metal entirely if the roughness value is too low. To avoid skybox discoloration but keep the metal looking shiny, it is recommended to keep the value closer to a midtone grey. The skybox tinting effect with low roughness is more pronounced and visible on any metallic bits facing up towards the sky, so anything on the chest, or if the arms are bent at a 90 degree angle (such as folded at the chest).
The default Tile used on the standard/body skin shader is number 63, which produces a wetness effect. This caused us to assume that the alpha on the body skin shader was a wetness mask, but any tile ID number will work with it if changed manually, therefore the alpha channel on the body skin shader is actually a tile mask. That said, changing these tiles is an advanced user feature, and using the alpha as before does not change much in practice unless you plan to manually adjust the tile pattern from wet effect to something else.
Hair Shader:
This is the hair Shader. Many things have changed and unlike character, there is no legacy version of this shader. All old hair mods must be converted to use the channels described in this section. Hair is also used for Miqo'te tails.
At this time, the shader does not seem to be responsive to whatever value appearance plugins and tools such as Anamnesis, Glamourer, and Ktisis used to use for their "hair glow" parameter. This indicates something was shuffled around, but we are currently unsure as to what.
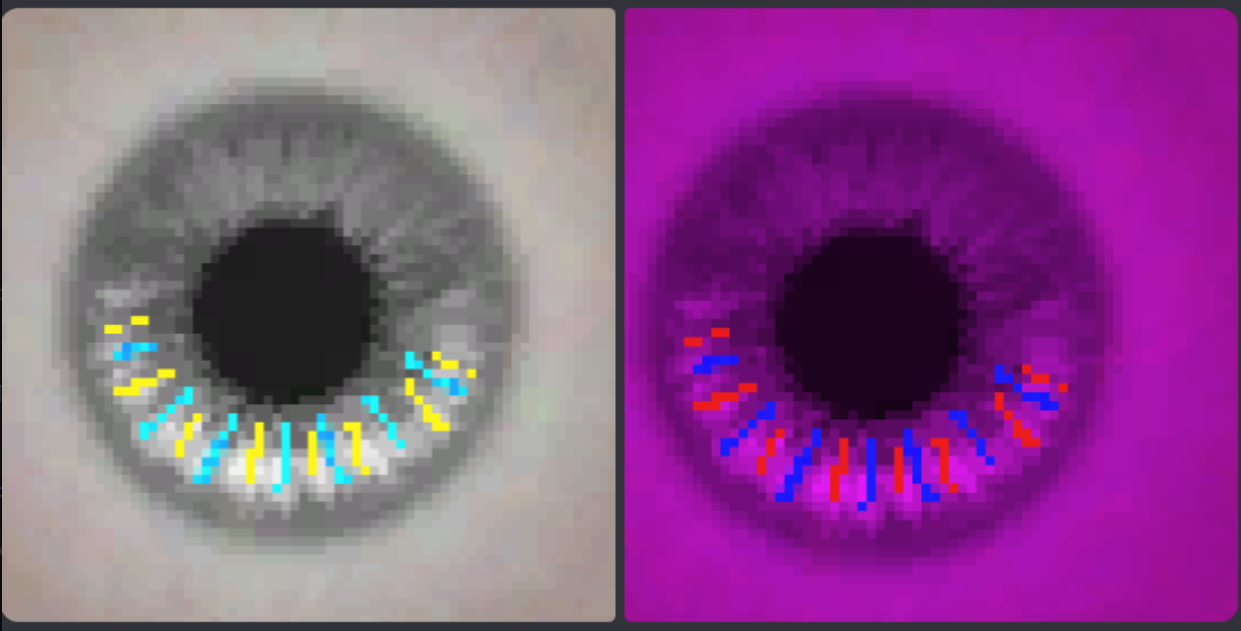
Eye/Iris Shader:
This is the iris, or new eye shader. There is no legacy version of this shader that can be used on players, so ALL eye mods must be thrown through a converter such as Loose Texture Compiler or Textools' Eye saver. This is non-negotiable.
The new iris shader allows for Sclera and Iris to be on the same map, allowing for some interesting effects
A large thing to note compared to old eye mods is that the catchlight is no longer an editable texture, and is using the Spheremaps which are currently not moddable. All Pre-DT catchlight mods or edits can no longer be used. If you want to create a fake catchlight, you can draw this onto the diffuse, but it will be static and not move around. You can reduce or change the existing catchlight (to an existing spheremap tile) using the shader constant listed below, but you cannot make custom catchlights.
Likewise, Au Ra limbal rings are also part of a shader now, and no longer part of a texture. Any mods that altered the Au Ra limbals must be scrapped. While shape cannot be changed, there is a shader constant that allows them to be turned on and off, and this is availible for all eyes, not just au ra. The Shader constants/parameters to change for eyes are:
|
7DABA471- g_IrisRingEmissive |
0-1 (au ra at 0.8) |
|
|
|
58DE06E2-Limbal Color |
Red (0-1) |
Green (0-1) |
Blue (0-1) |
|
074953E9 - Spheremap Tile |
0-60? (default 0) |
|
|
|
Constant |
Value 1 |
Value 2 |
Value 3 |
|
7DABA471- g_IrisRingEmissive |
0-1 (au ra at 0.8) |
|
|
|
58DE06E2-Limbal Color |
Red (0-1) |
Green (0-1) |
Blue (0-1) |
|
(General) Constant |
Value 1 |
Value 2 |
Value 3 |
|
074953E9 - Spheremap Tile |
0-60? (default 0) |
|
|
|
3BA64362-g_Emissive color |
Red (0-1) |
Green (0-1) |
Blue (0-1) |
|
11C90091-g_ White Eyes Color |
Red (0-1) |
Green (0-1) |
Blue (0-1) |
Furthermore, Sclera can either be changed by drawing on the diffuse, OR by changing shader constant- White Eyes Color. (Listed in table above)
Emissive is now included in the eye shader for ALL eyes, but in order to activate it, you need to mask out where you want glow on the mask RED channel, AND turn the Emissive shader constant on by changing the 3 values to not 0. Emissive strength is not known how or if it can be edited.
Finally, due to the eyeball now being a diffuse texture, it is possible to get multicolored eyes without having to sacrifice heterochromia. This both makes them more compatible with a variety of heads, and allows for more than 2 colors. Because FF14 overlays the eye color closest to the layer style Multiply, it is best to check how colors will interact by simulating in an art program. You can either draw with color on the iris portion of the diffuse, and then allow eye color influence to change those colors, or draw with color on the diffuse, and then mask off the same areas/gradients on the Mask Blue channel, to stop those portions from changing with your eye color.
This is an example of simulating how placing colors on the diffuse and then allowing the game to put color on top can change the colors. This is a simulation in an art program, but it's enough to show what the effect will do when you do not mask out the colored parts on the multi.
Character Tattoo/Face ETC Shader:
There isn't much to edit about this shader, but it is important to keep in mind, as Facial ETC textures have multiple materials that all point to the same textures, but have different shader keys and parameters. Before changing any, please check this table, or make the texture path for the specific one you want to change unique.
Stocking Shader:
As of 7.1 This shader is being adapted to player gear which allows us to research it more. This shader is nearly identical to the character (gear) shader, with a few exceptions. The main thing is that this shader utilizes UV channel 3 to copy and put skin underneath the "stockings" using only one mesh instead of the double layer mesh technique previously used. This is hardcoded to skin material A however, which means it will always be the symmetrical skin.
Texture wise, "opacity" on the normal map's blue channel is no longer overall opacity, but determines where and how much skin is shown "underneath".
Do NOT enable transparency in the material flags for this shader though, as it will crash your game.
The "nylon" texture and effect used on most gear with this shader is tile material 43, and you can get a nice stocking effect using a negative sheen value. Finally as of current research, sphere maps (like the holographic effect) seem to be disabled for this shader.
As of Penumbra update 1.5.1.0 (08/26/2025) it is possible to assign the stocking shader to use a modded material (mat B or Bibo) instead of it defaulting to mat A like it is normally hardcoded to do. To do this, you must add the attribute: "skin_suffix=bibo" or "skin_suffix=b" to the appropriate mesh (part) with the stocking shader on it. That mesh must also have it's UV3 correctly set up to match the modded skin's UV mapping.
(Eye) Occlusion Shader:
There isn't much to say about this shader.
Glass Shader:
According to recent testing, Passthrough visibility is conditional on dithering being active. That is, if the dithering key is not present (alongside the additional data bit value "00 80 00 00" being enabled), the passthrough effect will not do anything, even if the key is toggled on. To fully activate dithering, the shader key must be enabled, AND the bit value in the additional data section of the material editor must be enabled. (thank you arghblargh for this info)
As with Character Transparency, This shader is highly sensitive to opacity values in the textures, and special care must be taken to ensure that your texture map opacity strength is dialed in correctly, as there is no way to control or edit it with material constants in textools or penumbra. The shader and material constants are extremely important for this shader for your glass quality, as well as the Sphere ID and Tilemap selections.
Sphere map IDs can use color influence from your specular color (set in the colorset/color table) on this shader, and the tilemap selection can break the spheremap ID visuals up, leading to different results. When planning to use this shader, the meshes must be authored/created specifically for use with these shaders, as any accidental backfaces or face normals pointed in the wrong direction will cause visual artifacts and issues. That said, purposeful use of this can allow for neat effects for items like clear gemstones and glass dishware. (especially those with stacked transparency such as a wine glass with wine inside) (Thank you to Bacara for this information)
For glass, it is possible to manipulate and author specific IOR (Index of Refraction) values to create gems and other more mystical or stylized items. to use and manipulate IOR, you must set a tile map. this is non negotiable and will not work without one. any tilemap will do. Then click back to 0 or set 0% opacity if you need. It MUST be written on/in the material to let you do refraction values. From testing, these values are 10 times the usual strength of the values set in Unreal Engine. (thank you to Bacara for the information and Kthonia for testing)
This shader is still being researched. It mainly functions similarly to the standard Character shader in terms of Texture channels, but uses different constants and math to achieve different effects. There is currently no Automatic ways to convert a pre-DT mod to post DT with glass and have it look good, so using this shader will require manual authoring.
Character Transparency Shader:
This is a new shader introduced in 7.2, first seen on the Historia Chokers. It is assumed that it acts similarly to the standard character shader but uses a few additional shader keys for better transparency effects.
When these shaders are overlaid with certain other effects (like byakko's falling VFX) Character Glass will dither, but Character Transparency will hide completely. This could be a reason to use one shader over the other.
According to recent testing, Passthrough visibility is conditional on dithering being active. that is, if the dithering key is not present (alongside the additional data bit value "00 80 00 00" being enabled), the passthrough effect will not do anything, even if the key is toggled on. To fully activate dithering, the shader key must be enabled, AND the bit value in the additional data section of the material editor must be enabled. (thank you arghblargh for this info)
As with character glass, This shader is highly sensitive to opacity values in the textures, and special care must be taken to ensure that your texture map opacity strength is dialed in correctly, as there is no way to control or edit it with material constants in textools or penumbra. The shader and material constants are extremely important for this shader for your glass quality, as well as the Sphere ID and Tilemap selections.
Sphere map IDs can use color influence from your specular color (set in the colorset/color table) on this shader, and the tilemap selection can break the spheremap ID visuals up, leading to different results. When planning to use this shader, the meshes must be authored/created specifically for use with these shaders, as any accidental backfaces or face normals pointed in the wrong direction will cause visual artifacts and issues. That said, purposeful use of this can allow for neat effects for items like clear gemstones and glass dishware. (especially those with stacked transparency such as a wine glass with wine inside) (Thank you to Bacara for this information)
This shader makes use of "field 6" in penumbra (the textools name for this will be added later)
This shader for the most part uses all the same Texture channels as the Character shader.
Ink Shader:
So far, we know that this shader does not seem to utilize vertex color for anything special, and seems to utilize a mask map for the special effects. (Thank you to Ulli for this information) This shader is currently being researched by Bacara. It is assumed that textools will have an issue editing/reading and saving this shader. It is currently (as of 05/30/2025) only used for pictomancer VFX and the Sugar Riot raid boss. It is assumed that this shader will be good for latex, as well as the intended use case of fluids/liquids/slime/gummy materials.
This shader has been in the game since 7.0, but was first used on non-VFX in 7.2. We do not have any information on this shader and will be updating this portion when more information is found.
Character Scroll(ing) Shader:
This is a version of the character shader that uses the second UV channel to allow for an emissive texture to animate across the mesh using UV2. The speed and axis can be changed. UV2 must be a straight and flat run along one axis with everything oriented in the same direction.
(technically you only need to do what on the UV2 you need and what's linked UV and mesh wise to collaborate with your UV1's ID map for what you want to be scrolling, but for clarity's sake, try to keep it straight. for further clarification, please contact @Bacara on discord)
If you are using this shader on a skintight clothing mesh, or a mesh that is otherwise on top of another, make sure to offset the scrolling mesh by 0.03 to avoid LOD and Zfighting errors.
The easiest way to author with this shader is to use Bacara's mjolnir mod as a preset, or use the NPC gear E9242 as a material preset. this will give the texture path to something with Unknown_o, which is your scrolling emissive. When authoring this scrolling texture, you want it to be a tileable or seamless texture so it is not obvious when the pattern repeats.
The shader key for this shader to also enable opacity is
Important Colorset constants to know when authoring-
This shader's information was adapted entirely from Bacara. If you would like a more tutorial style explanation of how to use this shader with some examples, please check out their guide: https://docs.google.com/document/d/1Z_ao7r2hREzQBW1_5uXJF_2g-9ePB-MItj42CGyp6qQ/edit?tab=t.0#heading=h.echx7hlozmu
Furniture Shader:
This shader is not fully understood.
Dyeable Furniture Shader:
This shader is not fully understood.
Scrolling Furniture Shader:
Notes courtesy of Vincent on discord:
Keys:
9A696A17 - Velocity of the scroll. Positive values are left & up direction. Parameter 1 & 2 are Diffuse A's X & Y scroll respectively, and 3 & 4 are the same for Diffuse B.
Emissive, Diffuse, etc. - Affects these values on Diffuse A (the overlay layer.)
MultiEmissive, MultiDiffuse, etc. - Affects these values on Diffuse B (the base photo layer.)
BFE9D12D - A master emissive multiplier. Setting this to 0 turns off the lights on the whole thing.
The apparent 50% opacity on the Diffuse A overlay seems to be hard-coded. None of the other constants seemed to do anything at all.
Changing the alpha threshold parameter or alpha of the images had no effect.
This shader is used on the Phasmascapes.
We are assuming that this shader works the same as the non-dyeable furniture shader, with the addition of a second diffuse and scrolling parameters.
Additional Data Values Table
|
Additional Data bit Value |
Function |
Relevant Shader |
Bit Interactions |
Other Notes |
|
00 80 00 00 |
Enable Dithering |
Glass, Transparency. Character, CharacterScroll |
|
Glass often has this enabled and shadows disabled. Assumed that this also affects transparency in character shader. |
|
00 40 00 00 |
Disable Shadows |
Global (?) Glass, Transparency, Character |
|
|
|
|
|
|
|
|
|
|
|
|
|
|
|
|
|
|
|
|
|
|
|
|
|
|
|
|
|
|
|
|
|
|
|
|
|
|
|
|
|
|
|
|
Currently, we believe that all values in this table are Global, or work on all shaders, but as this has not yet been fully confirmed, I will continue listing the confirmed shaders that these data values work on.
Shader/Colorset Values Penumbra name Vs textools name.
|
Penumbra Name/Value |
Textools Name/Value |
|
Field #3 |
Diffuse unknown |
|
Field #7 |
Specular Unknown |
|
Field #11 |
Emissive Unknown |
|
Field #17 |
PBR Unknown |
|
Field #20 |
Effect Unknown R |
|
Field #22 |
Effect Unknown B |
|
Field #23 |
Effect Unknown A |
When swapping the Character shader from Legacy to Standard Fields 3 and 11 Should be manually set to 1 and Field 7 should be set to 0. This table should help if you are doing this in textools instead of penumbra.
Shader ID Nonstandard values Chart
| Shaderpack | ID # | Effect | Notes |
| Skin.shpk | 10 | Metalness/World Reflection | Swaps SSS/Parallax for Metalness |
| Character.shpk/Hair.shpk(?) | 4 | Fur/Parallax (Strong) | AO And parallax can be run on same texture if on different colorset rows |
| Character.shpk/Hair.shpk(?) | 5 | Fur/Parallax (Medium) | AO And parallax can be run on same texture if on different colorset rows |
| Character.shpk/Hair.shpk(?) | 6 | Fur/Parallax (Soft) | AO And parallax can be run on same texture if on different colorset rows |
| Hair.shpk(?) | 10 | Wet look/ Specular change | |
| Character.shpk | 0, 7, 10, 12, 17+ | Mask Blue is Ambient Occlusion | |
| Hair.shpk | 2 | Ignore self-cast shadows | Specifically when shader key-tattoo is enabled (?) |
These are shader IDs that are not commonly used, but can change the usage of certain channels in the Mask texture. We still don't know a lot about these, as more research needs to be done. Thank you to Bacara for for observations on the Character shader's IDs. Char shader ID 5 was first noticed in gear on the 2026 valentine's beret. Char shader IDs 4-6 use parallax in the same way that the Hrothgar skin shader do (Mask blue channel).
Thank you to CosmicMeow for info on Char shader IDs that use Mask blue as AO
This table is still a WIP, and some ID and item combinations may be incompatible. More research is being done to determine the causes.
As of current research, Character.shpk has a total of 19 valid shader IDs (0-18). not all are known though. Shader IDs appear to be consistent across most shaders Except skin, but this has not been fully verified.
On gear, it is possible to call shader IDs per row. As an example, this means you could use ID 0 (default) on row 1-13, ID 5 on row 14, ID 10 on row 15, and ID 2 on row 16. If you wish to make use of this on gear, be sure to author your ID map accordingly.
For non-skin Shader IDs 4-6, when set, the entire model ignores self-cast shadows in favor of a fluffy parallax effect.
Attribute Reference Tables
This page is based off the "attribute reference table" in the textools reference doc by sel. This information has not been validated to have been changed in dawntrail, so while nothing on here should have changed, it is possible that some information is outdated or missing.
Mesh parts in FF14 have many types of Attributes, and these determine when and what parts of a mesh should be hidden.
Every Mesh part (X.0, X.1, etc) Has it's own list of attributes that will change what is and is not hidden when the correct metadata is combined with it. for example a mesh part with the upper arm attribute will be hidden if the item is paired with long gloves.
This is especially important when replacing the mesh parts of one model with another's, or when you are making/altering a mesh that needs to hide certain parts. If the mesh part numbers are different, then unwanted parts may hide when something is equipped. If you ever have a mod where something goes invisible when another gear piece is worn (usually long gloves) then that means that an attribute was incorrectly placed on a mesh part. likewise, if a part of the mesh does not hide when the corresponding piece is worn (like long gloves) then that means that mesh part does not have the attribute set.
Some gear uses special "Variant Attributes" such as atr_tv_a. these attributes are special as they are not decided by what other gear you have on, but rather are decided by what item variant you have equipped. What variants hide/show what items is determined by thier IMC values, which can be found in the metadata editing tabs of your chosen mod editor.
Variant attributes go from a to j (so atr_xv_b for example) with a total of 10 possible variant attributes per item, at the time of writing this.
Other variant attributes may exist for other model types, but most other model types do not have IMC files, so they will not be gone over here.
Unlisted model types have no unique attributes. Ex: Tail (til) and Ear (zir)
Shapes Reference Table
This page was adapted from the Textools Reference doc by Sel. This information has not been updated or re-researched since pre-dawntrail, so some information may be missing or outdated.
It is assumed that a shape can be created for any otherwise unlisted attribute and will be triggered if the attribute associated with it is hidden, however this has not yet been tested.
Visibility Reference Tables
This page is an adaptation of the Textools Reference document by Sel. This data has not been tested since the release of dawntrail, so some information may be missing/outdated.
|
Visibility Flag |
Controlling Slot |
Attribute |
Shape |
Notes |
|
|
Byte 0 |
EnableBodyFlags |
Body (top) |
-- |
-- |
Must be enabled for the rest of the body flags to work correctly. |
|
BodyHideWaist |
Body (top) |
atr_kod |
shp_kod, shp_kos(?) |
||
|
Bit2 |
Body (top) |
??? |
??? |
||
|
BodyHideShortGloves |
Body (top) |
atr_arm |
atr_arm |
Has something to do with glove settings based on the type of glove equipped. |
|
|
BodyGloveUnknown2 |
Body (top) |
??? |
??? |
||
|
BodyHideMidGloves |
Body (top) |
atr_arm |
shp_arm |
Ex. HideLongGloves will only hide atr_arm on long gloves. |
|
|
BodyHideLongGloves |
Body (top) |
atr_arm |
shp_arm |
But not on Mid Gloves. |
|
|
BodyHideGorget |
Body (top) |
atr_inr |
shp_inr |
||
|
Byte 1 |
BodyShowLeg |
Body (top) |
-- |
-- |
When body gear hides other slots, the visibility parameters from that slot in the same set as the body gear |
|
BodyShowHand |
Body (top) |
-- |
-- |
is used for determining down-stream visibility settings. (Ex. Should Shoes be shown/hidden) |
|
|
BodyShowHead |
Body (top) |
-- |
-- |
||
|
BodyShowNecklace |
Body (top) |
-- |
-- |
If either of equipped body or head gear hides necklace, it will be hidden. |
|
|
BodyShowBracelet |
Body (top) |
-- |
-- |
If either of equipped body or glove gear hides bracelet, it will be hidden. |
|
|
BodyShowTail |
Body (top) |
-- |
-- |
If either of equipped body or leg gear hides tail, it will be hidden. |
|
|
BodyTriggersomeShapeData |
Body (top) |
??? |
??? |
||
|
Bit15 |
Body (top) |
??? |
??? |
||
|
Byte 2 |
EnableLegFlags |
Leg (dwn) |
-- |
-- |
Must be enabled for the rest of the leg flags to work correctly. |
|
LegHideKneePads |
Leg (dwn) |
atr_lpd |
shp_lpd |
||
|
LegHideShortBoot |
Leg (dwn) |
atr_leg |
shp_leg |
Like gloves, the atr_leg triggers are dependent upon the equipped boot's visibility settings. (Long boots cannot be hidden) |
|
|
LegHideHalfBoot |
Leg (dwn) |
atr_leg |
shp_leg |
||
|
LegBootUnknown |
Leg (dwn) |
??? |
??? |
Something to do with interactions with half-boots. |
|
|
LegShowFoot |
Leg (dwn) |
-- |
-- |
||
|
LegShowTail |
Leg (dwn) |
??? |
??? |
If either of equipped body or leg gear hides tail, it will be hidden. |
|
|
Bit23 |
Leg (dwn) |
??? |
??? |
||
|
Byte 3 |
EnableHandFlags |
Gloves (glv) |
-- |
-- |
Must be enabled for the rest of the hand flags to work correctly. |
|
HandHideElbow |
Gloves (glv) |
atr_ude |
shp_ude, shp_hij, shp_kat |
When Elbow is set without forearm the glove is marked as a short glove (which will trigger shp_hij). Exact selection of which Shapes are triggered is based on the combination of flags. (Mid glove triggers ude, Long triggers kat) |
|
|
HandHideForearm |
Gloves (glv) |
atr_hij |
shp_ude, shp_hij, shp_kat |
||
|
Bit27 |
Gloves (glv) |
??? |
??? |
||
|
HandShowBracelet |
Gloves (glv) |
-- |
-- |
If either of equipped body or glove gear hides bracelet, it will be hidden. |
|
|
HandShowRingL |
Gloves (glv) |
-- |
-- |
||
|
HandShowRingR |
Gloves (glv) |
-- |
-- |
||
|
Bit31 |
Gloves (glv) |
??? |
??? |
||
|
Byte 4 |
EnableFootFlags |
Shoes (sho) |
-- |
-- |
Must be enabled for the rest of the foot flags to work correctly. |
|
FootHideKnee |
Shoes (sho) |
atr_hiz |
shp_hiz, shp_sne, shp_mom |
When Knee is set without Calf, item is marked as a short boot (Which will hide shp_sne). Exact shapes triggered depends on the combination of the flags. (mid boot triggers hiz, long triggers mom) |
|
|
FootHideCalf |
Shoes (sho) |
atr_sne |
shp_hiz, shp_sne, shp_mom |
||
|
FootHideAnkle |
Shoes (sho) |
??? |
??? |
||
|
Bit36 |
Shoes (sho) |
-- |
-- |
Unused |
|
|
Bit37 |
Shoes (sho) |
-- |
-- |
Unused |
|
|
Bit38 |
Shoes (sho) |
-- |
-- |
Unused |
|
|
Bit39 |
Shoes (sho) |
-- |
-- |
Unused |
|
|
Byte 5 |
EnableHeadFlags |
Head (met) |
-- |
-- |
Must be enabled for the rest of the head flags to work correctly. |
|
HeadHideScalp |
Head (met) |
atr_kam |
shp_kam |
When set alone, hides scalp. When set with HideHair, hides everything. |
|
|
HeadHideHair |
Head (met) |
-- |
-- |
When set alone, hides hair. When set with HideScalp, hides everything. |
|
|
HeadShowHairOverride |
Head (met) |
-- |
-- |
When set, shows hair, regardless of the previous two flags. |
|
|
HeadHideNeck |
Head (met) |
atr_nek |
shp_nek |
||
|
HeadShowNecklace |
Head (met) |
-- |
-- |
If either of equipped body or head gear hides necklace, it will be hidden. |
|
|
Bit46 |
Head (met) |
??? |
??? |
||
|
HeadShowEarrings |
Head (met) |
-- |
-- |
Full earring toggle cannot be disabled without also disabling hair (HeadHideHair) |
|
|
Byte 6 |
HeadShowEarringsHuman |
Head (met) |
-- |
-- |
Everything not Au Ra (?) |
|
HeadShowEarringsAura |
Head (met) |
-- |
-- |
Au Ra Only (?) |
|
|
HeadShowEarHuman |
Head (met) |
atr_mim |
atr_mim |
Hyur/Elezen/Lalafell |
|
|
HeadShowEarMiqo |
Head (met) |
atr_top |
shp_top |
Miqo/Hrothgar |
|
|
HeadShowEarAura |
Head (met) |
atr_hrn |
shp_hrn |
Au Ra (Horns) |
|
|
HeadShowEarViera |
Head (met) |
-- |
-- |
Viera |
|
|
HeadUnknownHelmet1 |
Head (met) |
??? |
??? |
These flags are usually set in place of ShowEarrings[Race] flags on helmet gear. |
|
|
HeadUnknownHelmet2 |
Head (met) |
??? |
??? |
Their purpose is currently unknown, but presumably triggers some shape data. |
|
|
Byte 7 |
HeadShowHrothgarHat |
Head (met) |
-- |
-- |
Allows Hrothgar hats to be shown |
|
HeadShowVieraHat |
Head (met) |
-- |
-- |
Allows Viera hats to be shown |
|
|
Bit58 |
Head (met) |
-- |
-- |
Unused |
|
|
Bit59 |
Head (met) |
-- |
-- |
Unused |
|
|
Bit60 |
Head (met) |
-- |
-- |
Unused |
|
|
Bit61 |
Head (met) |
-- |
-- |
Unused |
|
|
Bit62 |
Head (met) |
-- |
-- |
Unused |
|
|
Bit63 |
Head (met) |
-- |
-- |
Unused |
(Dawntrail) Colorset Values reference table
This page has been adapted from the same from the Textools Reference Doc made by Sel.
Dawntrail colorsets now use an Index Texture/ID map and use TWO channels to complete thier blending. Index red is similar to Endwalker Normal Alpha in that it is divided into 16 blocks; However it cannot be blended.
Instead for Dawntrail each block comes as a pair of rows that can be blended and this blend is controlled by the index Green channel. A pure white value will blend to A and a pure black value will blend to B
for both Red and Green values-
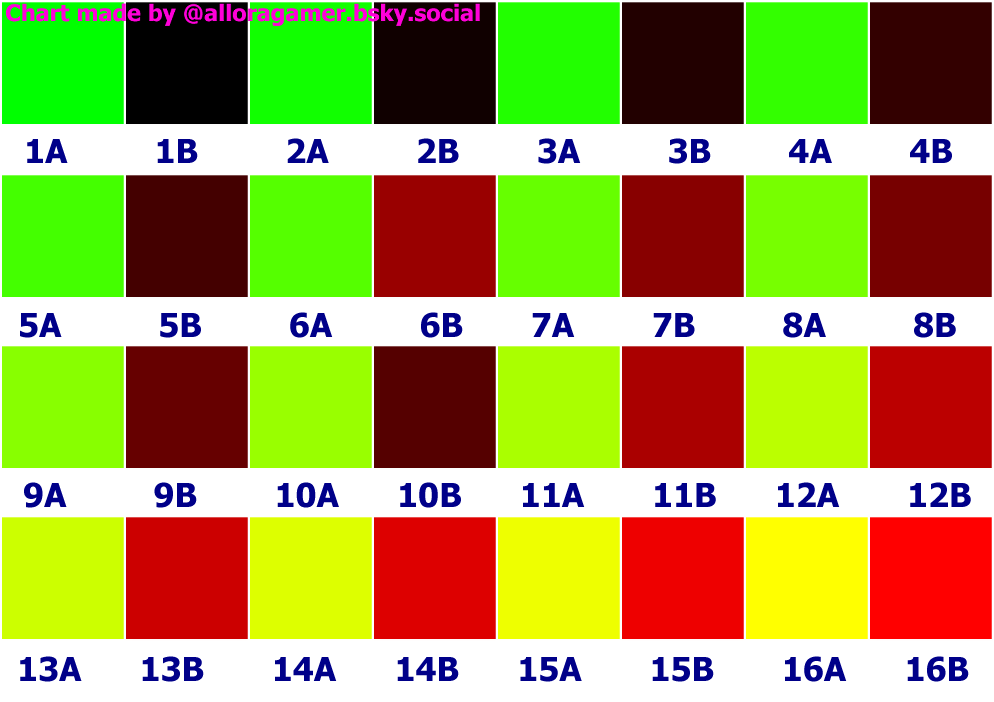
Here is a chart that can be colorpicked from with the corresponding values from the above chart.
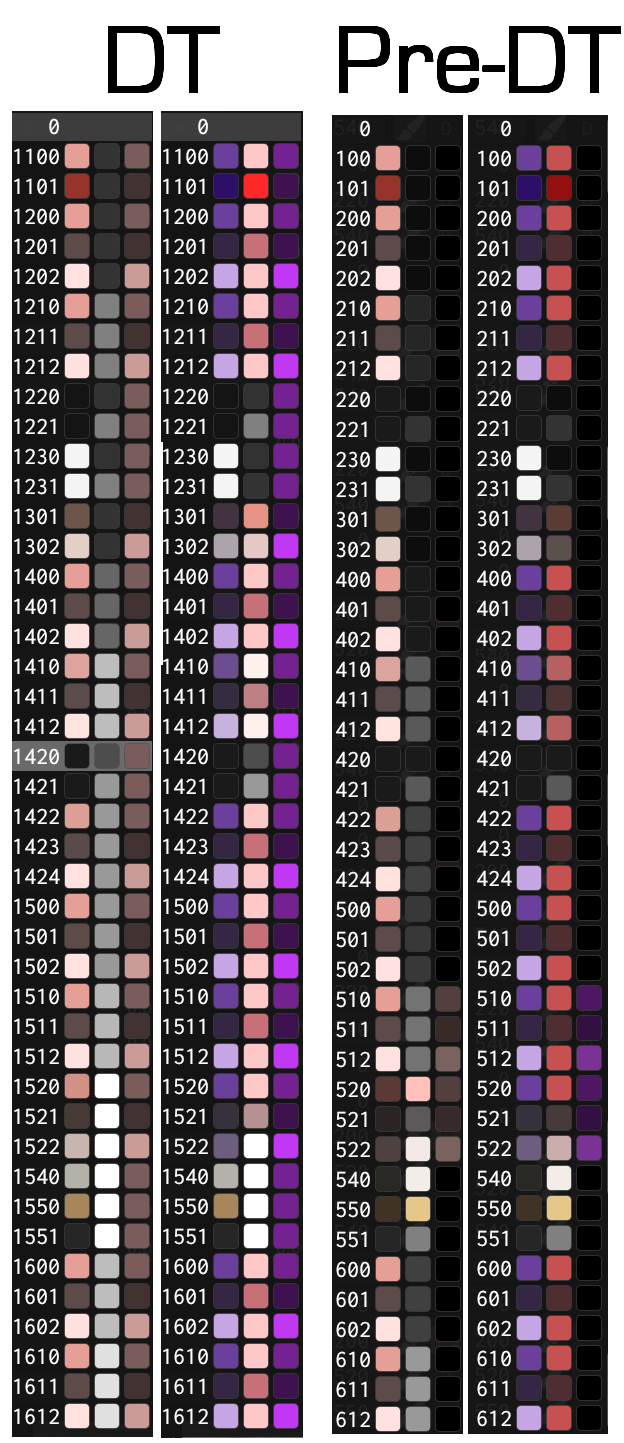
Dye templates and Tile References
This page was made as an adaptation of the same in the Textools Reference doc created by sel. This has not been Fully updated for dawntrail, so some information may be outdated or missing.
As of dawntrail, it is now possible to have two dye channels. In order to select and set between the two, you must go to the colorset editing window, and on the row you wish to be connected to the dye channel, select either Channel 1 or Channel 2. There are technically up to 4 channels in the data, but 3 and 4 are unused and cannot be manipulated in game.
There are currently 43 different dye templates in FF14. These templates control how dyes via the in game dye system or anamnesis/ktisis/brio/glamourer/etc affect a colorset row.
Other than selecting a template, you can also select which fields it should effect when dyed such as Diffuse color, Spec color, Emissive color, Gloss, and Spec power. Not all templates contain data for all of the above fields. Furthermore, emissive color can only be dyed using Legacy shader templates #510-522. It is not possible to dye the emissive or spec on Dawntrail shaders. When using the DT shaders, the emissive and specular will always default to the colors chosen by the stain template when dyed
A general rule of thumb is as follows:
- (#)#00- dyes "default"
- (#)#01- dyes "darker"
- (#)#02- dyes "lighter"
- (#)#2#- dyes black ((1)220, (1)420, (1)221, (1)421)
Dyed gloss values increase as you go up the 100s bracket from ~1 to ~24
Special templates other than black are:
- Silver- (1)540
- Gold-(1)550
These templates (and black) will always dye the same color no matter what dye is used.
For easy conversion between legacy shader and DT shader's dye templates, just select the same number but with a 1 in front of it (or remove the 1). For example, dye template 1550 is the same as legacy dye template 550 (forced gold).
As a visual aid, here are examples from penumbra's dye template GUI of the Legacy and DT shaders. Both shaders are shown with the dye preview for Rose Pink for standard dyes, and Metallic Purple for the metallic dyes.
Tile materials
In addition to basic colors per row, a sub material known as a tile material may be used for microdetail such as linen or leather. ff14 has 64 possible tile materials defined, though only half actually work.
The tile material is a 32x32 px normal map and diffuse map which is mapped onto the UV1 layer of the material. the tile material is also repeated (tiled) a specified amount of times along each axis and can be further skewed to rotate or change the tiling as desired.
The grid version of the tiles and texture paths for them will be updated when found for dawntrail.
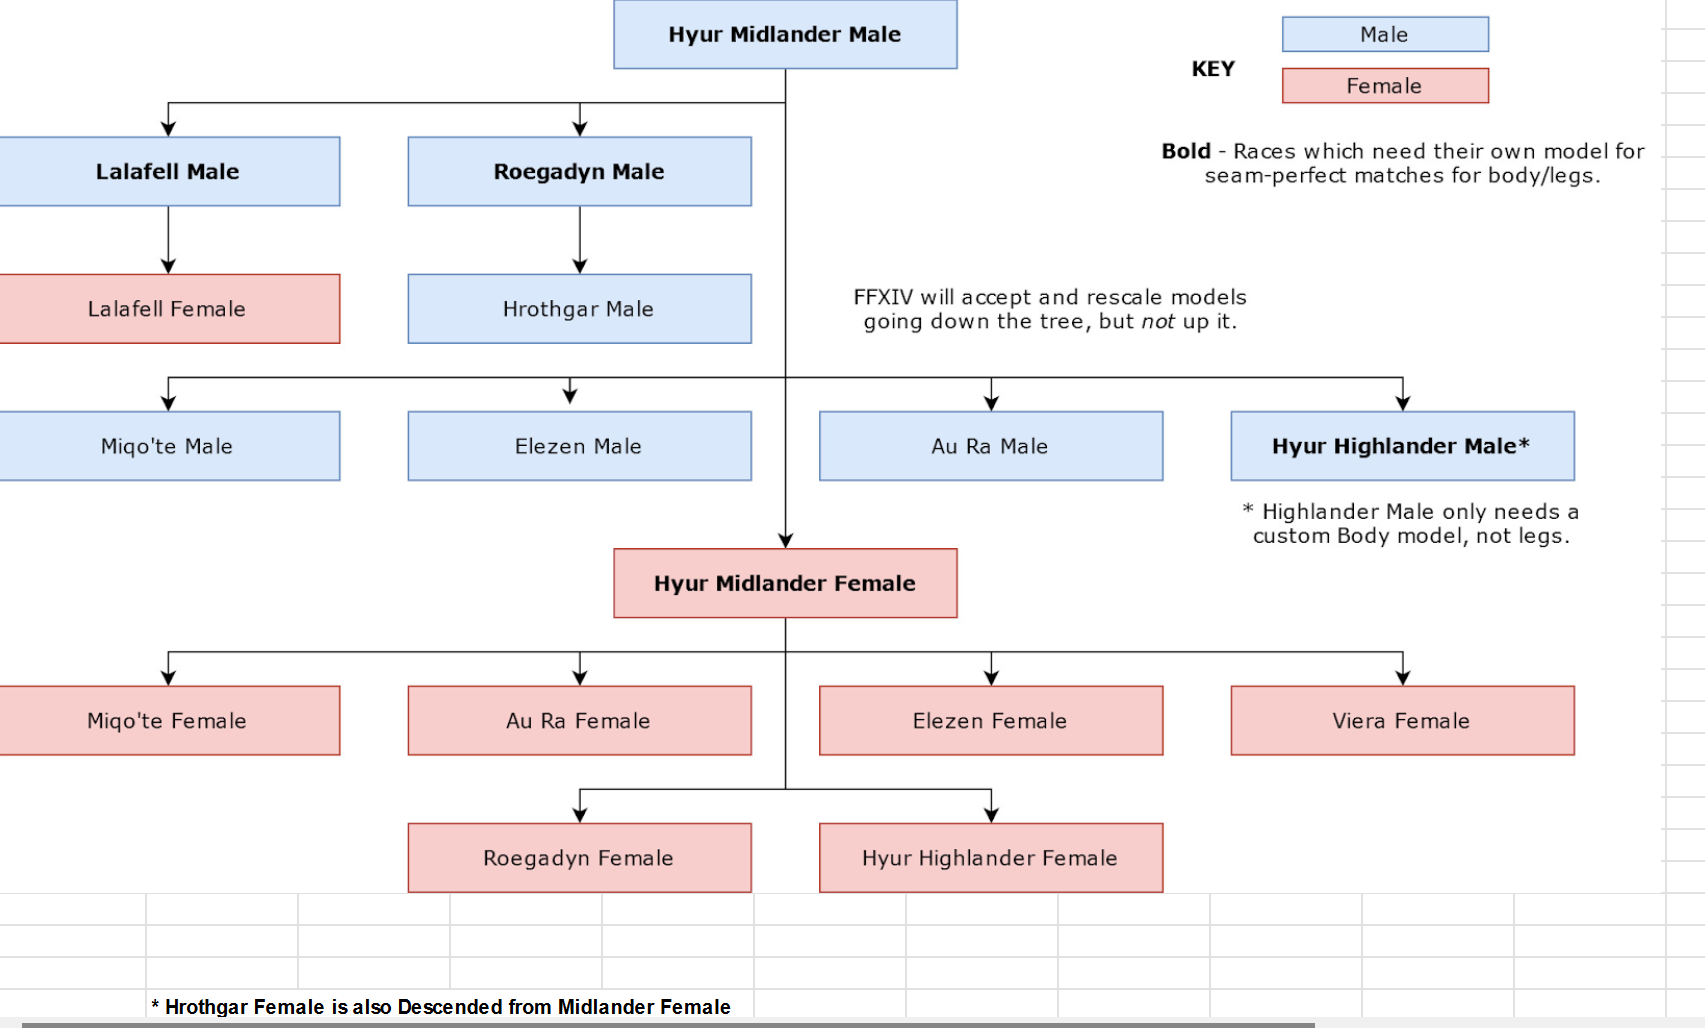
Racial Scaling tree (wip, outdated)
this does not include viera male or hrothgar female and must be remade. will update later, here's the old one.
Bone list and Bone Scaling notes.
this has been adapted from the textools reference doc page of the same title, created by sel. this has not been fully updated for dawntrail, and some information IS missing or outdated. I will correct when I can.
As a note. this list is based off the old bone list. Dawntrail completely redid the entire face skeletons, so please use the face bones specific list for all DT updated heads. The First three tables are a list of Vanilla bones.
Bones with <a-e> are multiple bones in sequence, such as sebo (spine) bones. Bones with <l/r> are left and right bones such as leg bones. bones with <f/b/s> are Front, Back, and Side bones, such as skirts. any bone with _ex in it's name is an Extra bone, and will only exist when the associated skeleton metadata is loaded. This is most commonly seen on hair, but has been used on gear on extremely rare occasions.
Main Bones (Vanilla)
Dawntrail Face Bones
As a note, not every bone can be manipulated or scaled outside of gpose, (such as with Customize+ for normal gameplay). furthermore, many of the facial bones are kindedriver or "Helper" bones, and are either not meant to be touched on thier own, or are meant to provide small adjustments after moving the main bone. If you are not posing an old NPC head, you should only use the face bones listed here, and not the ones in the above chart.
Some bones are labeled GPOSE ONLY bones. These bones will only ever work in gpose and in cutscenes, and trying to alter them in a non-gpose only setting such as customize+ will cause these bones to immediately revert when leaving gpose. Do not use these for scaling outside of screenshots. This is not fixable and is a game limitation. if you want to dialate or contract your pupils for out of gpose, you will need to look into eye mods
| Mouth | (Lips has 20 Bones as of Dawntrail) | |
| j_f_umlip_<01-02>_<l/r> | Upper Outer Lip (not corners) | 01 is the lipline set, 02 is the opening set |
| j_f_ulip_<01-02>_<l/r> | Upper Center Lip | 01 is the lipline set, 02 is the opening set |
| j_f_uslip_<l/r> | Upper Lip Corners | |
| j_f_dmlip_<01-02>_<l/r> | Lower Outer Lip (not corners) | 01 is the lipline set, 02 is the opening set |
| j_f_dlip_<01-02>_<l/r> | Lower Center Lip | 01 is the lipline set, 02 is the opening set |
| j_f_dslip_<l/r> | Lower Lip Corners | |
| j_f_bero_<01-03> | Tounge | Parented to Jaw (F_ago) |
| j_f_ago | (DT) Jaw | |
| j_f_dago | (DT) Lower Jaw/ Chin | |
| j_f_hagukiup | Upper Teeth | |
| j_f_hagukidn | Lower Teeth | |
| j_f_hige_<l/r> | Whiskers | Hrothgar Only |
| Eye Area | ||
| j_f_mabup_01_<l/r> | Upper Center Eyelid | I don't know why they're numbered AND labeled |
| j_f_mabup_02out_<l/r> | Upper Outer corner Eyelid | I don't know why they're numbered AND labeled |
| j_f_mabup_03in_<l/r> | Upper Inner corner Eyelid | I don't know why they're numbered AND labeled |
| j_f_mabdn_01_<l/r> | Lower Center Eyelid | I don't know why they're numbered AND labeled |
| j_f_mabdn_02out_<l/r> | Lower Outer corner Eyelid | I don't know why they're numbered AND labeled |
| j_f_mabdn_03in_<l/r> | Lower Inner corner Eyelid | I don't know why they're numbered AND labeled |
| j_f_mayu_<l/r> | Outer Eyebrow | |
| j_f_mmayu_<l/r> | Inner Eyebrow | |
| j_f_miken_<01-02>_<l/r> | Brow Ridge | 02 is the innermost one |
| j_f_eye_<l/r> | Eyeball | Cannot be scaled (linked by default in Anam) |
| j_f_mab_<l/r> | Eye Socket | |
| j_f_eyepuru_<l/r> | Eyeball 2 | Can be scaled (not linked by default in Anam) (gpose only?) |
| j_f_irisprm_<l/r> | Iris (2) GPOSE SCALE ONLY | values >1 Contract the Iris, <1 Enlarges the iris |
| j_f_eyeprm_01_<l/r> | Iris (3) GPOSE SCALE ONLY | values >1 Enlarge the Iris, <1 Contracts the iris |
| Nose | ||
| j_f_uhana | Nose Bridge | |
| j_f_hana_<l/r> | Nostril | |
| j_f_dmiken_<l/r> | Glabella | This is the part of the nose ridge directly between your eyes |
| Cheeks | ||
| j_f_hoho_<l/r> | Cheek (main) | This is where your cheekbone is/where you would put blush |
| j_f_dhoho_<l/r> | Outer Cheek | This is closer to your ear |
| j_f_shoho_<l/r> | Middle Cheek | Under your cheekbone, closer to your lips |
| j_f_dmemoto_<l/r> | Inner Cheek | Almost in-line with your nose bridge. where the cheek meets your eyebags |
Other Vanilla bones
This is a table of other VANILLA (unmodded) bones that didn't neatly fit in any other category. This also includes bones in Anamnesis' bone list that do not appear on DT updated heads, and are assumed to be Pre-DT fave bones. these bones will be marked.
As a note, there are Many more bones than here, but most of the bones not listed are _ex bones, these are "extra" bones that are not always present. EX bones are generally only seen on hair, but in rare occasions may be present on gear. Gear EX bones will be listed WITH THE EXCEPTION of the longer wedding veil's EX bones because there are TOO MANY. These bones are also only present on the longer version of the wedding veil which is normally only active when inside the sanctum of eternal bonding.
This chart will not list the sage or reaper scythe bones, as there are multiple sets per weapon type, and it's too much work for me to check all of them manually. Sorry.
The EX section of this chart IS incomplete, and likely always will be. This chart will not include Hair or Weapon EX bones, as there are too many, and they are being added too often.
| Non-EX hair | ||
| j_kami_<a-b> | Hair (back) | Most hairs longer than a bob will use these, but not always. |
| j_kami_f_<l/r> | Hair front (bangs) | Most hairs with bangs/front fringe will use these, but not always. |
| Non-DT/Other Face | ||
| j_f_dmab_<l/r> | Eyelid Lower | Could not find on DT Player Head |
| j_f_hana | Nose | Could not find on DT Player Head |
| j_f_lip_<l/r> | Lips | Could not find on DT Player Head |
| j_f_uago | Upper lip A | Could not find on DT Player Head |
| j_f_ulip | Upper Lip B | Could not find on DT Player Head |
| n_f_lip_<l/r> | Lips | Could not find on DT Player Head |
| n_f_ulip_<l/r> | Upper Lips | Could not find on DT Player Head |
| j_f_dlip | Lower Lips | Could not find on DT Player Head |
| j_f_memoto | (nose) Bridge | Could not find on DT Player Head |
| j_f_miken_<l/r> | Brow | Could not find on DT Player Head |
| j_f_umab_<l/r> | Upper Eyelid | Could not find on DT Player Head |
| j_f_face | Face | Could not find on DT Player Head |
| Gear-Specific Other (incl. Gear EX) | ||
| mh_n_hara | Main Hand | |
| oh_n_hara | Offhand | |
| mh_n_root | Mainhand Root | |
| oh_n_root | Offhand Root | |
| j_ex_met_va | Visor (A) | |
| j_ex_met_vb | Visor (B) | |
| j_ex_top_<a-d> | Phoenix Riser Top Tails | C and D are parented and A and B are parented |
| j_ex_top_<a-b>_<l/r> | (Kimono) Sleeve Bones | Far eastern schoolgirl's Hakama and Yotsuyu's Kimono |
| j_ex_met_<a-b> | Slime Jiggle | King Slime Crown |
Modded Bones
This is a list of bones that ARE NOT PRESENT in vanilla skeletons. These bones will ONLY exist if you have the accompanying extra skeleton mod, and have it set up properly AND a mesh rigged to these bones. Most of these bones were created for the purposes of NSFW animations or physics, rather than posing or scaling. That said, with some work, they can be used for those purposes. All IVCS1 bones are included In Other newer body skeletons such as IVCS2, YAS, and Skelomae for the sake of compatability. For other compatability questions between newer skeletons, Please check your preferred skeleton's documentation.
Because of the nature of modded skeletons, and the fact that these are not only capable of changing at any time; but also can be added to by anyone. This WILL NOT be a complete list. This list will only contain the basic bones used by most body mods. THERE WILL BE BONES AND SKELETON MODS MISSING FROM THIS LIST. THAT IS INEVITABLE.
This will NOT include any "exotic" bones or modded bones made for one specific gear/face/whatever mod, as it's again, more effort than it's worth for me alone to keep up with.
| Notes | |||
| Genitals | |||
| iv_ochinko_<a-f> | Penis Shaft | IVCS 1 | Yes, there are really 6 of them. Erect Penises only. |
| iv_kougan_<l/r> | Scrotum/Balls | IVCS1 | |
| iv_omanko | Vagina | IVCS1 | |
| iv_inshin_<l/r> | Labia | IVCS1 | If you don't know what this is, please google it |
| iv_kurrito | Clitoris | IVCS1 | It's easy to find now! |
| iv_koumon | Anus/Butthole | IVCS1 | The actual hole |
| iv_koumon_<l/r> | Anus/Butthole B | IVCS1 | To like. Open it/stretch it. |
| Main body Body parts | |||
| iv_nitoukin_<l/r> | Biceps | IVCS1 | For muscles/flexing |
| iv_c_mune_<l/r> | Breast B | IVCS1 | For breast animation/physics and CC male models |
| iv_shiri_<l/r> | Buttcheeks | IVCS1 | |
| iv_fukubu_phys | (Upper) Belly | IVCS2 | was made for physics but can be scaled |
| ya_fukubu_phys | (Lower) Belly | YAS | was made for physics but can be scaled |
| iv_daitai_phys_<l/r> | (Back) Thigh | IVCS2 | was made for physics but can be scaled |
| ya_daitai_phys_<l/r> | (Front) Thigh | YAS | was made for physics but can be scaled |
| ya_shiri_phys_<l/r> | Lower Buttcheeks | YAS | You could scale this but it's mainly only for physics |
| Hands | |||
| iv_hito_c_<l/r> | Index/Pointer (Finger) | IVCS1 | |
| iv_naka_c_<l/r> | Middle (Finger) | IVCS1 | |
| iv_kusu_c_<l/r> | Ring (Finger) | IVCS1 | |
| iv_ko_c_<l/r> | Pinky (Finger) | IVCS1 | |
| Feet | |||
| iv_asi_oya_<a-b>_<l/r> | Big Toe | IVCS1 | |
| iv_asi_hito_<a-b>_<l/r> | Index Toe | IVCS1 | |
| iv_asi_naka_<a-b>_<l/r> | Middle Toe | IVCS1 | |
| iv_asi_kusu_<a-b>_<l/r> | Fore Toe | IVCS1 | |
| iv_asi_ko_<a-b>_<l/r> | Pinky Toe | IVCS1 |
Bone scaling notes
Many in-game models share the same model, but scale the bones to fit the body shape they want. this is a list of known and confirmed scaling values that match up correctly with the in-game versions.
These are meant to be used with posing tools/plugins, with Customize+, or when testing your models in a modeling software to ensure that things don't clip at larger bust scalings.
At this time there is only bust scalings, but we will be happy to add other scalings as people find them. Keep in mind that not all gear pieces are weighted equally to the breast bones. Many newer gear pieces are weighted to 50% breast influence instead of 100%. For these you may need to go up another percentage category to have the same effect as your racial starter gear or nude.
Bust sizes (Middie F)- Apply to Mune_l and _r
| Slider Percentage |
X |
Y |
Z |
| 0% |
0.92 |
0.816 |
0.80 |
| 50% |
1 |
1 |
1 |
| 100% |
1.08 |
1.184 |
1.20 |
| 150% |
1.16 |
1.368 |
1.40 |
| 200% |
1.24 |
1.552 |
1.60 |
| 250% |
1.32 |
1.736 |
1.80 |
| 300% |
1.40 |
1.92 |
2 |
As a note, these same values will work in a 3d modeling software like blender or 3ds max. for 3ds max, move the decimal point back 2 spaces.
All races have racial scaling applied to them, these values are accurate for Middie F, but some races such as viera/roe and Au Ra may have slightly different values due to thier racial scaling. This chart is meant as a rough guide.
Outdated tables (cross-reference only)
These are a few pages/tables that are included for cross referencing for the sake of older mods and setups, and should not be used when doing things post dawntrail. they are being saved for archival's sake, but I will not be formatting them in a pretty way, sorry. These are taken from the Textools Reference doc made by sel.
Endwalker shader tables-
|
Standard Gear Shader |
||||||
|
Normal Map |
Multi |
Vertex Color/Alpha |
UV2 |
|||
|
RED |
Standard Tangent Space Normal Map |
RED |
Ambient Occlusion |
RED |
Ambient Occlusion |
Decal Placement, such as Grand Company Logos |
|
GREEN |
Standard Tangent Space Normal Map |
GREEN |
Gloss |
GREEN |
Gloss |
|
|
BLUE |
Opacity [0-128, 128+ is full Opacity] |
BLUE |
Specular Power |
BLUE |
Specular Power |
Specular |
|
ALPHA |
Colorset Row |
ALPHA |
??? |
ALPHA |
Opacity |
Standard Full Color Specular Map |
|
Standard Gear Shader - Monster Preset |
||||||
|
Normal Map |
Multi |
Vertex Color/Alpha(UV3) |
UV2 |
|||
|
RED |
Standard Tangent Space Normal Map |
RED |
Specular Intensity |
RED |
??? |
Decal Placement, such as Grand Company Logos |
|
GREEN |
Standard Tangent Space Normal Map |
GREEN |
Gloss (?) |
GREEN |
??? |
|
|
BLUE |
Opacity [0-128, 128+ is full Opacity] |
BLUE |
??? |
BLUE |
??? |
Specular |
|
ALPHA |
Colorset Row |
ALPHA |
??? |
ALPHA |
??? |
Used as a Multi map (See Multi column) |
|
Glass Shader |
||||||
|
Normal Map |
Multi |
Vertex Color/Alpha(UV3) |
UV2 |
|||
|
RED |
Standard Tangent Space Normal Map |
RED |
Ambient Occlusion |
RED |
??? |
??? |
|
GREEN |
Standard Tangent Space Normal Map |
GREEN |
Gloss |
GREEN |
??? |
|
|
BLUE |
Opacity |
BLUE |
Specular Power |
BLUE |
Z Depth? |
N/A |
|
ALPHA |
Colorset Row |
ALPHA |
??? |
ALPHA |
??? |
|
|
Skin Shader |
||||||
|
Normal Map |
Multi |
Vertex Color/Alpha(UV3) |
UV2 |
|||
|
RED |
Standard Tangent Space Normal Map |
RED |
Player Skin Color Selection Influence |
RED |
Player Muscle Slider Influence |
Decal Placement, such as Legacy Mark or Face Paint. |
|
GREEN |
Standard Tangent Space Normal Map |
GREEN |
Specular Intensity |
GREEN |
??? |
|
|
BLUE |
??? |
BLUE |
Unused |
BLUE |
Angle of Refraction Intensity |
N/A |
|
ALPHA |
??? |
ALPHA |
??? |
ALPHA |
Player Skin Color Selection Influence |
|
|
Skin Shader - Face Presets |
||||||
|
Normal Map |
Multi |
Vertex Color/Alpha |
UV2 |
|||
|
RED |
Standard Tangent Space Normal Map |
RED |
Player Skin Color Selection Influence |
RED |
Player Muscle Slider Influence |
Decal Placement, such as Legacy Mark or Face Paint. |
|
GREEN |
Standard Tangent Space Normal Map |
GREEN |
Specular Intensity |
GREEN |
??? |
|
|
BLUE |
Opacity |
BLUE |
Player Lip Color Selection Influence |
BLUE |
Angle of Refraction Intensity |
N/A |
|
ALPHA |
??? |
ALPHA |
??? |
ALPHA |
Player Skin Color Selection Influence |
|
|
Skin Shader - Skin with Hair Preset |
||||||
|
Normal Map |
Multi |
Vertex Color/Alpha(UV3) |
UV2 |
|||
|
RED |
Standard Tangent Space Normal Map |
RED |
Player Skin Color Selection Influence |
RED |
??? |
Decal Placement, such as Legacy Mark or Face Paint. |
|
GREEN |
Standard Tangent Space Normal Map |
GREEN |
Player Hair Color Selection Influence |
GREEN |
??? |
|
|
BLUE |
??? |
BLUE |
Hair Highlight Color Selection Influence |
BLUE |
??? |
N/A |
|
ALPHA |
??? |
ALPHA |
??? |
ALPHA |
??? |
|
|
Hair Shader |
||||||
|
Normal Map |
Multi |
Vertex Color/Alpha(UV3) |
UV2 |
|||
|
RED |
Standard Tangent Space Normal Map |
RED |
Diffuse Mask |
RED |
Red Color Influence |
Opacity Mapping |
|
GREEN |
Standard Tangent Space Normal Map |
GREEN |
Specular Mask |
GREEN |
Green Color Influence |
|
|
BLUE |
??? |
BLUE |
Unused |
BLUE |
Blue Color Influence |
N/A |
|
ALPHA |
Opacity (see UV2) |
ALPHA |
Highlight Color Influence |
ALPHA |
Opacity |
|
|
Hair Shader - Face Presets |
||||||
|
Normal Map |
Multi |
Vertex Color/Alpha |
UV2 |
|||
|
RED |
Standard Tangent Space Normal Map |
RED |
Brightness |
RED |
Red Color Influence |
Opacity Map |
|
GREEN |
Standard Tangent Space Normal Map |
GREEN |
Specular Intensity |
GREEN |
Green Color Influence |
|
|
BLUE |
??? |
BLUE |
Unused |
BLUE |
Blue Color Influence |
N/A |
|
ALPHA |
Opacity |
ALPHA |
Player Tattoo/Etc* Color Influence |
ALPHA |
Opacity |
|
|
Iris Shader |
||||||
|
Normal Map |
Multi |
Vertex Color/Alpha(UV3) |
UV2 |
|||
|
RED |
Standard Tangent Space Normal Map |
RED |
Diffuse Mask |
RED |
Left Eye Color Influence |
??? |
|
GREEN |
Standard Tangent Space Normal Map |
GREEN |
Specular Mask |
GREEN |
Right Eye Color Influence |
|
|
BLUE |
??? |
BLUE |
Gloss(?) |
BLUE |
??? |
Reflection |
|
ALPHA |
??? |
ALPHA |
??? |
ALPHA |
??? |
Reflection Map ("Catchlight") |
|
Furniture Shader |
||||||
|
Normal Map |
Multi |
Vertex Color/Alpha(UV3) |
UV2 |
|||
|
RED |
Standard Tangent Space Normal Map |
RED |
Diffuse Mask |
RED |
??? |
Emissive Color Mapping (?) |
|
GREEN |
Standard Tangent Space Normal Map |
GREEN |
Specular Mask |
GREEN |
??? |
|
|
BLUE |
Unused |
BLUE |
Gloss |
BLUE |
??? |
Diffuse Note |
|
ALPHA |
Opacity |
ALPHA |
Emissive Mask |
ALPHA |
??? |
Diffuse Alpha is also used for Opacity |
|
Dyeable Furniture Shader |
||||||
|
Normal Map |
Multi |
Vertex Color/Alpha(UV3) |
UV2 |
|||
|
RED |
Standard Tangent Space Normal Map |
RED |
Specular Mask |
RED |
??? |
Emissive Color Mapping (?) |
|
GREEN |
Standard Tangent Space Normal Map |
GREEN |
Roughness |
GREEN |
??? |
|
|
BLUE |
Unused |
BLUE |
Also Specular Mask...? |
BLUE |
??? |
Diffuse Note |
|
ALPHA |
Opacity |
ALPHA |
Emissive Mask |
ALPHA |
??? |
Diffuse Alpha is used for Dyeability |
|
Further Notes |
|||||||
|
SE's Gloss implementation is very unique, and doesn't adhere particularly well to most modern PBR system's assumption of Gloss. (Closer to non-PBR Spec-Gloss) |
|||||||
|
In particular, their Gloss layers in the textures are really more like [Specular + Gloss]. To get a true Gloss-Only variance, your best bet is to blend Colorset Rows. |
|||||||