Creating Transparent overlays from Pre-existing textures
This page will explain 2 methods on how to create a transparent overlay from a merged skin mod. This assumes you already have basic knowledge of what texture maps are, and how to use an art program of some sort.
- Method 1- Recreating your mod out of multiple transparents that you can re-download, or making a transparent normal and multi from a pre-existing transparent diffuse
- Method 2- extracting a transparent overlay from a fully merged texture (not perfect, not guaranteed to work perfectly on faces, esp custom; may require cleanup.)
- After you have your Overlays
Method 1- Recreating your mod out of multiple transparents that you can re-download, or making a transparent normal and multi from a pre-existing transparent diffuse
THIS INFORMATION CONTAINS NSFW VISUAL AIDS/IMAGES. IF YOU ARE UNCOMFORTABLE WITH THIS OR ARE UNDER 18, PLEASE LEAVE THIS PAGE. THE IMAGES SHOWN ARE FOR DEMONSTRATIVE AND NONSEXUAL PURPOSES, BUT THEY DO CONTAIN DEPICTIONS OF GENETALIA.
If you don’t have transparent overlays of your skin and makeup mods, you really should, especially now that Dawntrail will require you to update your custom skin mods.
This guide assumes you have basic knowledge of texture maps, digital art software, and access to the devkit or base modded texture for your body. This guide will show how to do it in either clip studio paint or photopea, however the basic concepts are the same for any digital art program other than ms paint.
This method is pretty simple! It works best for when you have a custom mod made up of multiple other mods that all contained transparent overlays/PSDs for at least the diffuse.
Step 1- Redownload all the mods you used to create your custom mod! Ideally only the raw files or PSDs. If you still have the original files, you can skip this step.
- If your mods did not come with raw files, Import them into textools via a "transaction" and export the raw files from your mod by finding them on your race's body. I personally reccommend using PNG or TARGA/.TGA as TGA is an uncompressed format that properly handles alpha channel data, and does not have as many restrictions as to what programs it can go in/out of like DDS has.
Step 2- Import all files into your art program of choice. Photoshop is the standard, but Photopea is a free Photoshop clone in the browser that I highly recommend using if you don’t have Photoshop. You can also do this in clip studio paint, which is what I’ll be showing, or gimp, paint tool sai…. Really any art program with layers, transparency support, and clipping masks/clipping layers.
- As a note, if your files are .dds, or contain files for specific rgba channels, the only programs that currently support this are Photoshop, Photopea, and Gimp. Of these programs, only Photopea supports BC7 .dds without the need for a plugin (or at all in gimp's case) It is now STRONGLY recommended that you use .TGA for files you plan on editing something with a non-transparent alpha channel, as they offer no data loss, proper alpha channel handling as non-transparency, alongside being able to be opened by just about any art software, including 3d modeling programs.
Step 3- Arrange the layers in the order you need them, and make any adjustments (erasing or drawing things) as needed.
Step 4- Save as/export as either PNG or TGA I recommend saving one of each if your program allows for it, as png is easier to work with, but contains less data.
- It is also recommended to save it as a psd at this step, as having a project file can be incredibly helpful for later. Psd files preserve layer data, so you don’t have to have everything merged down but transparent.
If your files do not include transparent overlays for normal maps or multis, but do contain merged ones, at this step, either merge all the transparent diffuse layers down into one layer, or place them in a folder depending on if multiple are merged, or if only one is merged. If they contain only transparent overlays for any normal maps or multi maps, repeat steps 1-4 for those as well.
Step 5- Add in all your normal maps, both transparent or merged down. Rearrange them in the correct order, trying to mimic the order of your diffuses.
Step 6- if you have only one merged normal or multi, but the rest are transparents, merge all the normal layers together using the overlay layer style, and the multis together using a normal layer style.
Step 6.5- If you have multiple merged normal (non transparent) arrange every normal map on top of their corresponding diffuse. Do the same with the multis. DO NOT MERGE THEM.
Step 7- On the normal map layer, activate the button to “clip to layer below”. It may have a different name in other programs. This will cause your normal map to mimic the same transparency as the diffuse layer that matches it, creating a transparent normal map overlay.

Step 8- Make sure all multi map layers are hidden, as well as any diffuse maps that don’t have corresponding normals/ don’t have a normal map clipping to them. Click save as/export as, and do the same as step 4.
- You can optionally hide layers and save each normal map corresponding to a diffuse as it’s own image, and recreate your psd again with layers or normal maps. This isn’t required, but can again, be very helpful.
Step 9- Hide the normal maps and repeat for the multis, making sure they are unhidden.
And with that, you’re done. Make sure to name these in a way that makes sense to you. I would recommend making a final psd with your normal, multi, and diffuse all in one file, either in individual layers per item with a folder, or as just three layers, one for each map. This is not required, but can be much cleaner and easier to edit later. If you do this, it MUST be saved as a psd to ensure that it preserves layers and can be edited in most programs.
If you have diffuse maps that are fully merged, say some of the mods used only contain a merged diffuse texture, please have a look at method 2.
Method 2- extracting a transparent overlay from a fully merged texture (not perfect, not guaranteed to work perfectly on faces, esp custom; may require cleanup.)
THIS INFORMATION CONTAINS NSFW VISUAL AIDS/IMAGES. IF YOU ARE UNCOMFORTABLE WITH THIS OR ARE UNDER 18, PLEASE LEAVE THIS PAGE. THE IMAGES SHOWN ARE FOR DEMONSTRATIVE AND NONSEXUAL PURPOSES, BUT THEY DO CONTAIN DEPICTIONS OF GENETALIA.
If you don’t have transparent overlays of your skin and makeup mods, you really should, esp now that Dawntrail will require you to update your custom skin mods.
This guide assumes you have basic knowledge of texture maps, digital art software, and access to the devkit or base modded texture for your body. This guide will show how to do it in either clip studio paint or photopea, however the basic concepts are the same for any digital art program other than ms paint.
If you have one or more diffuse maps that are fully merged with the base skin, you’ll need to find a way to extract it. This is a method to do so, but it isn’t perfect, and may require some cleanup. I have not tested it on faces, and due to dawntrail changing the UVs, faces will require going through Loose Texture Compiler either before or after this process, depending on if you have an endwalker vanilla/matching unmakeuped diffuse or not. It also does not work on custom/non vanilla based sculpts if your sculpt does not include a barefaced/no makeup diffuse. This method was taught to me by bizu, and I want to make sure it’s shared. Please do not use this for theft, and respect the original mod author’s perms. Do not use this to extract a transparent texture, and then reupload with no other edits as your own, that’s stinky.
This method can be done with Photoshop, Photopea, or Clip Studio Paint, though some of the steps are a little different between the three. I will first show clip studio paint, as it’s the one I had the most success with. Keep in mind that this is not perfect and may require other cleanup, and that this may not work well if at all for textures that are mostly non-opaque, such as body blushing, and may not work on things that are small or microdetail such as freckles. It’s likely possible to do this with other programs, but I can’t promise they’ll work on other programs.
As a new Dawntrail note- while body diffuses have for the most part not changed, you will still need to use an OLD version of the base bodies' skins for Pre-Dawntrail skin mods. Updated body textures for Dawntrail have the neck blended in from vanilla, and if you use a new Dawntrail modded base with an old Endwalker texture, this may not work or produce artifacts around the neck area.
Step 1- Find and download your mod with a merged texture
Step 2- Determine what the base skin texture used is. In this example it’s bibo, and specifically bibo non-smooth (detailed) skin. Figuring out the exact base skin texture used underneath is VERY important. You cannot use bibo smooth(new default) with a bibo non smooth (detailed), or tb2 with tbse. The only thing that doesn’t matter is the dialation on the textures outside of the UVs.
Step 3- Obtain the base skin texture matching your skin mod, and import both into the same file as layers.
Step 4-Duplicate the layer with the tattoos/body details and hide this layer.
Step 5- Use the layer style Divide (CSP) or Difference (PS/Photopea) on the layer that has the extra details. With divide, this should make everything but the differences pure white, and with difference, this should make everything but the differences pure black.
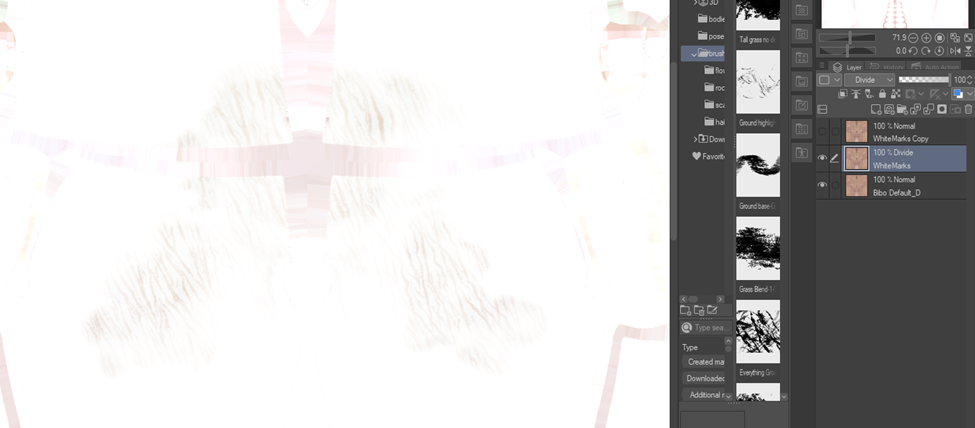
(This is Divide in CSP)
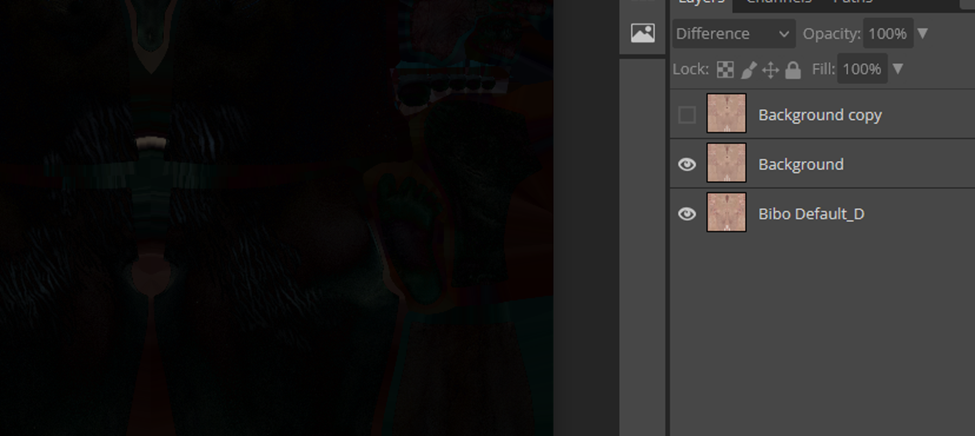
(This is Difference in Photoshop)
Step 6-Merge the two visible layers together
Step 7-Adjust levels so that there is a more extreme difference between the differences and stuff that was blotted out

Step 8-Convert the image to greyscale. There are a few ways to do this, depending on the program, but in CSP, I do edit> tonal correction> Hue/saturation/luminosity and turn the saturation as low as it can go.

- Optional step, but if you have a lot of extra junk like I do here, loosely select around the area/clean up around the area and fill it with either black or white, depending on which you’re doing.

Much better. This is even easier if you have a transparent UV overlay with no dialation, but this is assuming you don’t have that.
From here the process will be a little different depending on if you’re using Clip Studio, or Photoshop/photopea. I’ll start with Clip Studio.
Step 9a-In clip studio, once you get to this step, you’ll then go to edit. Convert brightness to opacity. This is why we used divide instead of difference.

Step 10-you can finally turn on the other layer we duplicated, and have it clip to the layer below.

From here, you can determine if you want to clean up your “mask” layer more or not. If needed, you can redo your levels and grayscale step, and then further edit the levels/contrast from there. If it’s clean enough but not opaque enough, you can duplicate the mask layer and keep merging it down to make it more opaque. Just make sure to keep checking your opacity by turning on your color layer again.

(This is after duplicating and merging twice)
Once you are satisfied with the opacity, you can merge the layers together, and do any further cleanup. (in my case, that’s erasing the belly button and the dialated pixels. Make sure to save this as both a png for using as a clipping mask for your normal/multi, and as a .dds, just to be safe.
Now for the photoshop version, as demonstrated by photopea.

At this point, we are going to use this as a mask. Technically speaking, you can instead of forcing it to greyscale manually, you can just grab a single color channel to use as a mask, but in order for me to get it to this point, I had to do a lot of contrast, levels, curves, and other adjustments that were easier to do after I put it to greyscale/black and white
Step 9b- In Photoshop, you will go to edit > brightness to opacity or in both Photoshop and Photopea, you can go to select> color range.

Step 10-After that you will click your color layer and select “add clipping mask” and this will clip to the layer below.

After that, you’re done, and can save as/export as png and .dds, then use the steps from method 1 to get your transparents for the normal and multi map.
After you have your Overlays
If you've gotten here, well done! From here, I'd like to explain a few extra things you can/should do with your overlays, especially if you're converting an Endwalker one to Dawntrail.
-
Use the loose texture compiler to convert your stuff. Yes I'm serious. Having overlays is wonderful, and makes using loose texture compiler even better at doing it's job. While the body diffuses haven't really changed, the channels for the normal map have, and the multi is an entirely new texture called a mask. You will want to use the loose texture compiler to convert your overlays to the dawntrail correct versions of the maps if your tattoo/skin detail had either normals associated with it, or used the multi to make it not change color as much with your skin.
-
-
-
The loose texture compiler is also REQUIRED if you used this to create face or scale overlays, as those completely changed, and face UVs are entirely different now. You do NOT want to be doing this by hand.
-
Loose texture compiler can also help you make a Gen 3 version of your overlay (or a bibo one if you started with gen 3) much more painlessly than using Xnormal alone, or reprojecting the texture in a 3d software. If you aren't concerned about having compatibility across the 3 fem bodies it's less of a concern, but it's always good to have, and LTC works best with transparent overlays
-
-
-
Make a "raw files" folder somewhere on your PC, and save these there for later use. If you ever decide to change your skin or add to it, it'll be helpful to have them saved somewhere so you don't have to go through the effort again.
-
If you are using Textools to create mods, slap your overlays in there using the "add overlay" button on top of your base body's new skin! (Keep in mind this only works with a single overlay layer. If you have tattoos+body hair+ scales for example, you'll need to combine them into one overlay for this to work. If you wanna keep them separate and combine them temporarily or as permutations, use a PSD for that please)
-
It isn't required to do any of these things, but I Highly recommend you do so for your own sanity. Also keep in mind that in order to reduce neck seam, you'll want to either add these overlays on top of a NEW AND UPDATED base body texture, or use the corresponding body's Neck overlays for the diffuse and normal if you want to use an older version of the base textures. if you don't there will be a neck seam.
I also HIGHLY recommend saving your raw overlays as .png, and your final textures as .tga (or .dds bc7 if your program supports it)
If you have multiple overlays and are wondering what order to stack them in, the correct order is 99% of the time:
-
Base modded body texture
-
Neck overlay (if applicable and not Au Ra)
-
Tattoo/skin detail 1 (I usually put a tattoo first)
-
Tattoo/skin detail 2 if applicable (i would put scars here)
-
Tattoo/skin detail 3 if applicable (if you have bruises or bites or something, idk)
-
Body Hair (if applicable)
-
Scales (if Au Ra)
-
Scale neck overlay (if Au Ra)
You can obviously mix up the order if you want to and have a specific look you're going for, but it may cause things to look a little strange if you don't know what you're doing.