3D Modeling
Anything pertaining towards editing 3D Models
Gear Item Weights
Weights control how a mesh rotates and deforms based on the underlying skeleton animations.
Tips and Tricks
Transferring Weights
One way to quickly get weights onto a gear item is to transfer them from the body mesh or another similarly shaped gear items.
Click the mesh to transfer from and then shift click the mesh to transfer to. Then switch to Weight Paint mode and select Weights -> Transfer Weights
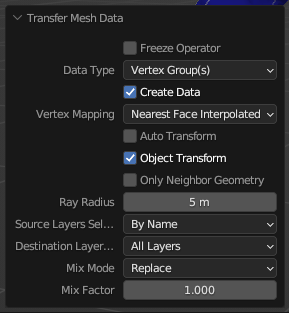
Use the following settings to transfer the weights. (there is no confirm action, the mesh is automatically updated as settings are picked)
Smoothing Weights
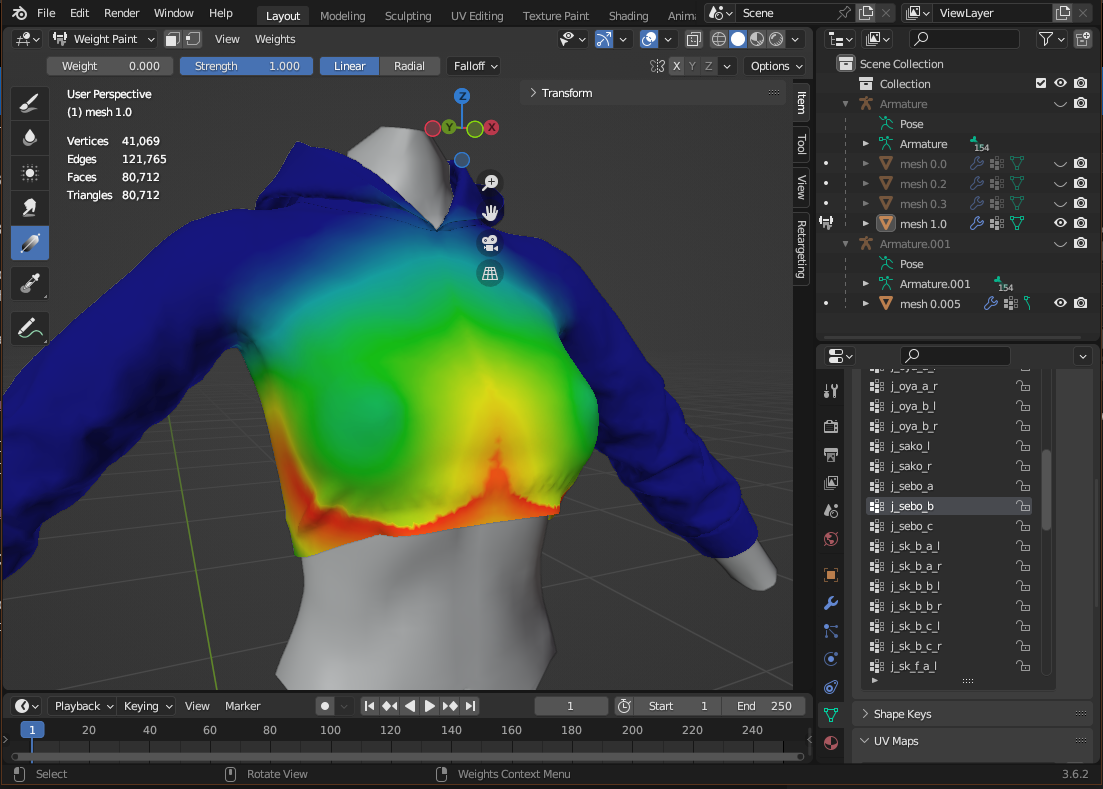
If you notice your weights have harsh edges and deform the mesh poorly. You can use the smooth tool to clean this up some. In the following picture you can see that the vertex group for bone j_sebo_b has some harsh lines.
Ensure you have the vertex group selected for the bone you want to smooth. Switch to Weight Paint mode and then select Weights -> Smooth. You will need to play around with the settings until you get results you like.
Here is the same bone rotations after smoothing.
Adding a hat to a Minion
Do you want your minion to have a cool hat? ![]() Read on
Read on
Preparing our files
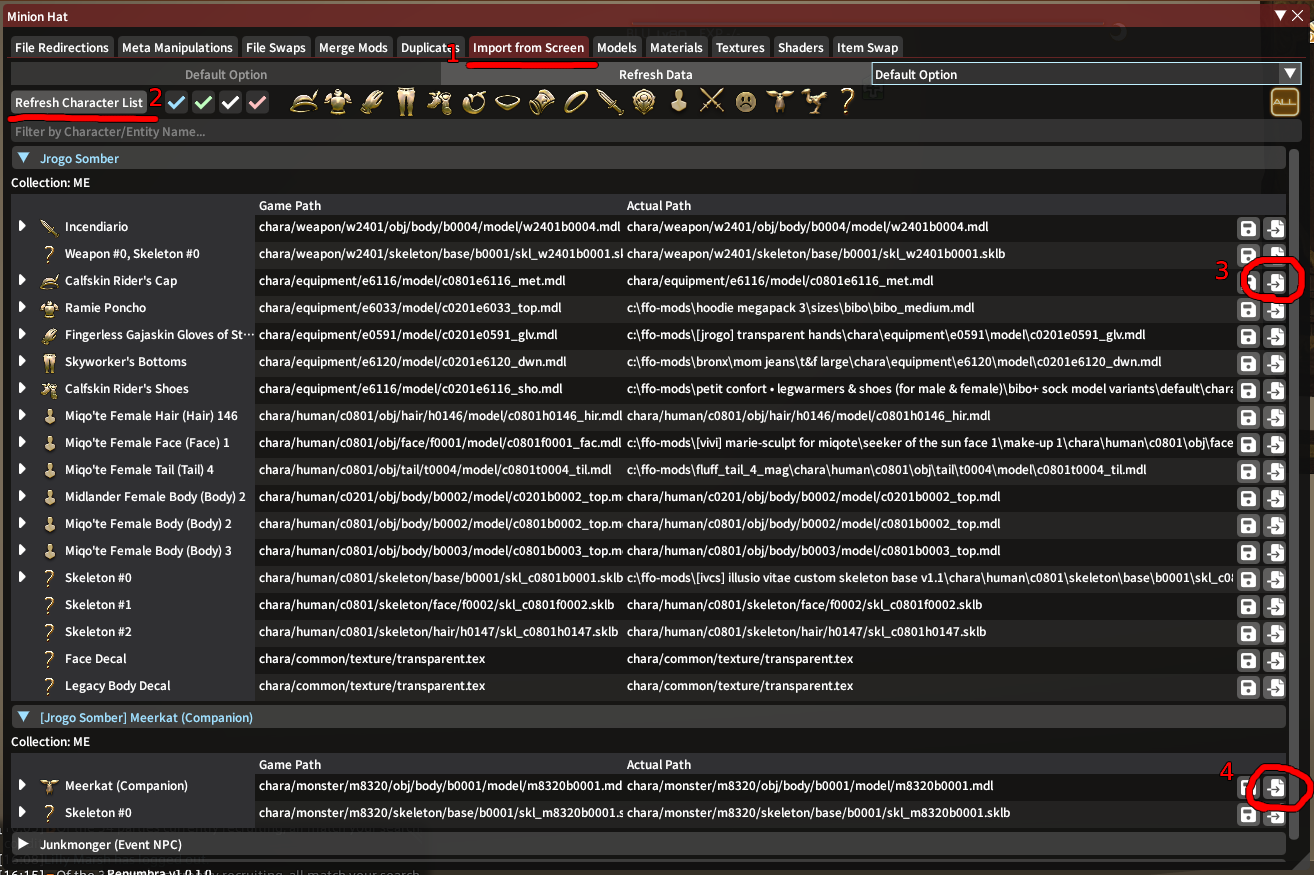
There are a few different ways to get files from the game. For this guide lets use Penumbra's Import from Screen combined with model export (textools can also accomplish this).
We are going to put the "Calfskin Rider's Cap" onto the "Meercat" minion. Equip the hat on your character and summon the minion. Then in Penumbra's Mods tab, make a new blank mod (call it whatever you like) and open Advanced Settings.

Open the Import from Screen tab, click Refresh Character List at the top left. Then click the Add a copy... button at the far right for the "Calfskin Rider's Cap" mdl on your character and the minion body on the Meerkat.
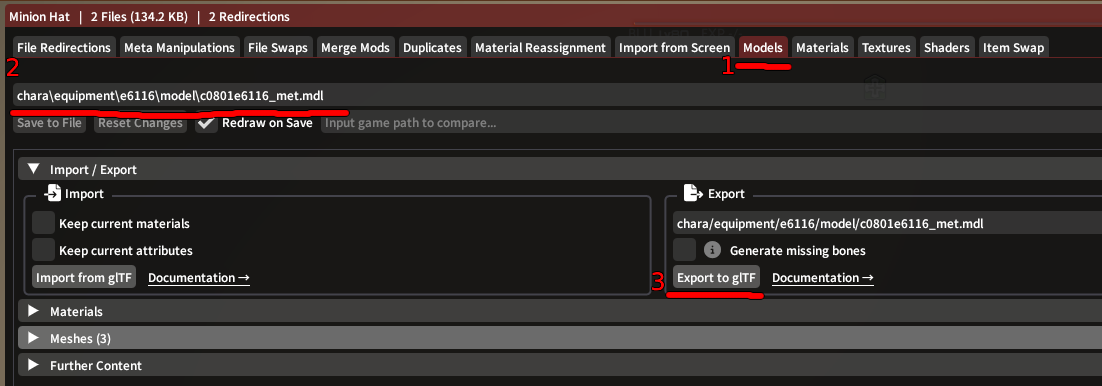
Now we will export these model files so that we can edit them in blender. Go to the Models tab of Advanced Editing (the window that we already have open).
For each model, select it in the dropdown, expand the Import/Export tab, and click Export to glTF. Put these files somewhere you will remember cause we will need them in the next step ![]() (You may want to put them in a folder as they will also export all the textures for the model)
(You may want to put them in a folder as they will also export all the textures for the model)
Blender!
(Note: This guide is using Blender version 3.6.2)
Importing the files
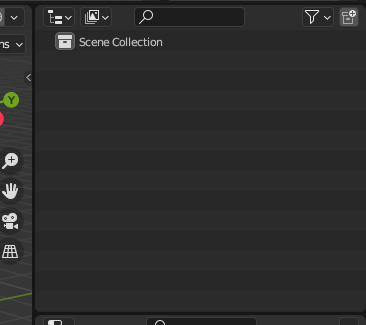
Open blender and clear out the tree navigation to the right.
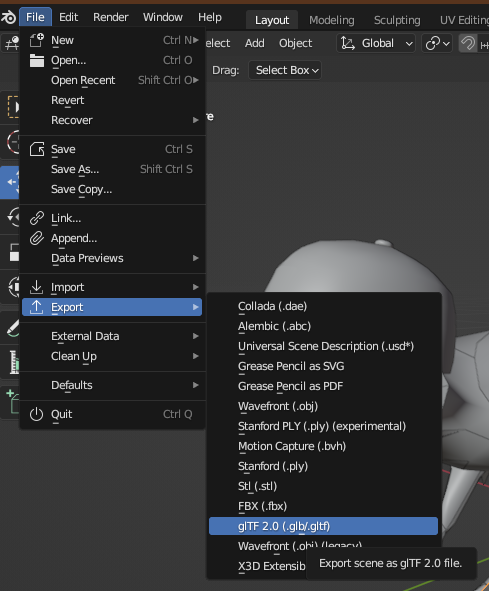
Now we will import our models. We will first import m8320b0001.gltf then we will import c0801e6116_met.gltf. Go to File -> Import -> glTF 2.0 and find each model and import them.

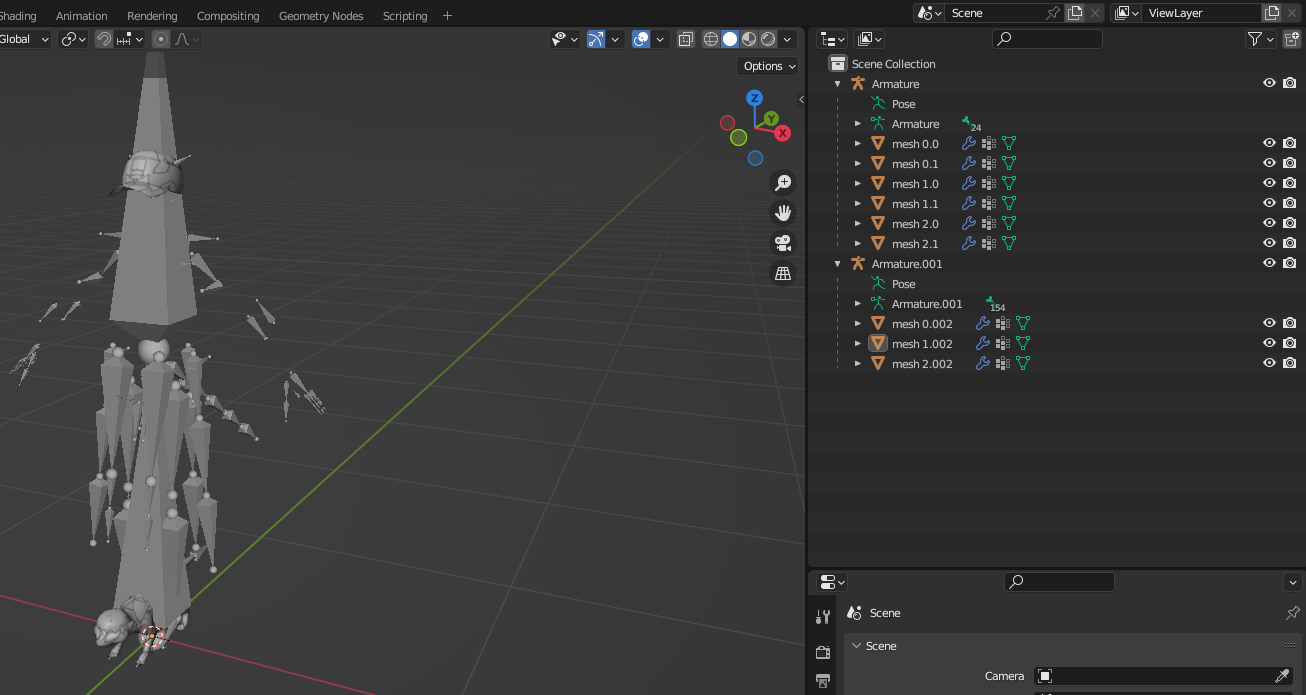
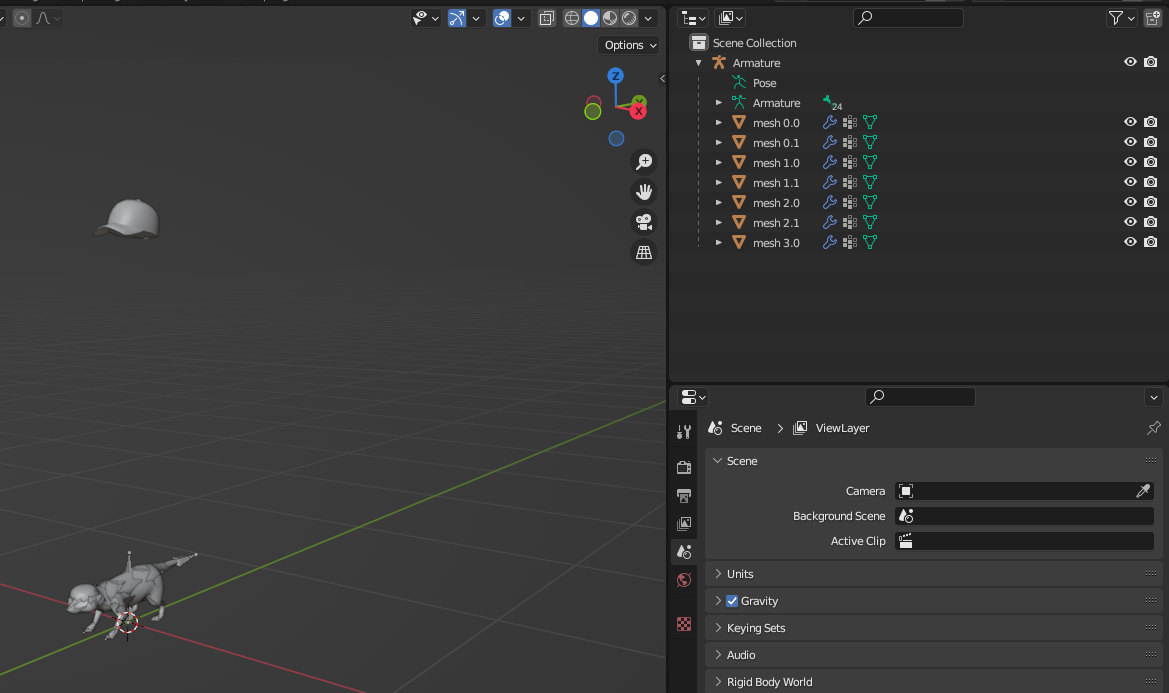
You should have some items on the right panel now and if you expand them they should look like the following. mesh 0.002, mesh 1.002, and mesh 2.002 should be the different level of detail models for the hat as long as blender gave you the same names on import. We are going to use mesh 0.002.
Click on mesh 0.002, hold shift drag it to Armature on the right panel. Then rename it to mesh 3.0.
Select mesh 3.0 and change its armature modifier to point to Armature instead of Armature.001.
Now right click on Armature.001 and select Delete Hierarchy
Your setup should now look like this.
Moving the hat
Click on the hat mesh in the 3d space and select Object -> Set Origin -> Origin to Geometry.
Now we will use the move and rotate tools to move the hat to the minions head. This part is not an exact science, so use the gif below as a guide and move the head to a position you like.
Adding weights
Now we need to add weights to our hat otherwise it will not move with the minions head. We are getting off a little easy with this mod as we only need to give the hat weights for one bone to make it look correct. Weights can be much more complicated for other clothing items, but we will keep it basic in this guide.
First lets figure out the bone that controls the minions head. In the gif below we can see that the bone for the head is j_head.
Now lets add weights for the hat to that bone. Switch back to object mode in the top left dropdown. Then select mesh 3.0, open the data panel (green triangle looking one), and delete all current vertex groups.
Add a new group called j_head and switch to Weight Paint mode.
Ensure your weight slider is set to 1.0. Switch to the gradient tool, and make the whole hat red.
Verify! Now we can switch back to our Armature then in pose mode we can verify the hat is attached to the head bone now.
Export
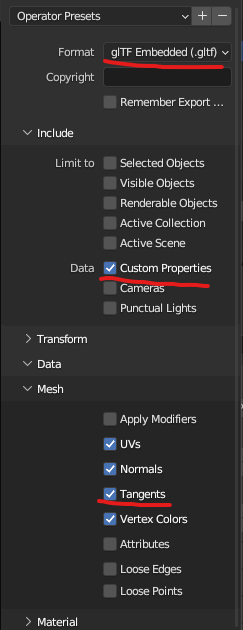
Now we can export for the game. We will be exporting as a glTF. There are a few settings we need to change for the export as well. Specifically we will enable Tangents and Custom Properties as they are not included by default. Please see the Penumbra Model Info if you are having issues with this.
Import back into game
Before we import the updated minion model, we will need to grab the hat material and redirect it to the minions folder in game so that the new mesh can use it. Lets use the Import from Screen tab in Advanced Settings to import this material from our character, then update the file redirect to put it in the minions material folder.
We can also delete the hat mdl file from our modpack while we are at it as it is no longer needed. Make sure to remove the file redirect then click Apply Changes before deleting the file or you will cause issues with your hat in game.
Now lets import our new minion. Go back to the model tab, select the minion model, select import from glTF and find your minion model you exported from blender. (Do not check the checkboxes above the import button, we should not need them.)
Click Save to File after import is done.
All Done!
That's it. Enable your modpack and redraw your minion and you should see the hat ![]()
Customize+ Edits Applied in Blender
How to use a Blender Script to read your Customize+ edits!
Something to know before you start!
This method sadly makes you lose all bone parents, but not bone weights! so you will have to re-parent every bone manually. But I personally think that's much easier than Scaling, Rotating, and Positioning manually
Step 1 Locate your .JSON file:
- Your Customize+ template data can be found in %appdata%\XIVLauncher\pluginConfigs\CustomizePlus\templates
- Change the path "\" to "/" for example "%appdata%/XIVLauncher/pluginConfigs/CustomizePlus/templates/example.json"
Step 2 Add the Location to Your Blender Script:
- Using this script Import Customize+ Public, locate the 'json_path' and replace the red text saying 'PUT YOUR .JSON HERE'
Note: Its important you keep the ' at the beginning and end. Leaving those out will lead to errors.
(The text may not be red in the actual script, It is located at the bottom of the script.)
# Update the armature bpy.context.view_layer.update() # Path to the JSON file json_path = 'PUT YOUR .JSON HERE' armature_name = 'n_root' apply_transformations_from_json(json_path, armature_name) - Save the script with the added .JSON location
Step 3 Blender:
- After you've opened blender, and assuming you have already extracted your model using FFXIV Textools, import your model and DO NOT change any bone names!
- Go into edit mode and hit the A key to select all bones, after doing so right click and select Parent>Clear>Clear Parent. Then return to object mode.
- Next go to the Scripting tab and import the script by hitting the folder icon at the top of the script area.
- After that, select "n_root" aka your armature and hit Text>Run Script.
- I personally use a script called CATS to apply transforms. I don't know where I got this exact version from but be sure to support the makers of it! CATS Github - CATS_version i have installed
- Go to Layout>CATS>Model>Apply as Rest Pose
- Manually re-parent every bone so it all works properly!
And You're done! Hope this helps anyone who was trying to figure out how to get C+ edits onto a model!